Operation, Listening to am/fm radio, About antennas – NAD C426 User Manual
Page 10: Selecting a tuner band, Tuning stations, Storing presets, About user names, Refer also to the item about delete a preset at
The C 426 offers very high quality sound from radio broadcasts. The
reception and sound quality will always be dependent to a degree however
on the type of antenna(s) used as well as proximity to the broadcast origin,
geography and weather conditions.
ABOUT ANTENNAS
The supplied ribbon-wire FM antenna can be connected to the rear panel
FM-antenna input using the included “balun” adapter and should be fully
extended to form a “T”. This folded-dipole antenna will usually work best
when oriented vertically, with the arms of its “T” fully outstretched and
arranged perpendicular to the origin of the desired broadcast. There are
no “rules” however, and experimenting freely with antenna placement and
orientation may yield the clearest sound and lowest background noise.
In areas of poor FM reception, an exterior FM antenna can improve
performance dramatically. If radio listening is important to you, consider
consulting an antenna installation professional to optimize your system.
The supplied AM “loop” antenna will usually provide adequate reception.
However, an exterior AM antenna can be used to improve reception.
Consult an antenna professional for more information.
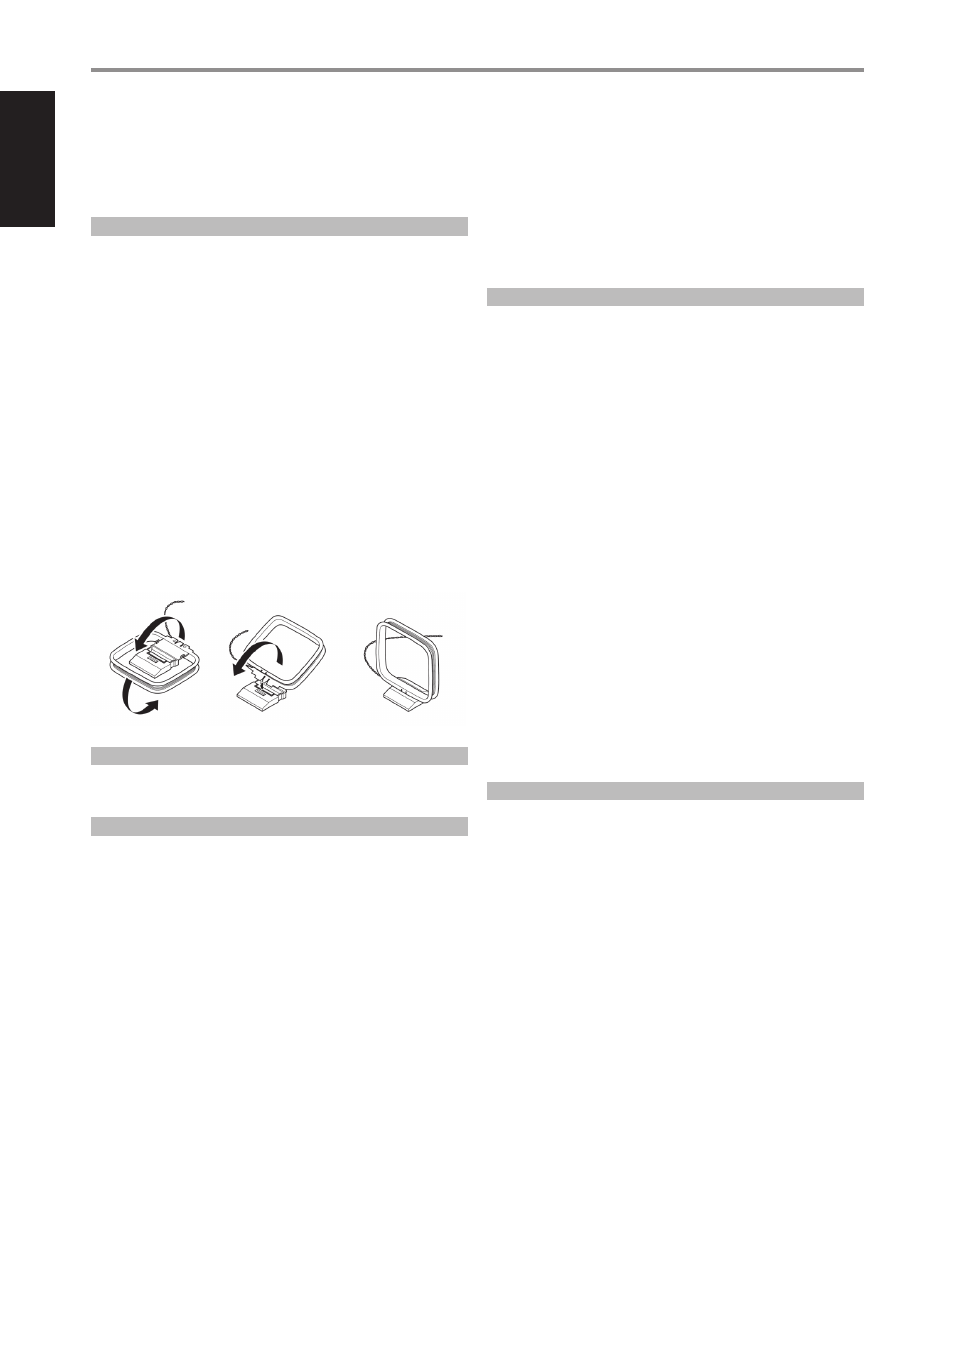
ASSEMBLING THE LOOP ANTENNA
1 Rotate the outer frame of the antenna.
2 Insert the bottom edge of the outer frame into the groove on the stand.
3 Extend the antenna cord.
SELECTING A TUNER BAND
Toggle front panel’s [FM/AM] button to select either AM or FM band. Using
the TNR 1, select desired band by directly pressing [AM] or [FM] button.
TUNING STATIONS
Toggle front panel’s [PRESET/TUNE] button to switch between “Preset” and
“Tune” mode. Select TUNE mode (“TUNE” scrolls through the VFD) or PRESET
mode (“PRESET” scrolls through the VFD).
1 Rotate the PRESET/TUNE control in either direction for more than 1
second to engage automatic tuning. The tuner will stop at the next
sufficiently strong signal it encounters. Note that this function “wraps”
– that is, it will continue to search from one end of the AM or FM band
to the other until it stops at a strong signal. Rotate the PRESET/TUNE
control again for more than 1 second to start searching again.
2 By briefly rotating the PRESET/TUNE control in either direction, manual
tuning is engaged for precise tuning to a specific frequency. With each
brief rotation, the tuner will take 0.05 MHz steps at FM band and 10
kHz (120V version) or 9 kHz (230V version) at AM band. When tuned
accurately to a station, “TUNED” will be illuminated in the VFD. The
antenna bars displayed below the ANTENNA icon in the VFD reflects the
signal strength of the tuned station.
Automatic tuning is available on both AM and FM band.
DIRECT TUNING
If you know your desired station’s frequency allocation, you can tune
directly to the station.
1 Toggle front panel’s [PRESET/TUNE] button to switch between “Preset”
and “Tune” mode. Select TUNE mode (“TUNE” scrolls through the VFD).
2 Using the numeric keys of the remote control, key-in the frequency
allocation of the station. For example, to enter 104.50MHz, press “1”, “0”,
“4”, “5” and “0” or press “1”, “0”, “4” and “5”.
STORING PRESETS
The C 426 can store a mix of your 40 favorite AM and FM stations for
immediate recall.
1 To store a Preset, tune first to the desired frequency and then press the
front panel [MEMORY] button.
2 “MEMORY” and the next available Preset number will continually flash
on the VFD (If all 40 preset numbers are allocated already, you can
overwrite an existing Preset number. Rotate the PRESET/TUNE control
knob to select the Preset number you want to overwrite).
3 Press the [MEMORY] button again to store the desired frequency on the
Preset number shown (“STORED” scrolls through the VFD). Your desired
frequency is now stored in the assigned preset.
DIRECT RECALL OF A PRESET
You can directly recall a desired Preset number.
1 Toggle front panel’s [PRESET/TUNE] button to switch between “Preset”
and “Tune” mode. Select PRESET mode (“PRESET” scrolls through the
VFD).
2 Using the numeric keys of the remote control, key-in directly your
desired Preset number.
DELETE A PRESET
1 Select the Preset number to be deleted.
2 Press and hold both the front panel [MEMORY] and [DISPLAY] buttons
until “DELETE” is shown flashing in the VFD. Immediately release both
buttons and then press [DISPLAY] button again (“DELETED” scrolls
through the VFD). Current Preset number is now deleted.
ABOUT USER NAMES
A particular Preset number can be assigned an eight-character “User Name”.
This applies only to stored AM stations and non-RDS FM stations. The
assigned “User Name” will be shown in the VFD whenever the associated
Preset number is recalled.
ENTERING USER NAMES
To assign a Preset number with the user name “NEWS”, follow the procedure
as below.
1 Recall the desired Preset number.
2 Press and hold [DISPLAY] button until the display shows a flashing
cursor point.
3 Rotate the [PRESET/TUNE] control knob to select the first character of
the name (“N” from the alphabetical list).
4 Press [DISPLAY] button to select the character and correspondingly
move forward to the next position. Repeat this process for each
character in sequence.
5 Press the [MEMORY] button to store the User Name (“STORED” scrolls
through the VFD). The current Preset number is now assigned the user
name “NEWS”.
OPERATION
LISTENING TO AM/FM RADIO
10
EN
G
LIS
H
FR
A
N
Ç
A
IS
ES
PA
Ñ
O
L
IT
A
LIA
N
O
D
EU
TS
CH
N
ED
ER
LA
N
D
S
SV
EN
SK
A
РУ
СС
К
И
Й