Preparation, Installation, Wiring connections – NuTone RANGE HOODS RL6200-H User Manual
Page 3: Completing assembly, Replacement parts, Operation and maintenance
PREPARATION
1. Use the dimensional drawing to lay out the Range Hood’s mount-
ing holes, wiring access and ductwork.
2. Make cutouts for wiring and ductwork.
3. If the hood is to be ducted, install the ductwork so that is flush to
the Range Hood’s mounting surface.
• Refer to Figure 1 for Model RL5300-H.
• Refer to Figure 2 for Model RL6100-H.
• Refer to Figure 3 for Model RL6300-H.
4. Run two-conductor wire (with ground) from a power source to the
hood location. Bring approximately 12” of wiring through wiring
hole in cabinet.
5. Drill four 3/32” diameter pilot holes at points where mounting holes
are marked in the filler strips or cabinet bottom.
6. Insert four (4) mounting screws (not supplied), leaving approxi-
mately ¼” of thread exposed. Use No. 8 or No. 10 round head
screws.
INSTALLATION
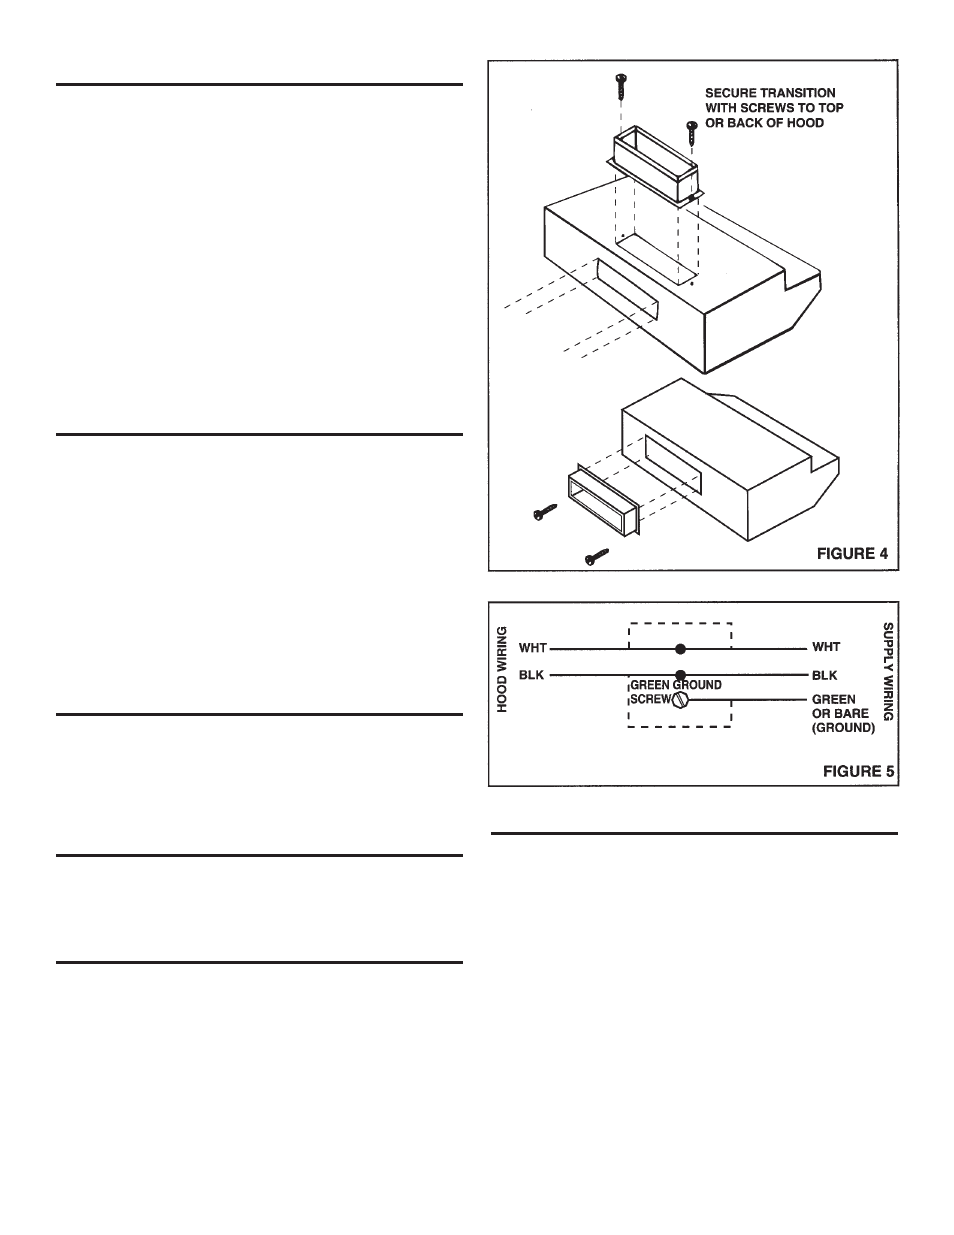
1. For RL6100 model, attach duct transition to top or back of hood
using screws provided. (Refer to figure 4)
Note: for horizontal venting the damper in the duct transi-
tion may be removed to avoid interference with the wall cap.
2. Remove top or back wiring knockout from the hood and feed the
wiring into electrical box.
3. Align hood’s keyhole mounting slots over the four partially in-
stalled screws.
4. Making sure the duct positions over the hood’s duct transition,
push the hood against the rear wall. Secure hood by tightening
screws.
5. Using a long blade screwdriver, reach into the discharge open-
ings and be certain the damper operates freely.
6. Secure ducting to hood.
WIRING CONNECTIONS
All wiring connections must comply with local codes and the unit
must be properly grounded.
1. Make sure box connector is secure.
2. Refer to Figure 5. Make wiring connections.
3. Replace electrical box cover and secure with screw.
COMPLETING ASSEMBLY
1. Install 75-watt (maximum) bulb in to receptacle.
(Purchase bulb locally).
2. Install filter and light lens.
REPLACEMENT PARTS
Should replacement parts be required, please indicate hood
model number and appropriate part number. Contact your NuTone
dealer or write to NuTone: Madison and Red Bank Roads, Cincin-
nati, Ohio 45227-1599. Attn.: Parts Department.
OPERATION AND MAINTENANCE
NOTE: To avoid risk of fire, electrical shock, or injury, turn off
power at supply before servicing.
FILTERS
The aluminum filter should be removed once a week and washed
in hot detergent water. Rinse in clear, warm water and shake off
excess moisture before replacing. The filter may also be cleaned in
your dishwasher.
CLEANING
The hood should be wiped off occasionally both inside and out-
side using warm water, mild dish detergent and a soft cloth. Never
use scouring powders, steel wool pads or any other abrasive clean-
ers which will destroy the hood’s finish.