NEC PX-42VP4D User Manual
Page 42
35
Video Wall setting
Use this feature to configure a 2
×
2 or 3
×
3 video wall.
Set “ADVANCED OSM” to “ON” in the main menu (1/
2), then perform the following operations.
Press the MENU/ENTER button on the remote control to
display the MAIN MENU on the screen, then...
1. Use the ▲ and ▼ buttons to select “OPTION3”, then
press the MENU/ENTER button.
The “OPTION3” screen appears.
2. Use the ▲ and ▼ buttons to select “VIDEO WALL”,
then press the MENU/ENTER button.
The “VIDEO WALL” screen appears.
VIDEO WALL
EXIT
DIVIDER
POSITION
DISP. MODE
AUTO ID
IMAGE ADJUST
P. ON DELAY
PLE LINK
REPEAT TIMER
:
1
: SPLIT
: OFF
: OFF
: OFF
: OFF
SEL.
RETURN
ADJ.
3. Set the VIDEO WALL using ▲▼
ᮤ
and
ᮣ
buttons.
See page 35 to set DIVIDER.
See page 35 to set POSITION.
See page 36 to set DISP. MODE.
See page 36 to set AUTO ID.
See page 36 to set IMAGINE ADJUST.
See page 37 to set P. ON DELAY.
See page 37 to set PLE LINK.
See page 38 to set REPEAT TIMER.
4. Once the setting is completed...
Press the EXIT button to return to the OPTION3 menu.
5. Press the EXIT button to return to the main menu.
To delete the main menu, press the EXIT button once
more.
Note: A contingency method of shutting off the electric
power should be used in cases of emergency during video
wall setup.
Information
Ⅵ
Restoring the factory default settings
Select “ALL RESET” under the OPTION1 menu. Note
that this also restores other settings to the factory
defaults.
DIVIDER
Set the 2
×
2 or 3
×
3 video wall.
Example: Setting “4”
Perform Steps 1-2 of VIDEO WALL, then...
3. Use the ▲ and ▼ buttons to select “DIVIDER”.
4. Use the
ᮤ
and
ᮣ
buttons to select “4”.
The mode switches as follows each time the
ᮤ
or
ᮣ
button is pressed:
→
OFF
↔
1
↔
4
↔
9
←
VIDEO WALL
EXIT
DIVIDER
POSITION
DISP. MODE
AUTO ID
IMAGE ADJUST
P. ON DELAY
PLE LINK
REPEAT TIMER
:
4
: SPLIT
: OFF
: OFF
: OFF
: OFF
SEL.
RETURN
ADJ.
Information
Ⅵ
DIVIDER settings
OFF, 1 .......
1 Screen (Matrix display function does not
work)
4 ................
4 Screens (2
×
2 video wall)
9 ................
9 Screens (3
×
3 video wall)
* When you select “4” or “9”, set the VIDEO WALL
POSITION.
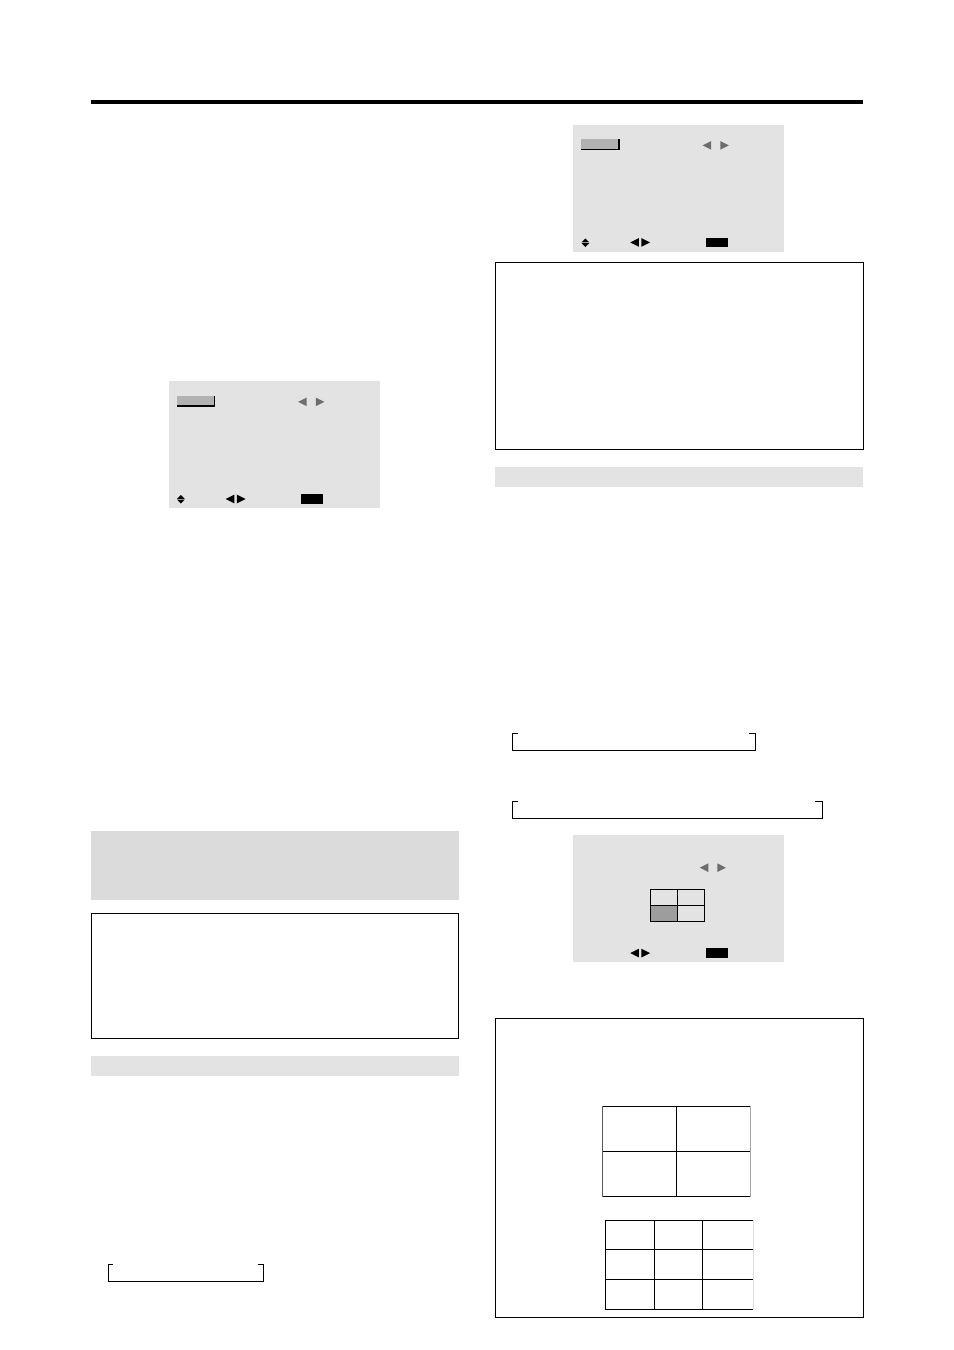
VIDEO WALL POSITION
Set the position of each display.
Example: Setting “4”
Perform Steps 1-2 of VIDEO WALL, then...
3. Use the ▲ and ▼ buttons to select “POSITION”, then
press the MENU/ENTER button.
The “VIDEO WALL POSITION” screen appears.
4. Use the
ᮤ
and
ᮣ
buttons to select “NO. 4”.
The mode switches as follows each time the
ᮤ
or
ᮣ
button is pressed:
• 4 Screens
→
NO. 1
↔
NO. 2
↔
NO. 3
↔
NO. 4
←
• 9 Screens
→
NO. 7
↔
NO. 8
↔
.......
↔
NO. 14
↔
NO. 15
←
VIDEO WALL POSITION
POSITION NO.
4
EXIT
RETURN
ADJ.
5. Press the EXIT button to return to the VIDEO WALL
screen.
Information
Ⅵ
VIDEO WALL POSITION settings
1 Screen .....
There is no need to set POSITION.
4 Screens
9 Screens
NO. 1
NO. 2
NO. 4
NO. 3
NO. 7
NO. 8
NO. 9
NO. 10
NO. 11
NO. 12
NO. 13
NO. 14
NO. 15