Connections – Panasonic WV-CLR920A User Manual
Page 12
-12-
Copper wire
#24
#22
#20
#18
size (AWG)
(0.22 mm
2
) (0.33 mm
2
) (0.52 mm
2
) (0.83 mm
2
)
Resistance
0.078
0.050
0.030
0.018
Ω/m
Resistance
0.026
0.017
0.010
0.006
Ω/ft
A. WV-CLR920A (220 - 240 V AC 50Hz)
1. Plug the AC power cord (supplied as standard
accessory) into the AC inlet socket.
2. Connect the AC power cord to a 220 - 240 V AC
50 Hz outlet.
Notes:
• Connect the power cord firmly.
• The power cord should be long enough for panning
and tilting.
If the cable is too short, the power cord plug may
be pulled off the camera when the camera pans or
tilts.
B. WV-CLR924AE (12 V DC/24 V AC 50Hz)
Cautions:
1. Connect to 12 V DC (10.8 V - 16 V) or 24 V AC
(19.5 V - 28 V) class 2 power supply only. Be sure
to connect the grounding lead to the GND terminal
when the power is supplied from a 24 V AC power
source.
2. To prevent fire or electric shock hazard, use a UL
listed cable (VW-1, style 1007) for the Input
Terminal.
3. Take AC 24 V power supply from a third-party
external power supply device that complies with the
safety standard.
The WV-CLR924AE has an AC/DC compatible input ter-
minal. The 12 V DC or 24 V AC power supply cord can
be connected to this terminal. The camera detects the
power source automatically.
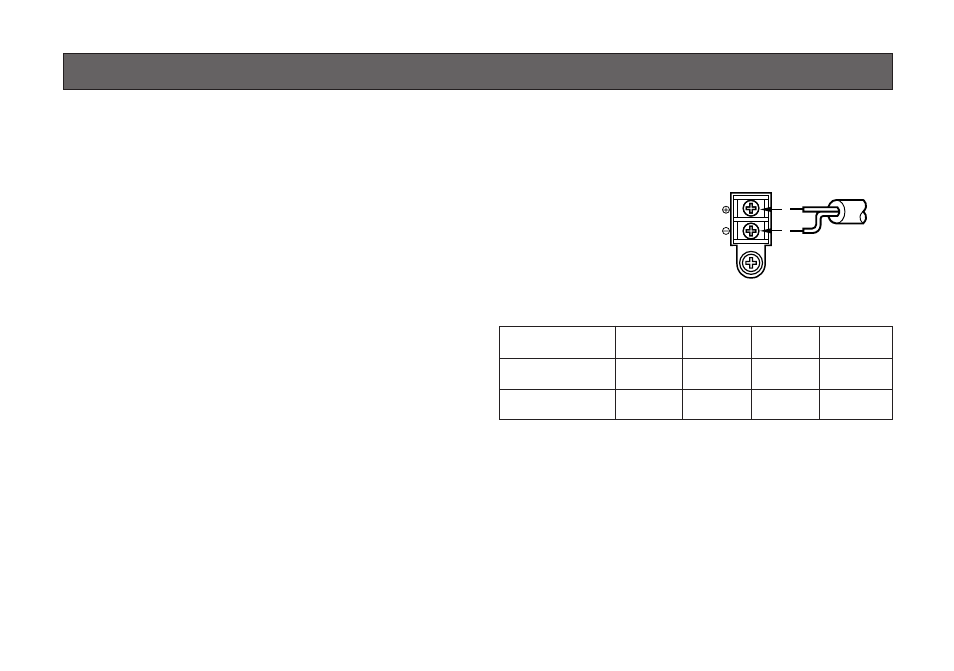
1. 12 V DC Power Supply
Connect the power cord
to the AC/DC compatible
input terminal on the rear
panel of the camera.
Resistance of copper wire [at 20 °C (68 °F)]
AC 24V
IN
DC 12V
IN
1
2
GND
12 V DC
(10.8 V - 16 V)
You can use the formula below to select the power sup-
ply, and power cable. The voltage supplied to the
power-in terminals must be between 10.8 V - 16 V.
10.8 V(minimum)
≤ V
A
– 2RLI
≤ 16 V (maximum)
V
A
: Output voltage of power supply
R: Resistance (
Ω/m) (Ω/ft), see table
L: Cable length (m) (ft)
I: Current consumption (A), see specifications
CONNECTIONS