Figure 1. kbd300 keyboard definitions – Pelco Kbd300 User Manual
Page 5
Pelco Manual C527M (11/97)
3
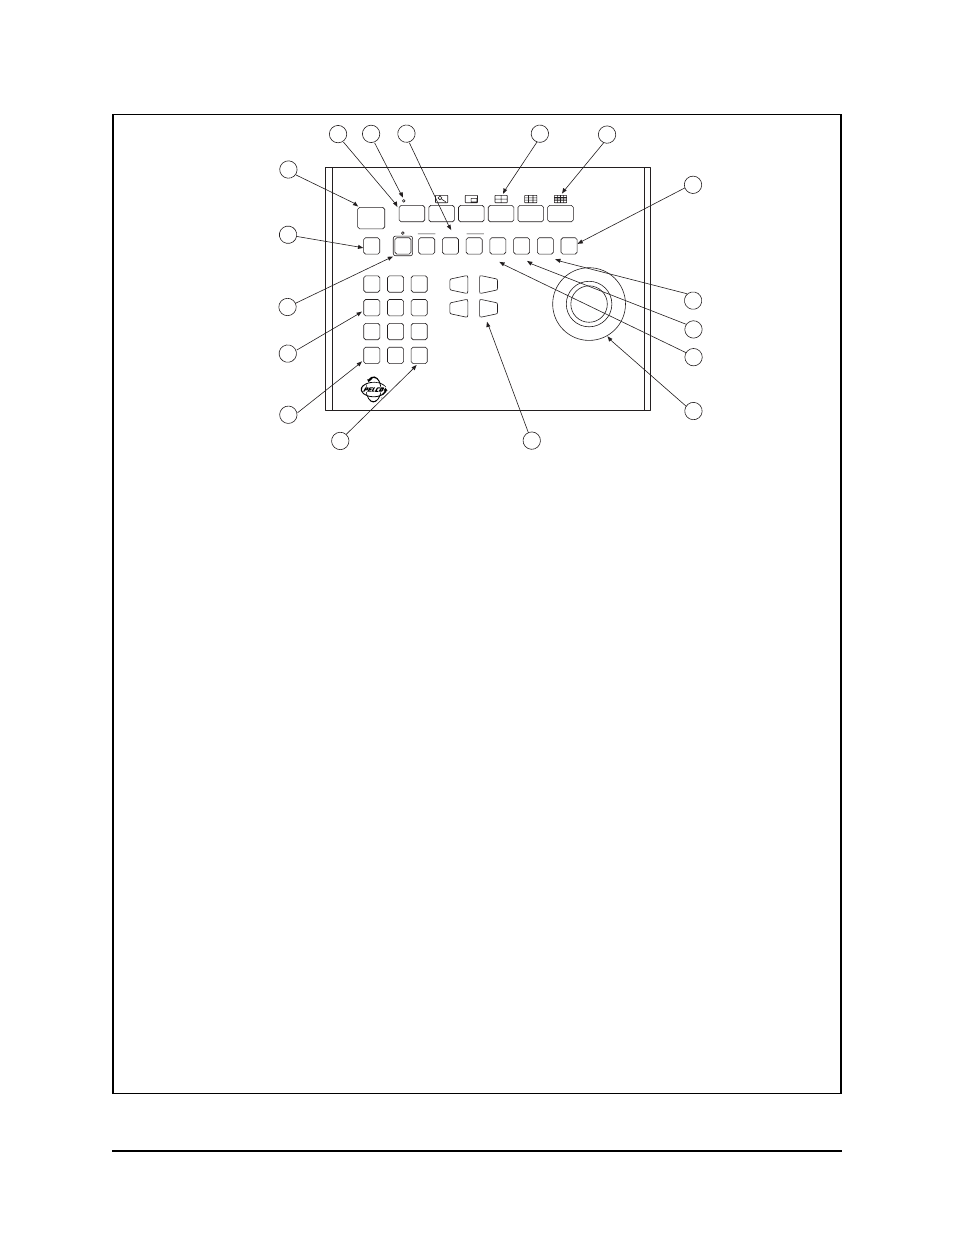
Figure 1. KBD300 Keyboard Definitions
SHIFT
SEQUENCE
MON
ACK
PREV
NEXT
HOLD
PATTERN PRESET
MACRO
PGM
F1
F2
F3
F4
F5
KBD300
1
2
3
4
5
6
7
8
9
0
CLEAR
CAM
MADE IN USA.
1
2
4
5
6
7
8
9
10
11
12
13
14
15
17
16
3
OPEN
NEAR
FAR
CLOSE
1.
DIGIT DISPLAY LED
Displays monitor number in Run
mode and P in program mode.
2.
SHIFT KEY
Press to activate Multiplexer Mode.
3.
SHIFT KEY LED
Illuminates when Multiplexer Mode is
active.
4.
SEQUENCE KEYS
When Sequence Status Indicator displays O on monitor
(sequence not running and not on hold)
PREVIOUS (PREV)
Press to step backward through
all available system cameras. Hold for two seconds to start
a sequence in reverse.
NEXT
Press to step forward through all available system
cameras. Hold for two seconds to start a sequence.
HOLD
No function.
When Sequence Status Indicator displays F or B (se-
quence running forward or backward)
PREVIOUS (PREV)
Press to step backward through a
sequence and/or reverse a forward sequence.
NEXT
Press to step forward through a sequence and/or
reverse a backward sequence.
HOLD
Press to place a sequence on hold.
When Sequence Status Indicator displays H (sequence
on hold)
PREVIOUS (PREV)
Press to step backward through
the camera sequence, including presets. Hold for two sec-
onds to start a sequence in reverse.
NEXT
Press to step forward through the camera se-
quence. Hold for two seconds to start a sequence.
HOLD
No function.
5.
FUNCTION KEYS
, Normal Operation
F1 Press to activate the NO/NC relay.
F2 Press to activate the F2 open collector output.
F3 Press to activate the F3 open collector output.
F4 Press to activate a receiver/driver auxiliary for selected
camera. Press and hold for momentary aux.
F5 Press to deactivate a receiver/driver auxiliary for se-
lected camera.
6.
FUNCTION KEYS
, Multiplexer Mode (Shift Key LED
Illuminated)
F1 Press to activate digital zoom.
F2 Press to activate Picture in Picture.
F3 Press to activate Quad display.
F4 Press to activate Nine-screen display.
F5 Press to activate 16-screen display.
7.
PROGRAM KEY (PGM)
Press to enter the program
mode.
8.
MACRO KEY
Start a salvo sequence (macro 1 or 2) by
first entering the macro number then pressing this key.
9.
PRESET KEY
Send a camera to a preset by first enter-
ing the preset number then pressing this key. Program a
preset by first entering the preset number then holding
the key for two seconds
10.
PATTERN KEY
Press to begin a pattern. Hold for two
seconds to program a pattern.
11.
LENS CONTROL KEYS
Control camera lens functions;
focus and iris.
12.
PTZ FUNCTION JOYSTICK
Variable speed, vector-
solving, bi-directional joystick with twisting head zoom
control. Turbo pan* is achieved by full joystick deflection
in either pan direction.
13.
CLEAR KEY
Clear a numeric entry.
14.
CAMERA KEY (CAM)
Select a camera by first enter-
ing the camera number then pressing this key.
15.
NUMBER PAD
Enter numbers.
16.
ALARM ACKNOWLEDGE (ACK)
Press to acknowl-
edge an alarm.
17.
MONITOR KEY (MON)
Select a monitor by first enter-
ing the monitor number then pressing this key.
*
* The turbo pan
feature may be
disabled. Place
switch 4 on the
rear panel DIP
switch block in
the off position.
See Figure 4.