How to use the on screen display (osd), Pincushion, balanced – Philips 21B582BH User Manual
Page 15
14
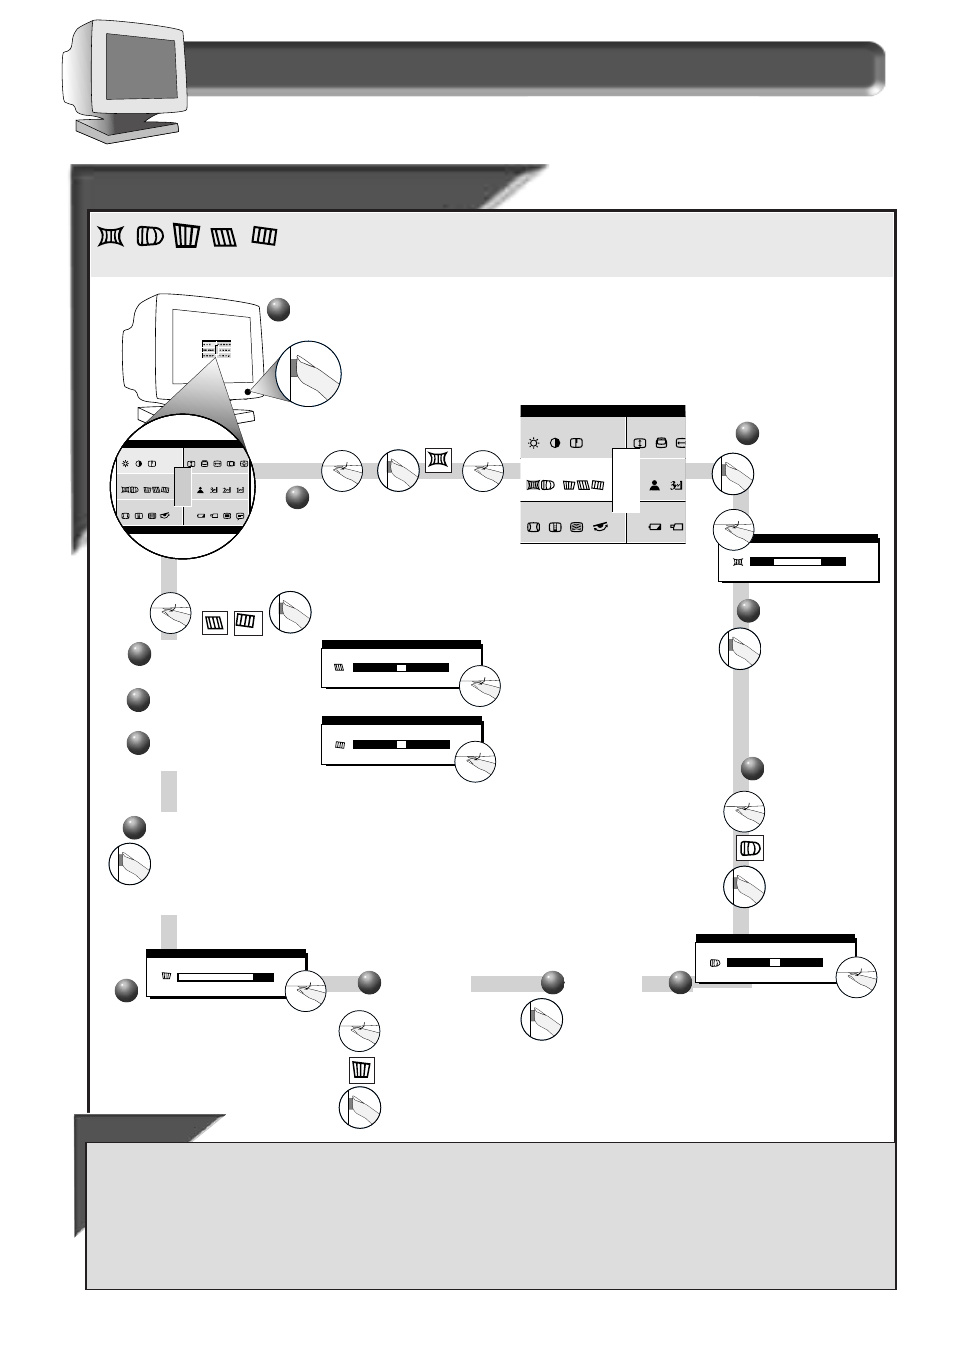
How to Use the On Screen Display (OSD)
G e o m e t r y C o n t r o l s w i n d o w
Pincushion, Balanced
Pincushion, Balanced
Pincushion,
Pincushion,
T
T
r
r
apezoid,
apezoid,
P
P
ar
ar
allelogr
allelogr
am,
am,
R
R
ot
ot
a
a
tion
tion
Follow the steps below to adjust any of the five preset options (P
INCUSHION
, B
ALANCED
P
INCUSHION
, T
RAPEZOID
,
P
ARALLELOGRAM
, or R
OTATION
). You can make individual adjustments to each of the preset options. Note: use these
features only when the picture is not square.
Smart Help
To exit G
EOMETRY
C
ONTROLS
. . .
. . . but continue to another window, turn the R
OTARY
knob until E
XIT
is highlighted. Next, press the O
N
S
CREEN
D
ISPLAY
button. Then, turn the R
OTARY
knob
until that window is highlighted. Now, press the O
N
S
CREEN
D
ISPLAY
button and follow the instructions for that window.
. . . completely, press the O
N
S
CREEN
D
ISPLAY
button and hold for 1.5 seconds. The On Screen Display will disappear. All changes will be saved.
To make changes to one item, follow the steps for that item. Then, follow “To exit G
EOMETRY
C
ONTROLS
. . . .”
To return to factory presets, see “To Reset an Individual Window” on page 15.
A I N C
M
ma i n
r e e n
s c
e t r y
g e om
o l o r
c
n c e d
a d v a
c i a l
s p e
ONT RO L S
1 2 00
1
1 6 0 0 x
0 6 . 3 K / 8 5HZ
RESET
EXIT
A I N C
M
ma i n
r e e n
s c
e t r y
g e om
o l o r
c
n c e d
a d v a
c i a l
s p e
ONT RO L S
1 2 00
1
1 6 0 0 x
0 6 . 3 K / 8 5HZ
RESET
EXIT
Press the O
N
S
CREEN
D
ISPLAY
button.
2b
2b
1
1
2a
2a
Turn the R
OTARY
knob until the G
EOMETRY
C
ONTROLS
window is highlighted. Next,
press the O
N
S
CREEN
D
ISPLAY
button.
Then, if necessary, turn the R
OTARY
knob until P
INCUSHION
icon
is highlighted.
Press the O
N
S
CREEN
D
ISPLAY
button. Then, turn
the R
OTARY
knob to
adjust the
pincushion.
ma i n
s
e t r y
g e om
n c e d
a d v a
s p
RESET
EXIT
P I N C U S H I O N
B A L A N C E D P I N C U S H I O N
5 0 %
3a
3a
To select B
ALANCED
P
INCUSHION
, turn the
R
OTARY
knob until
B
ALANCED
P
INCUSHION
is highlighted. Next,
press the O
N
S
CREEN
D
ISPLAY
button.
3b
3b
Turn the R
OTARY
knob (on
the lower right-hand corner of
the monitor) to adjust the
balanced pincushion.
T R A P E Z O I D
5 0 %
4b
4b
Turn the R
OTARY
knob to
adjust the trapezoid.
4c
4c
When done, press the
O
N
S
CREEN
D
ISPLAY
button.
This will save the
change and return the
screen to G
EOMETRY
C
ONTROLS
window.
To select P
ARALLELOGRAM
or
R
OTATION
, turn the R
OTARY
knob
until P
ARALLELOGRAM
or R
OTATION
icon is highlighted. Next,
press the O
N
S
CREEN
D
ISPLAY
button. Then follow steps 4b
and 4c to make the
appropriate changes.
5a
5a
5c
5c
P I N C U S H I O N
5 0 %
2c
2c
When done, press
the O
N
S
CREEN
D
ISPLAY
button to
save the change
and return to
G
EOMETRY
C
ONTROLS
window.
When done,
press the O
N
S
CREEN
D
ISPLAY
button. This will
save the change
and return the
screen to
G
EOMETRY
C
ONTROLS
.
3c
3c
To select
T
RAPEZOID
, turn the
R
OTARY
knob until
T
RAPEZOID I
con is
highlighted. Next,
press the O
N
S
CREEN
D
ISPLAY
button.
4a
4a
5b
5b
P A R A L L E L O G R A M
5 0 %
R O T A T I O N
5 0 %