How to use the on screen display (osd), Osd controls, Video inp – Philips 21B582BH User Manual
Page 12: Video inp ut ut, 7smart help, 4smart help
11
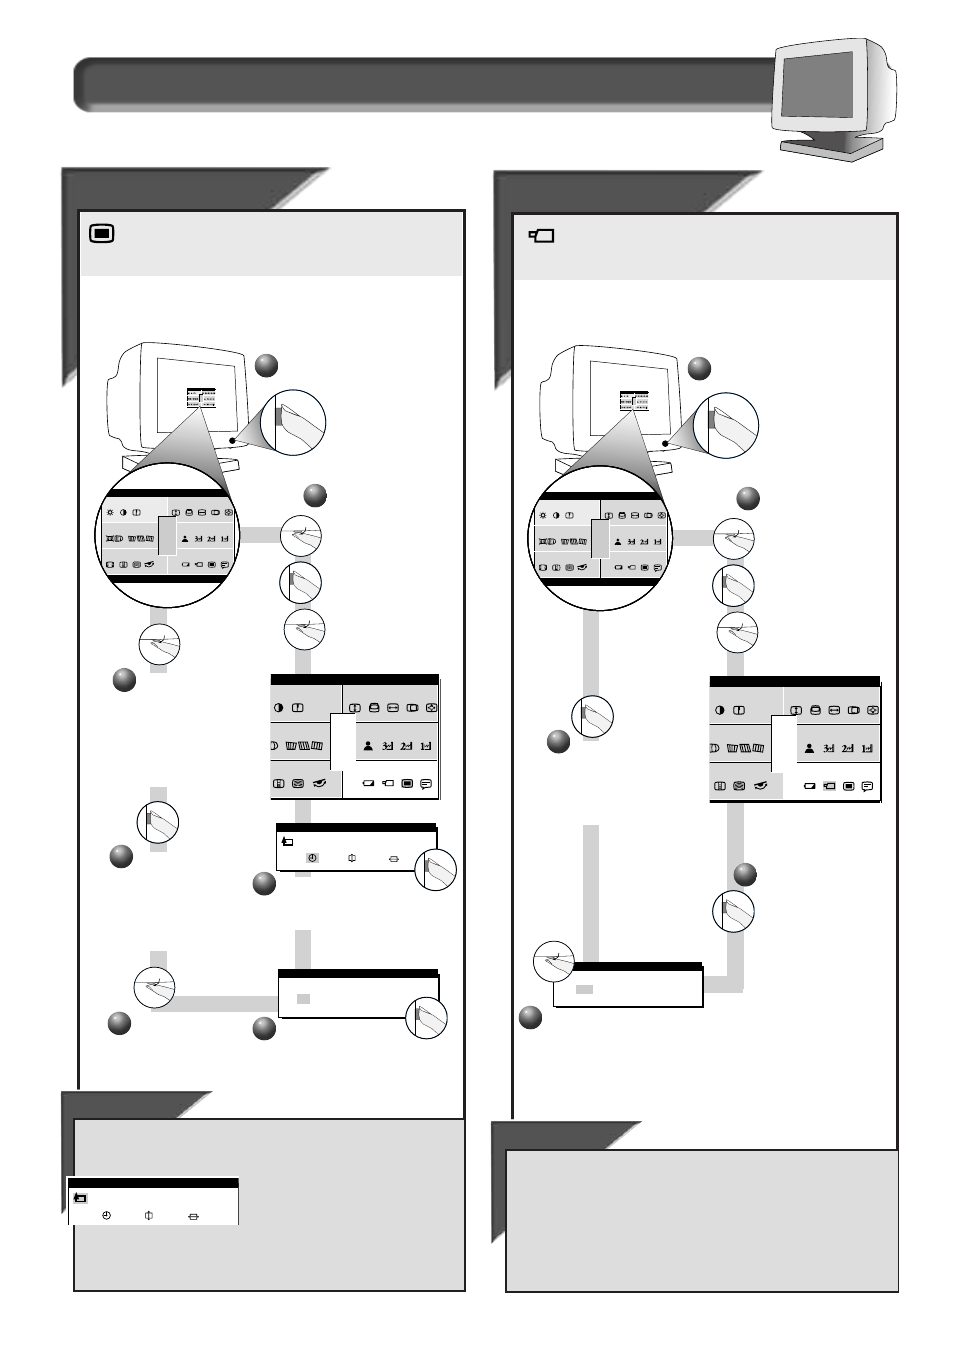
How to Use the On Screen Display (OSD)
S p e c i a l C o n t r o l s w i n d o w
OSD Controls
OSD Controls
W
ITH
OSD C
ONTROLS
, you can set the time for the On Screen
Display to time out, and change the vertical and horizontal
position of the OSD on the monitor screen.
n
r e e n
s c
e t r y
om
o l o r
c
n c e d
v a
c i a l
s p e
RESET
EXIT
O S D C O N T R O L S
2
2
Press the O
N
S
CREEN
D
ISPLAY
button.
Turn the R
OTARY
knob
until S
PECIAL
C
ONTROLS
is highlighted. Next,
press the O
N
S
CREEN
D
ISPLAY
button. Then,
turn the R
OTARY
knob
until the OSD
C
ONTROLS
icon is
highlighted.
1
1
A I N C
M
ma i n
r e e n
s c
e t r y
g e om
o l o r
c
n c e d
a d v a
c i a l
s p e
ONT RO L S
1 2 00
1
1 6 0 0 x
0 6 . 3 K / 8 5HZ
RESET
EXIT
A I N C
M
ma i n
r e e n
s c
e t r y
g e om
o l o r
c
n c e d
a d v a
c i a l
s p e
ONT RO L S
1 2 00
1
1 6 0 0 x
0 6 . 3 K / 8 5HZ
RESET
EXIT
Press the O
N
S
CREEN
D
ISPLAY
button to add your
change and return to
OSD C
ONTROLS
.
6
6
3
3
Press the O
N
S
CREEN
D
ISPLAY
button to bring up
OSD C
ONTROLS
screen.
OSD CONTROLS
TIMER
Press the O
N
S
CREEN
D
ISPLAY
button to bring up
T
IMER
screen.
4
4
TIMER
05
10
25
OFF
Turn the R
OTARY
knob to select 05,
10, 25 seconds, or
OFF.
5
5
Turn the R
OTARY
knob to select
either V
ERTICAL
or
H
ORIZONTAL
P
OSITION
and repeat
steps 3 - 6.
7
7
Smart Help
After returning to S
PECIAL
C
ONTROLS
. . .
. . . to continue to V
IDEO
I
NPUT
, turn the R
OTARY
knob until G
O
B
ACK
is
highlighted. Next, press the O
N
S
CREEN
D
ISPLAY
button. Then, turn the R
OTARY
knob until the V
IDEO
I
NPUT
icon is
highlighted. Next, follow steps 3 - 6
under V
IDEO
I
NPUT
.
. . . to exit completely, press the OSD button and hold for 1.5
seconds. (See page 15 for other exit options.)
Video Inp
Video Inp
ut
ut
V
IDEO
I
NPUT
helps determine what you see on the screen. It is
set at 0.7V(olts), but if the video input signal is different than
the output signal, you may want to change it to 1.0V.
i n
r e e n
s c
e t r y
om
o l o r
c
n c e d
v a
c i a l
s p e
RESET
EXIT
V I D E O I N P U T
2
2
Press the O
N
S
CREEN
D
ISPLAY
button.
Turn the R
OTARY
knob
until S
PECIAL
C
ONTROLS
is highlighted. Next,
press the O
N
S
CREEN
D
ISPLAY
button. Then,
turn the R
OTARY
knob
until the V
IDEO
I
NPUT
icon is highlighted.
1
1
A I N C
M
ma i n
r e e n
s c
e t r y
g e om
o l o r
c
n c e d
a d v a
c i a l
s p e
ONT RO L S
1 2 00
1
1 6 0 0 x
0 6 . 3 K / 8 5HZ
RESET
EXIT
A I N C
M
ma i n
r e e n
s c
e t r y
g e om
o l o r
c
n c e d
a d v a
c i a l
s p e
ONT RO L S
1 2 00
1
1 6 0 0 x
0 6 . 3 K / 8 5HZ
RESET
EXIT
VIDEO INPUT
0.7V
1.0V
Turn the R
OTARY
knob to select
either 0.7V or 1.0V.
Press the O
N
S
CREEN
D
ISPLAY
button
to save your selection
and return to S
PECIAL
C
ONTROLS
.
5
5
3
3
Press the O
N
S
CREEN
D
ISPLAY
button. The
V
IDEO
I
NPUT
screen
appears.
4
4
Smart Help
After returning to S
PECIAL
C
ONTROLS
. . .
. . . to continue to A
DVANCED
C
ONTROLS
, turn the R
OTARY
knob until E
XIT
is
highlighted. Next, press the O
N
S
CREEN
D
ISPLAY
button. Then, turn the
R
OTARY
knob to A
DVANCED
C
ONTROLS
window and go to the next page.
. . . to exit completely, press the OSD button and hold for 1.5 seconds.
(See page 15 for other exit options.)
OSD CONTROLS
GO BACK