Philips D750 User Manual
Page 6
5
A – Telephone operation:
1
Start up
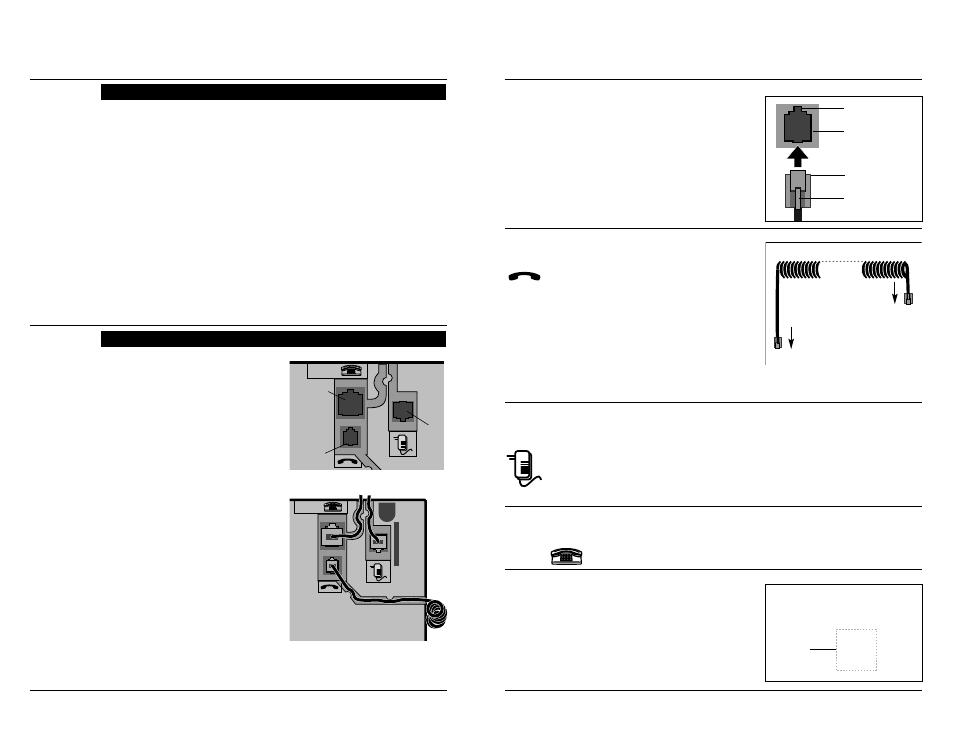
Insertion is performed in the same
way for all three sockets:
• Insert the plug into the socket so
that the locking catch points in
the direction of the correspon-
ding cut-out in the socket.
• Push the plug into the socket
until it locks.
You will find the handset and the
spiral cable in the packaging.
• Connect the plug of the cable
end with the longer straight
piece with the corresponding
socket on the underside of the
telephone
(refer to sketch on
previous page).
• Connect the other plug of the
cable with the
socket of handset.
• Route the cable through the cable guide.
Now insert the appropriate plug of the plug-in power supply unit into the
corresponding socket (see sketch on previous page). For safety reasons, the
telephone must only be operated using the plug-in power supply unit sup-
plied with it. Insert the plug-in power supply unit into the 220 / 230 volt
socket.
Caution: Your telephone will not operate if the plug-in power supply is
not inserted or in the case of a power failure.
The connection cable for the ISDN line has two identical plugs.
Insert one of them into the telephone socket. Connect the other one with
the socket of the telephone connection (ISDN socket).
First of all, pull the
plug-in power
supply unit out of the power socket.
Releasing a plug-in connection:
❶ Press the locking catch towards
the plug.
❷ Pull out the plug, holding it on
both sides (keep locking catch
depressed).
❶
❷
To the handset
socket
Spiral cable for
telephone
handset
To the telephone
Cut-out
Locking catch
Socket
Socket
Plug
Plug-in
connections
Telephone
handset
Power
supply
Telephone
connection
Releasing
the plug-in
connections
ISDN
4
A – Telephone operation:
1
Start up
1.1
Connecting the telephone
Prior to initial operation, you must
carry out some connections.
The necessary cables and the plug-
in power unit are included in the
telephone’s scope of delivery. For
safety reasons, the telephone must
only be operated using the plug-in
power supply unit supplied with it.
The connection sockets are on the
underside of the telephone. They
can be distinguished by their diffe-
rent sizes and are marked by sym-
bols (refer to sketch).
Refer to the following page for the
connections.
Once you have established the
plug-in connections, you must route
the cable through the accompany-
ing cable guides. This ensures a
correct setting up of the telephone.
Carefully press the cable into the
recesses (refer to sketch).
ISDN
ISDN
Telephone
connection
to ISDN
network
Handset
Underside of unit
Underside of unit
Power
supply
Cables
Connection
sockets
Cable guides
1
Start up: Overview
The SmartLine D750 offers you a large range of functions – yet it is simple and
quick to use: You can use your telephone after only three preparatory steps!
❍ Step 1: Connecting the telephone
(1.1)
Here you will be shown the necessary connections.
❍ Step 2: Operating overview
(1.2)
The SmartLine D750 supports you in all operations through information
in the display. This section provides you with an overview of basic
displays and operations.
❍ Step 3: Connecting the telephone
(1.3)
Your telephone requires some information about your ISDN line. Polling
is performed automatically during initial operation.
You will find further basic settings in chapters 4 and 5.
● Now you can use the telephone:
Telephoning: The first steps
(2.1)