Using the dj software changing the settings, Using the dj software, Changing the settings – Pioneer Multi Player CDJ-350 User Manual
Page 23: Relay play on two dj players, Changing the midi channel setting, Setting preferences
22
23
DRB1507-D
En
23
Op
erations
Relay play on two DJ players
1 Connect the CDJ-350 and a DJ mixer.
For instructions on connecting, see Using the relay play function on
page 14.
2 Set the DJ mixer’s cross fader to the center position.
3 Turn auto cue on for both DJ players.
The DJ players’ auto cue indicators light.
4 Start playback on this unit.
When playback of the first track on this unit finishes, playback auto-
matically begins on the other DJ player. This unit cues at the begin-
ning of the next track and is set to the pause mode. This operation is
repeated for relay play on the two DJ players.
! The medium can be changed and the cue point set on the DJ
player that is in standby.
! The fader start function does not work during relay play.
! Relay play may not be possible if the two DJ players are not con-
nected to the same DJ mixer.
! If the power of the currently playing DJ player is turned off, play-
back may start on the other DJ player.
Using the DJ software
The CDJ-350 also outputs the operating data for the buttons and
dials in MIDI format. If you connect a computer with a built-in MIDI-
compatible DJ software via a USB cable, you can operate the DJ
software on this unit. The sound of music files being played on the
computer can also be output from the CDJ-350.
To use this unit as an audio device, install the driver software on the
computer beforehand (page 11). This unit must also be selected in the
DJ software’s audio output device settings. For details, see your DJ
software’s operating instructions.
1 Connect the USB port on this unit to your computer.
For instructions on connecting, see Using DJ software on page 14.
2 Press [
] for at least 1 second.
The [CONTROL MODE] screen appears on the main unit display.
3 Start the DJ software.
Communication with the DJ software starts.
The DJ software can be operated using this unit’s buttons and
controls.
! It may not be possible to use some buttons to operate the DJ
software.
! For messages output by the CDJ-350, see List of MIDI Messages.
Changing the MIDI channel setting
1 Press [DISPLAY (UTILITY)] j for at least 1 second.
The [UTILITY] screen is displayed.
2 Turn the rotary selector m, then press it.
Select [MIDI CH.].
3 Turn the rotary selector m, then press it.
Select the MIDI channel and change the setting. A setting from 1 – 16
can be selected.
4 Press the rotary selector m.
The changed MIDI channel settings are stored.
! To close the [UTILITY] screen, press [DISPLAY (UTILITY)] or
[BACK].
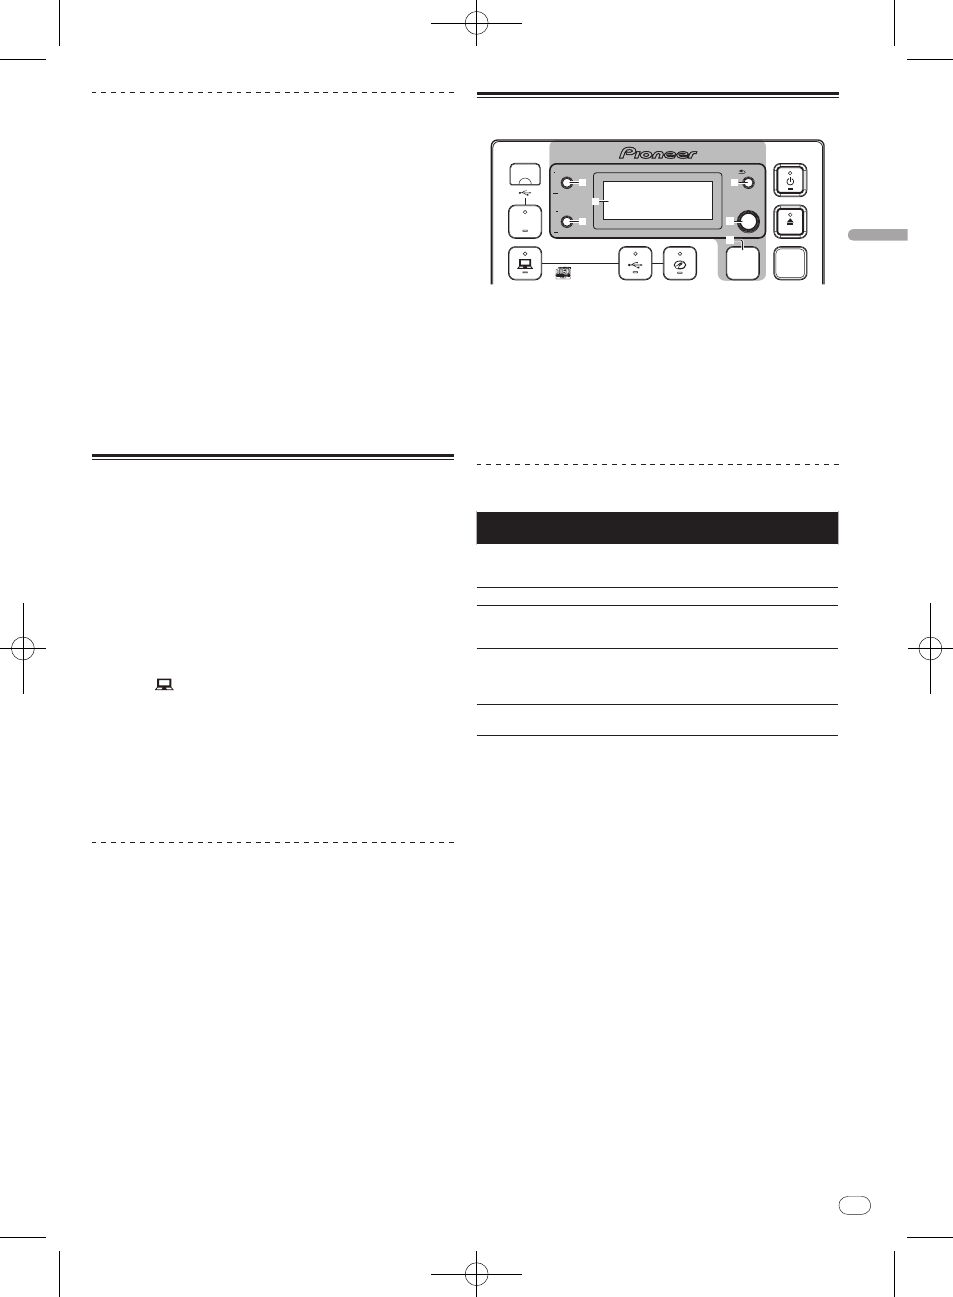
Changing the settings
USB
STOP
SOURCE SELECT
MP3/AAC
WAV/AIFF
PLAYLIST
BPM
DISC
LOCK
BACK
SELECT PUSH
TIME MODE
AUTO CUE
DISPLAY
UTILITY
k
l
m
n
i
j
1 Press [DISPLAY (UTILITY)] j for at least 1 second.
The [UTILITY] screen is displayed.
2 Use the rotary selector m to change the setting.
! Press [BACK] l to return to the previous screen.
3 Press the rotary selector m.
The changed settings are stored.
! To close the [UTILITY] screen, press [DISPLAY (UTILITY)] or
[BACK].
Setting preferences
Options
settings
Selection items
Descriptions
A. CUE LEVEL
–36 dB/ –42 dB/ –48 dB/
–54 dB/ –60 dB*/ –66 dB/
–72 dB/ –78 dB
For details, see Chang-
ing the auto cue level on
page 18.
MIDI CHANNEL
1* to 16
—
AUTO STANDBY
OFF/ 20 min*/ 40 min/ 60 min
For details, see About the
auto standby function on
page 23.
LIBRARY CRE-
ATOR
LIBRARY*/ FOLDER
Sets the browsing method
for media on which Pioneer
MEP-7000 libraries are
recorded.
VERSION No.
—
Displays the CDJ-350’s
software version.
*: Setting upon purchase
About the auto standby function
When the auto standby function is turned on, the power is automati-
cally set to the standby mode after the set time has passed with all of
the conditions below met.
— That this unit’s buttons, controls, etc., are not operated.
— That no track is played.