3 auto bracketing, Notice – Phase One 645 AF User Manual
Page 46
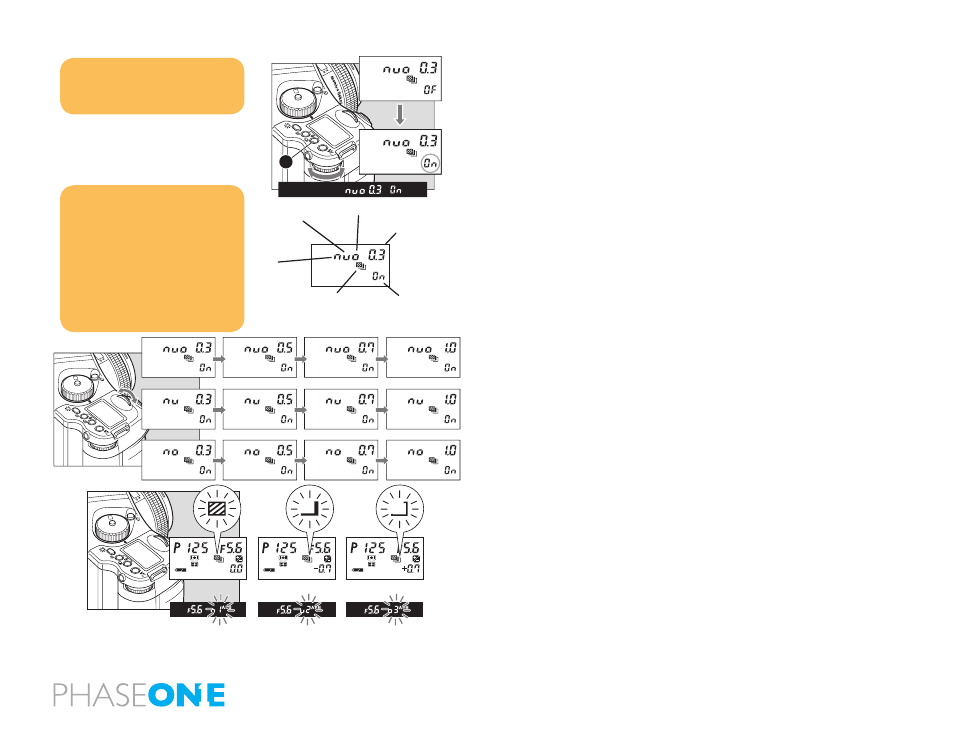
4.3
Auto Bracketing
With auto exposure bracketing, you can capture different exposure
variations automatically for three or two successive frames, when it is
difficult to determine an exposure compensation value. The number
of frames to be taken, the bracketed shooting sequence, bracketing
margin and other settings can be selected as desired for shooting in
auto bracketing mode.
1. Turn the shutter release mode selector lever to the “S” or “C”
position.
When set at the “S” position, you can shoot one frame with each press
of the shutter release button. In the “C” mode, the camera takes three (or
two) frames successively with one press of the shutter release button.
2. Keep pressing the auto-bracketing button for approximately one
second, the auto bracketing mark will blink on the top LCD panel. Turn
the rear dial before this indicator goes out, and change “OF” on the
display to “On”.
3. While the auto bracketing mark is blinking, turn the front dial to
change number of frames (3 or 2), sequence of the shots in 2-shot
mode (shown above), and increment (1/3, 1/2, /2/3 or /1-stop).
4. Press the shutter release button.
When the shutter button is pressed in auto bracketing mode the
shooting sequence and auto bracketing mark blink on the LCD inside
the viewfinder. Furthermore, the auto bracketing mark blinks, the
bracket step width is displayed, and the shooting sequence can be
checked on the external LCD.
5. After taking pictures, press auto bracketing set button A, turn the
rear dial, set auto bracketing mode to “OF,” and release.
Then press the auto bracketing set button or half-press the shutter
button to return to the normal display mode.
NOTICE:
When you want to cancel the auto-
bracketing mode, turn the rear dial to
change “On” to “OF”
SET
AEL
P
Av
Tv
M
X
CF
A
SET
AEL
P
Av
Tv
M
X
CF
SET
AEL
P
Av
Tv
M
X
CF
Underexposure
Bracketing Margin
Overexposure
Auto Bracketing Icon
Standard
Setting selection
NOTICE:
The letters (n, u, o) indicate the type
of exposure (“n” for normal, “u” for
underexposure and “o” for over-
exposure) and numbers indicate
increment (0.3 for 1/3, 0.5 for 1/2, 0.7
for 2/3, and 1.0 for 1/1)
By pressing any other button or
leaving the camera for 5 seconds,
setting for the auto bracketing
will be stored.
Overexposure
Normal exposure
Underexposure