Lochinvar MFH-I&S-02 User Manual
Page 5
5
MFH-I&S-02
1. Connect this water heater only to the type of gas (Natural or Propane gas)
as shown on the rating plate. Use clean 1/2"black iron pipe. (Dirt and scale
from the pipe can enter the combination control and cause it to malfunction).
The inlet gas line must have a minimum length of 3" (7.6 cm) drip leg
(sediment trap) installed as close to the water heater’s combination gas
control as possible. A ground joint union must be installed in the gas supply
line feeding the water heater to permit servicing of the water heater.
Compounds used on the threaded joints of the gas piping must be resistant
to the action of liquefied petroleum gases/propane gas.
2. This water heater and its gas connection must be leak tested before placing
the water heater in operation. Check for gas leaks with a soap and water
solution and a brush or a commercial leak detector fluid. NEVER USE A
MATCH OR OPEN FLAME FOR TESTING!
This water heater has a gas control which will operate on either natural or
liquefied petroleum (LP) gas. Normally the control is set to operate on natural
gas, but can be converted for liquefied petroleum (LP) gas by following these
instructions for gas conversion.
GAS CONVERSION INSTRUCTIONS
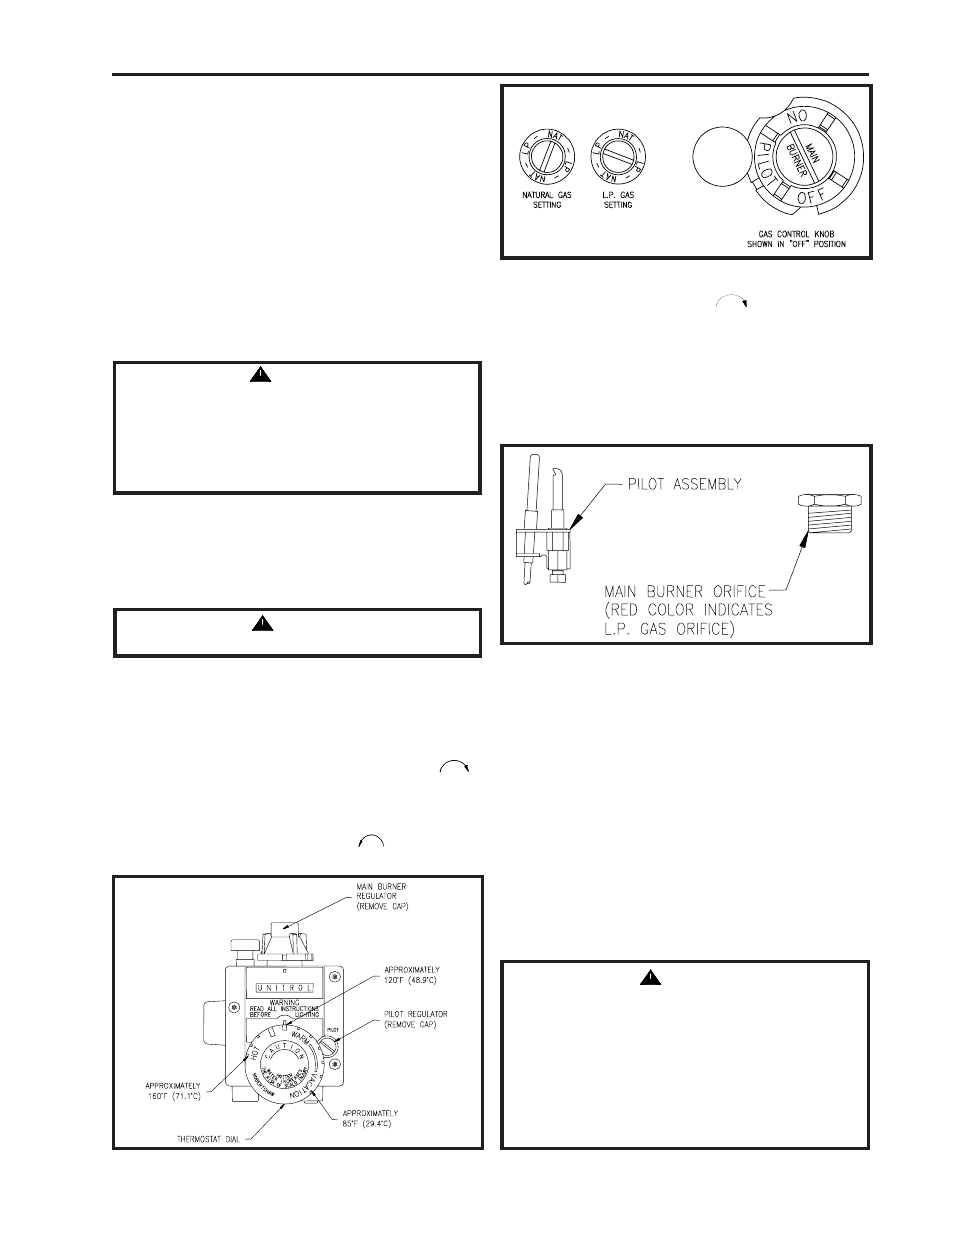
To convert from natural gas to LP gas
1. Depress and rotate gas main burner regulator knob clockwise to
the “OFF” position.
2. Change main burner gas regulator by removing cap from gas regulator.
Depress and rotate knob counterclockwise to the L.P. setting
using a screwdriver. Replace cap.
CAUTION
All gas conversions must be performed by qualified service personnel only.
CAUTION
The water heater and individual shut-off valve must be disconnected from the
gas supply piping system during any pressure testing of the system at test pressures
in excess of ½ psi (3.5kPa). The water heater must be isolated from the gas supply
piping system by closing its manual shut-off valve during any pressure testing of
the gas supply system at test pressures equal to or less than ½ psi (3.5kPa). The
supply line must be capped when not connected to the water heater.
3. Change the pilot regulator by removing thermostat dial and pilot regulator
cap. Depress and rotate knob clockwise
to the L.P. setting using a
screwdriver. Replace cap.
4. Remove the outer door. Remove, or slide open, the inner door.
5. Disconnect thermocouple, Gas supply tube and pilot tube from the gas
valve and remove the burner assembly from the water heater.
6. Remove main burner orifice and pilot assembly and replace with “RED”
color coded L.P. orifice and pilot assembly provided in the cloth bag
attached to the water heater.
7. Replace the burner assembly and reconnect all fittings.
8. Close and/or replace inner and outer doors.
9. To light pilot, follow the lighting instructions provided on the water heater
and in this installation and operation instruction manual.
To convert from LP to natural gas
1. Follow the instructions above except remove the “RED” main burner orifice
and pilot assembly. Replace with the ones originally provided with the
water heater.
2. Change the main gas regulator to “NAT” as noted in step 2 of the above
instructions.
3. Change the pilot regulator to “NAT” as noted in step 3 of the above
instructions.
GENERAL OPERATION
WARNING
Water heaters are heat producing appliances. To avoid damage or injury there
shall be no materials stored against the water heater or vent-air intake system,
and proper care shall be taken to avoid unnecessary contact (especially by
children) with the water heater and vent-air intake system. UNDER NO
CIRCUMSTANCES SHALL FLAMMABLE MATERIALS, SUCH AS GASOLINE
OR PAINT THINNER BE USED OR STORED IN THE VICINITY OF THIS
WATER HEATER, VENT-AIR INTAKE SYSTEM OR IN ANY LOCATION
FROM WHICH FUMES COULD REACH THE WATER HEATER OR
VENT-AIR INTAKE SYSTEM.