Getting a blood sample from your forearm or palm, Reviewing past results, Setting the time and date – Lifescan OneTouch UltraMini Blood Glucose Modelling System User Manual
Page 2: Abbreviated procedure guide, Need help
The hour will now start flashing. Press and release ▲ or ▼ to
change the hour. Note that “AM” or “PM”
changes when you pass 12:00.
When the correct hour is on the display,
wait five seconds.
1
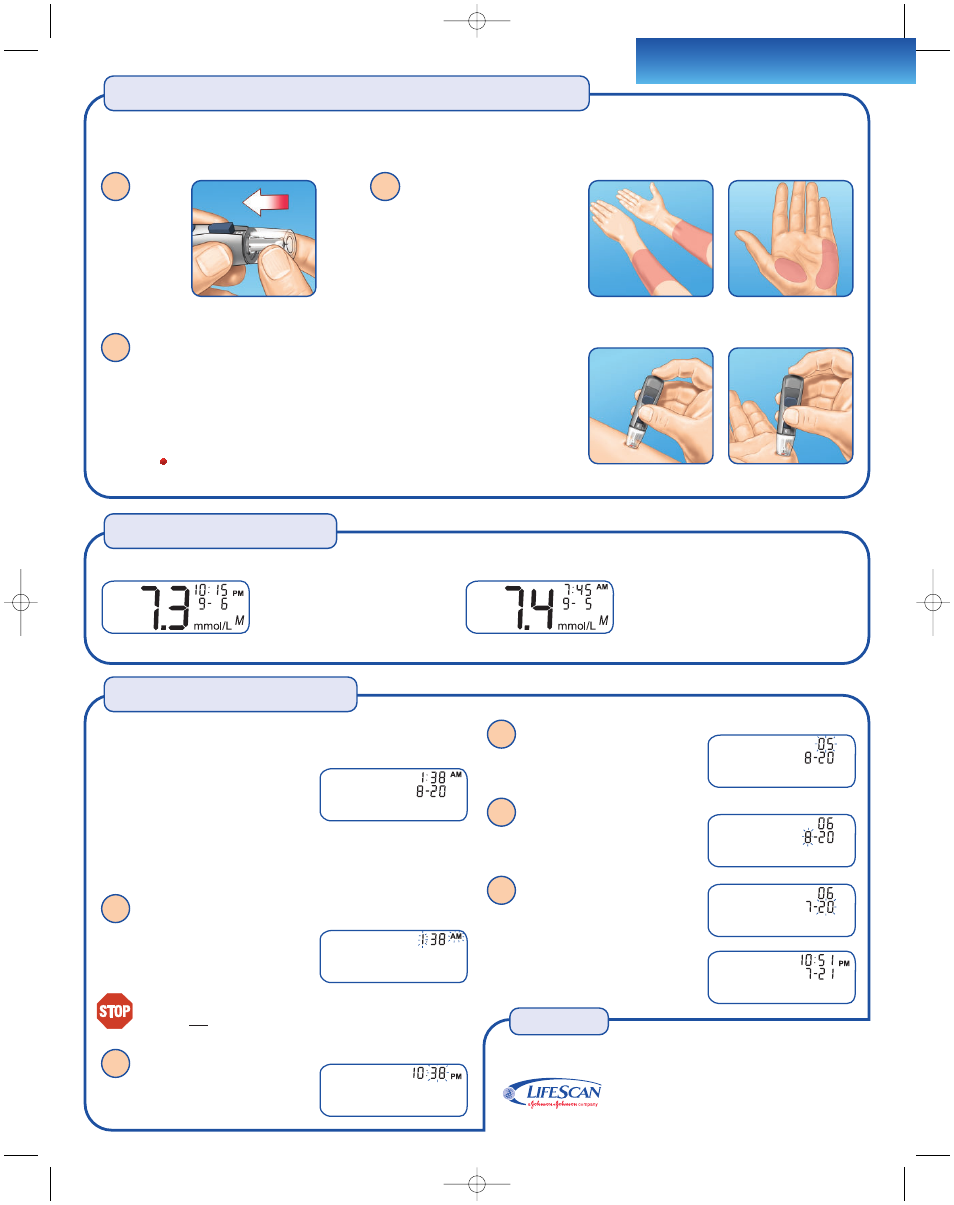
Firmly press and hold the lancing device against your forearm or palm for a few seconds.
Wait until the skin surface under the AST
™
Clear Cap changes color (as blood collects beneath
the skin). This tells you there is enough blood flow for a good sample. Then press the release
button while continuing to apply pressure. Keep holding the lancing device against your skin
until a round drop of blood forms under the cap.
When sampling blood from your forearm or palm, make sure the drop of blood is of at least one
microlitre (
actual size) before you release pressure and remove the lancing device.
3
Choose your sample site.
Forearm
Choose a fleshy area of the forearm away
from bone, visible veins and hair.
Palm
Choose a fleshy area on the palm below the
thumb or pinky finger. Select a spot with no
visible veins and away from deep lines.
2
Replace the blue
cap with the
AST
™
Clear Cap.
1
Getting a blood sample from your forearm or palm
The OneTouch
®
UltraMini
™
Meter allows you to sample blood from your forearm or palm as well as your fingertip. Before using your forearm or palm
for sampling, please speak to your healthcare professional and refer to the owner’s booklet for complete instructions.
Forearm
Palm
Forearm
Palm
Abbreviated Procedure Guide
With the meter off, press and
release ▼ to turn it on. Your most
recent test result will appear on
the display.
Press ▼ to move to the previous result stored
in the meter. Then, press ▲ or ▼ to move
forward or backward through all of your
results. When you’re finished, press and
hold ▼ for two seconds until the meter turns off.
Reviewing past results
The minutes will now start flashing.
Press ▲ or ▼ to change the minutes, then
wait five seconds.
2
Setting the time and date
The meter stores a maximum of 50 blood glucose test results. You can review the results stored in the meter memory, starting with the most recent.
Before using your meter for the first time, you should check and update
these settings. Start with the meter off, then press and hold ▼ for five
seconds until the start-up test screen
appears. After the test screen, the pre-set
time and date will appear on the display
for five seconds.
Note: If a setting does not need to be updated, simply wait five seconds.
The meter display will automatically advance to the next setting.
Check AM/PM. If not correct, continue to press ▲ or ▼ until
the hour and “AM” or “PM” are correct.
The year will now flash. Press ▲ or ▼
to change the year. When the correct year is
on the display, wait five seconds.
3
With the month flashing on the
display, press ▲ or ▼ to change the month,
then wait five seconds.
4
The day will now flash. Press ▲ or ▼
to change the day, then wait five seconds.
Your time and date settings will appear on
the display for five seconds. Your settings
will be saved and the meter will then turn off.
5
Need help?
Call the OneTouch
®
Customer Care Line
1 800 663-5521
or
Visit us at www.OneTouch.ca
Trademarks owned by Johnson & Johnson and used under license.
Rev. 2007/03
©2007 LifeScan Canada Ltd., Burnaby, B.C., V5C 6C6
AW 088861A
33716 OTUMini APG 088861A E 7/3/07 2:56 PM Page 2