Kawasaki 1600 User Manual
Page 15
ASSEMBLY 13
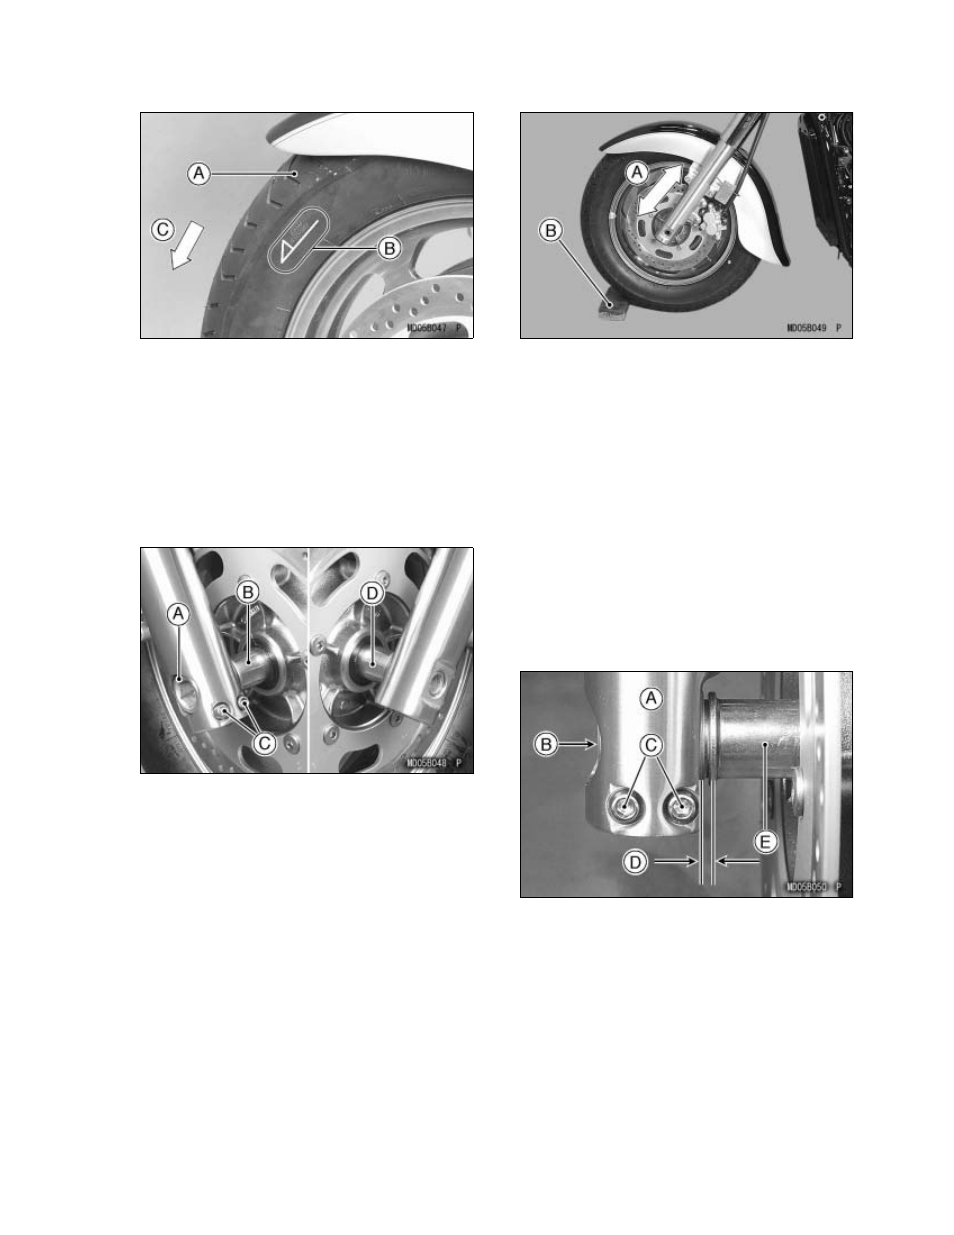
A. Front Tire
B. Arrow
C. Rotation
•
Fit the axle collars on both sides of the front
wheel hub. The collars are identical.
•
Put the front wheel assembly between the
fork legs.
•
Insert the front axle from the right side of the
wheel and push it completely through.
A. Front Axle
B. Collar (Right)
C. Axle Clamp Bolts (Right)
D. Collar (Left)
•
Tighten the front axle to the specified torque.
Torque : 108 N·m (11.0 kgf·m, 80 ft·lb)
•
Temporary install the front brake calipers.
•
Before tightening the axle clamp bolts on the
right fork leg, pump the front fork up and down
4 or 5 times to align the right front fork leg and
to seat the front axle. Do not pull the brake
lever when pumping the fork.
NOTE
ż
Do not apply the front brake during this
process to stop the motorcycle from rolling
forward. Put a block in front of the front wheel
to prevent movement.
A. Pump the fork up and down.
B. Block
•
Tighten the axle clamp bolts on the right fork
leg to the specified torque.
Torque : 29 N·m (3.0 kgf·m, 21 ft·lb)
NOTE
ż
Tighten the two front axle clamp bolts alter-
nately two times to ensure even tightening
torque.
•
Check the clearance between the right fork
leg and the axle collar with a thickness gauge.
There should be about 2.0 mm (0.08 in.) of
clearance. The clearance between 1.05 ~
3.19 mm (0.04 ~ 0.13 in.) is acceptable.
A. Right Fork Leg
B. Front Axle
C. Axle Clamp Bolts
D. About 2.0 mm (0.08 in.)
E. Collar (Right)
•
If the clearance is out of this range, remove
the front wheel and check the axle, wheel hub
and other related parts for damage.
•
Tighten both front brake caliper mounting
bolts (D = 10, L = 47) to the specified torque.
Torque : 34 N·m (3.5 kgf·m, 25 ft·lb)