4 cabling, Cabling – Studer Innotec XTH 3000-12 User Manual
Page 9
Steca
Xtender
Installation and Operating Instructions 723.932 Xtender V0.511
Seite 9
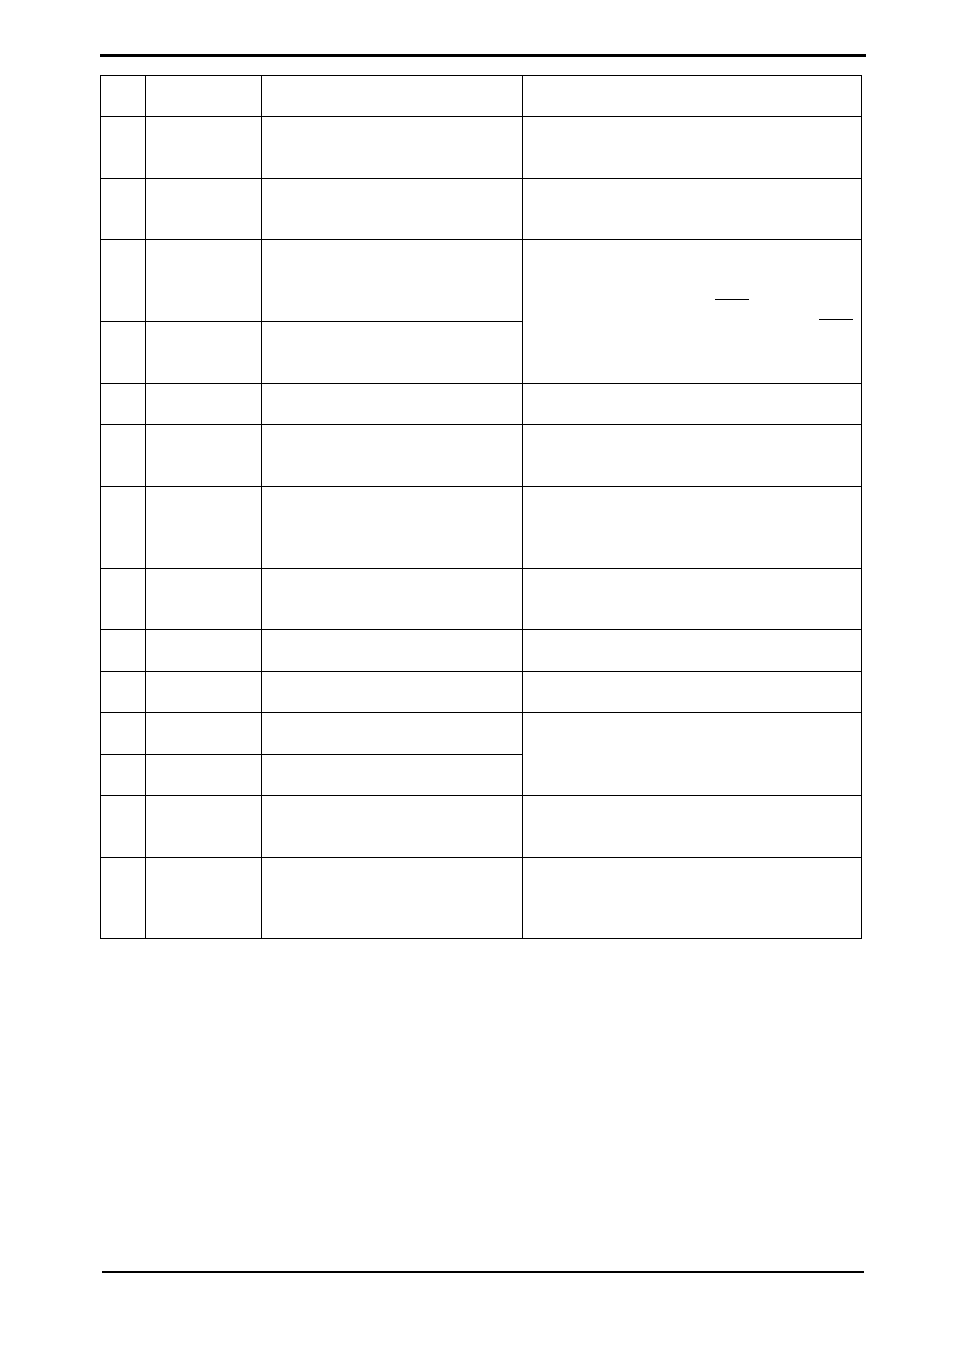
Pos.
Denominati
on
Description
Comment
1 ON/OFF
Main switch
Main on/off switch
See chapter Automatic load shedding of
the inverter (2 sequences)
7.1 – p 26.
2
Temp. Sens Connector for the battery
temperature sensor
See chapter 6.2.11 – p. 23.
Only connect the original Steca BTS-01
sensor
3
Com. Bus
Double connector for
connecting peripherals such as
the RCC002/03 or other
Xtender units
4
O / T
(Open /
Terminated)
Switch for terminating the
communication bus.
See chapter 4.5.8 – p. 16.
The two termination switches (4) for the
communication bus both remain in
position T (terminated) except when both
connectors are in use.
5
--
3.3 V (CR-2032) lithium ion
type battery socket
Used as a permanent supply for the
internal clock. See chapter 6.2.10 – p 23.
6
--
Jumper for programming the
off/on switch by dry contact
See chapter 6.2.11 – p. 23 and fig. 8b
point (6) and (7). They are positioned at
A-1/2 and B-2/3 by default
7 REMOTE
ON/OFF
Connection terminals for dry
on/off remote connection.
See chapter 6.2.11 – p. 23).
When the control via dry contact is not
being used, a bridge must be present
between the two terminals.
8 AUXILIARY
CONTACT
Auxiliary contact
See chapter 6.2.9 – p. 23
Take care not to exceed the admissible
loads
9
--
Activation indicators for
auxiliary contacts 1 and 2
See chapter 6.2.9 – p. 23
10
L1/L2/L3
Phase selection jumpers.
See chapter 6.3.1. – p. 24.
Jumper default at position L1
11
+BAT
Positive pole battery
connection terminals
12
-BAT
Negative pole battery
connection terminals
Carefully read chapter 4.5 – p. 12
Take care with the polarity of the battery
and when tightening the clamp.
13
AC Input
Connection terminals for the
alternative power supply
(generator or public network)
See chapter 0 - p. 16.
Note: It is imperative that the PE terminal
be connected.
14
AC Output
Connection terminals for the
device output.
See chapter 4.5.5 - p. 16.
Note: Increased voltages may appear on
the terminals, even in the absence of
voltage at the input of the inverter.
4 Cabling
The connection of the Xtender inverter / charger is an important installation step.
It may only be carried out by qualified personnel and in accordance with the applicable local
regulations and standards. The installation must always comply with these standards.
Pay attention that connections are completely tightened and that each wire is connected at the
right place.