Maintenance (continued) – Shindaiwa T272X User Manual
Page 15
15
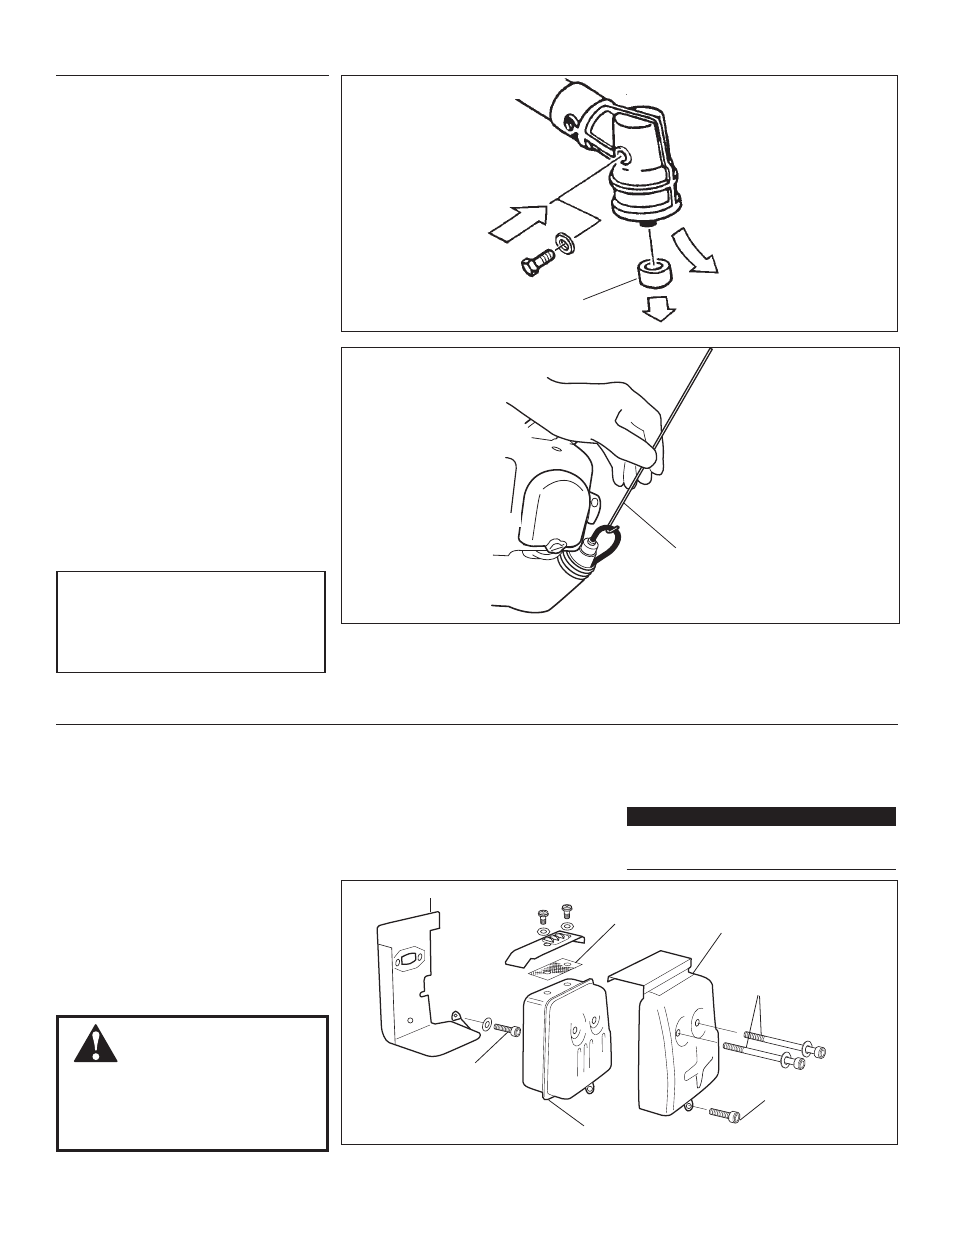
New Grease
Old Grease
Gear Shaft
Collar
Figure 29
Hooked
Wire
Figure 30
Forward
Muffler Shield
Lower Muffler Screw
Muffler
5 mm Muffler
Screws
Rear Muffler Shield
Spark Arrester
Screen
Rear
Muffler
Shield
Screw
Figure 31
135-Hour Maintenance
Seperate the muffler from the forward
muffler shield, while observing the orien-
tation of the components. See Figure 31.
Remove the spark arrester screen and
clean with a stiff bristle brush.
Gently tap the muffler on a wood sur-
face to dislodge any loose carbon.
4.
5.
6.
Inspect the cylinder exhaust port for
carbon buildup.
Reassemble the muffler in the reverse
order of disassembly.
7.
8.
CAUTION!
Make sure you do not pierce the fuel line
with the end of the hooked wire. The line
is delicate and can be damaged easily.
Maintenance (continued)
50 Hour Maintenance
Perform more frequently in dusty or
dirty conditions.
Remove and clean the cylinder cover
and clean grass and dirt from the cyl-
inder fins.
Remove the cutting attachment, cut-
ting attachment holder and gear shaft
collar. Remove the filler plug from
the side of the gearcase and press
new grease into the gearcase until old
grease is pushed out. Use only lith-
ium-base grease such as Shindaiwa
Gearcase Lubricant or equivalent.
Fuel Filter Maintenance
Use a hooked wire to extract the fuel
filter from inside the fuel tank.
Remove the filter element.
Before reinstalling the new filter ele-
ment, inspect the condition of all the
fuel system components (fuel pick-up
line, fuel return line, tank vent line, tank
vent, fuel cap and fuel tank). If damage,
splitting or deterioration is noted, the
unit should be removed from service
until it can be inspected or repaired by a
Shindaiwa-trained service technician.
■
■
■
■
■
Every 135 hours of operation,
remove and clean the muffler.
Hard starting or a gradual loss of perfor-
mance can be caused by carbon depos-
its lodged in the muffler’s spark arrester
screen.
Remove the spark plug boot.
Remove the four 4 mm engine cover
screws (two in the back and two in the
front of the cover) and lift the cover
from the engine.
Remove the two 5 mm muffler screws.
Remove the lower muffler screw, then lift
the muffler assembly from the engine.
1.
.
3.
WARNING!
Never operate this unit with a
damaged or missing muffler or spark
arrester! Operating with missing or dam-
aged exhaust components is a fire haz-
ard and may also damage your hearing
IMPORTANT!
If you note excessive carbon buildup, con-
sult with an authorized servicing dealer.