Initial reset, A. customizing the rgb input adjustment settings, Computer adjustments – Sharp XG-NV4SU User Manual
Page 18: On-screen display
Operation
E-17
• When connecting third party video cards and other
Macintosh computers, set “MODE” to “ON” or “OFF” to
select the correct display mode.
• When the input signal is automatically detected or when
there is no input signal, “MODE(---)” appears on the
screen and the display mode cannot be changed.
Initial Reset
To return “CLOCK”, “PHASE”, “H-POS” and “V-POS”
adjustments to their initial settings, select “RESET”
and then press
ENTER
.
Memory Select
Used to store up to seven computer mode
adjustments. (See below.)
• Avoid displaying computer patterns which repeat every other
line (horizontal stripes). (Flickering may occur, making the image
hard to see.)
To return to normal screen, press MENU.
Computer Mode Memory Adjustments
This projector allows you to store up to seven RGB
input adjustment settings for use with various
computers. Once these settings are stored, they can
be easily selected each time you connect the
computer to the projector.
a. Customizing the RGB input
adjustment settings
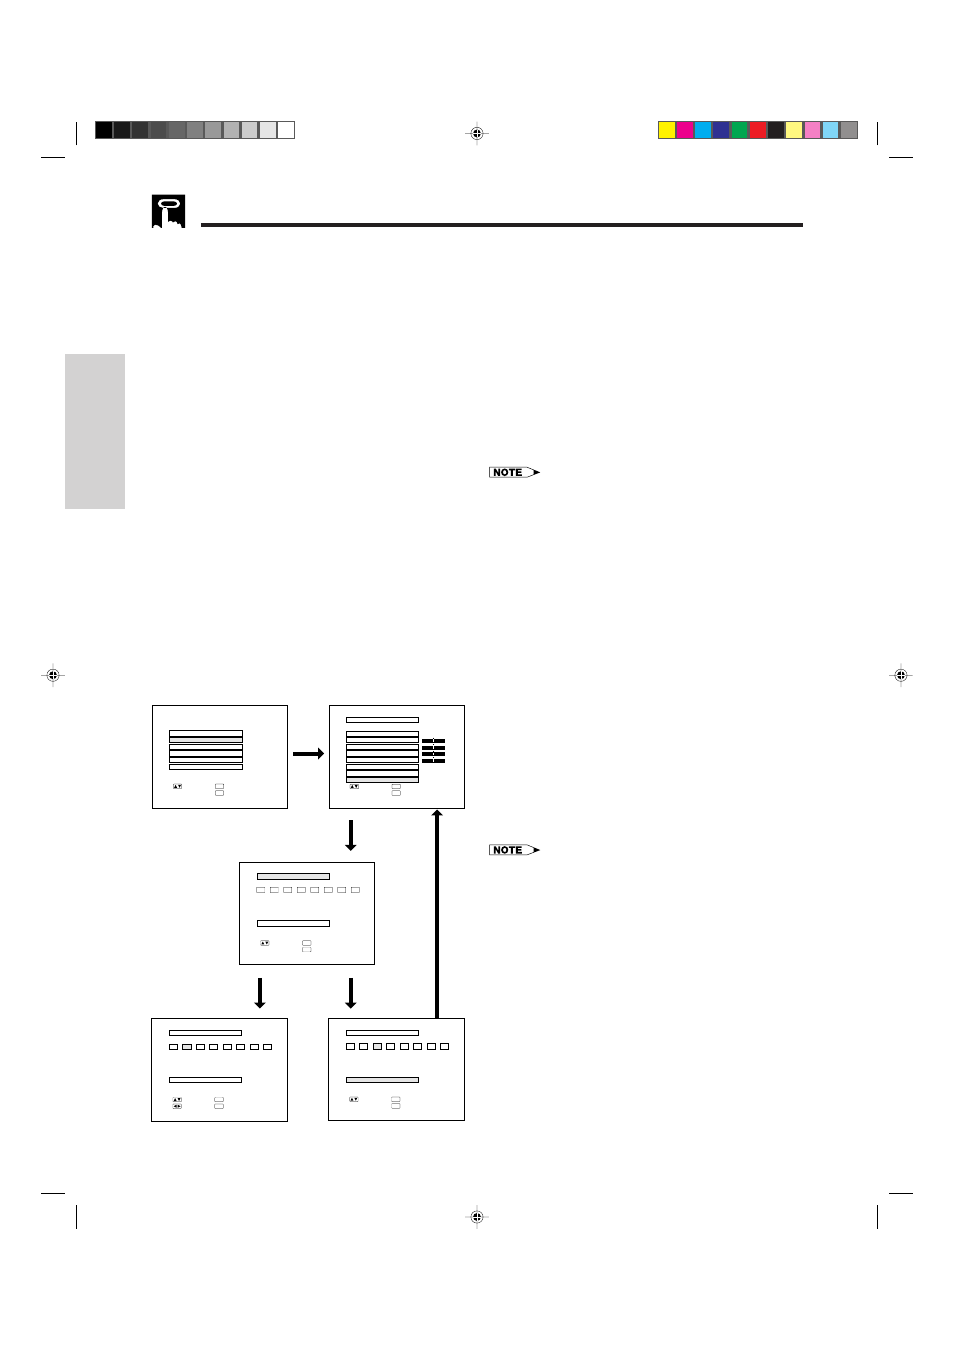
1. Press
MENU
to display the menu screen. Press
ADJUSTMENT
∂/ƒ to select “RGB1 INPUT
ADJ.” Then press
ENTER
to display the “RGB1
INPUT ADJ.” screen.
2. Press
ADJUSTMENT
∂/ƒ to select “MEMORY
SELECT”. Then press
ENTER
to display the
“MEMORY SELECT” screen.
3. Press
ADJUSTMENT
ƒ once, then press
ADJUSTMENT
ß/© to select the number of the
memory adjustment mode you want to adjust.
• If the memory position has not been set, “NON” will appear on
the screen.
• Memory No. 0 cannot be set. It contains the fixed factory preset
setting.
4. Press
ADJUSTMENT
∂/ƒ to select “SETTING”.
Then press
ENTER
to return to the “RGB1 INPUT
ADJ.” screen.
5. Press
ADJUSTMENT
∂/ƒ to select the item you
want to adjust. Then press
ADJUSTMENT
ß/©
to adjust the setting.
6. Press
MENU
to store the adjusted RGB input
adjustment setting under the number of the
selected memory adjustment mode.
Computer Adjustments
R G B 1 A D J .
R G B 1 I N P U T A D J .
I M A G E A D J .
A U D I O
S Y S T E M S E T U P
L A N G U A G E
: S E L .
: N E X T
ENTER
: E N D
MENU
M E M O R Y S E L E C T
S E T T I N G
: S E L .
: B A C K
ENTER
: E N D
MENU
0
1
2
3
4
5
6
7
M E M O R Y S E L E C T
: S E L .
: A D J .
ENTER
: E N D
MENU
0
1
2
3
4
5
6
7
R E S O L U T I O N
H O R F R E Q
V E R T F R E Q
S E T T I N G
: E N T E R
Hz
KHz
6 0 . 0
7 5
1 0 2 4
× 7 6 8
R G B 1 I N P U T A D J .
+
: S E L .
: N E X T
ENTER
: E N D
MENU
[ – – – ]
-
+
-
+
-
+
-
P H A S E
H - P O S
V - P O S
M O D E
[ O F F ]
A U T O S Y N C
R E S E T
M E M O R Y S E L E C T
0
0
0
0
C L O C K
M E M O R Y S E L E C T
N O N
S E T T I N G
: S E L .
ENTER
: E N D
MENU
0
1
2
3
4
5
6
7
: E N T E R
On-screen Display
a.1
a.2 (a.5)
a.3
a.4
XG-NV4SU (E)-b
98.10.19, 5:37 PM
17