L installation step 2, Installation step 3, Balanced/unbalanced input – Soundstream Technologies 414s User Manual
Page 7: Read this, or sparks will f/y
l
l INSTALLATION STEP 2
BALANCED/UNBALANCED INPUT
The REFERENCE6445 amplifier has the ability to accept either standard
Unbalanced RCA signal inputs, or Balanced “Pro Audio” inputs with the use of
the Soundstream
or
Balanced Line Transmitters or some other
balanced line audio source. Before installing your system, you should decide
upon which signal type you wish to run. There are advantages to both:
BALANCED INPUT
Improved Signal-to-Noise
Ratio.
Ratio)
2. Excellent noise cancellation
characteristics.
3. Immune to noise radiated in
the car audio environment.
ADVANTAGES
1. Most preamplifier/ source
The
amplifier’s signal input?. accept two ranges of input
signal levels: 0.2 2.0
or 0.5 5.0 Vrms for both Balanced and
Unbalanced inputs. The input range switch position and level settings are
dependent upon the preamplifier source unit output signal level. For the best
system Signal-to-Noise Ratio, we recommend that the input level controls be set
as far down as possible (rotated counter-clockwise), while maintaining an
acceptable level of output.
the
RCA
When using the Unbalanced RCA input. the RIGHT channel (channel 2) input
signal switch MUST be in the
position. Also, when first installing the
amplifier using this input configuration. we suggest that the remaining input
signal switches be in the
position as well. If
alternator whine or other installation noise with both switches in the
try
channels 1. 3 4
switches
This should remove any system noise due to installation.
the “Balanced” RCA input
When using the Balanced
DIN input, both switches MUST be in the
position. Also, we recommend that when using this input configuration, the
“INPUT LEVEL” switch be in the “0.5
position, and the gains on the
amplifiers be set to “minimum” (rotated counter-clockwise). The system gains
should then be adjusted on the
or
Balanced Line Transmitter,
or other balanced line audio source.
For the pin configuration. see the
diagram below:
RAI
NOTE:
The pin
configuration shown
in the diagram is the
view looking
the +
balanced input jack
on the amplifier.
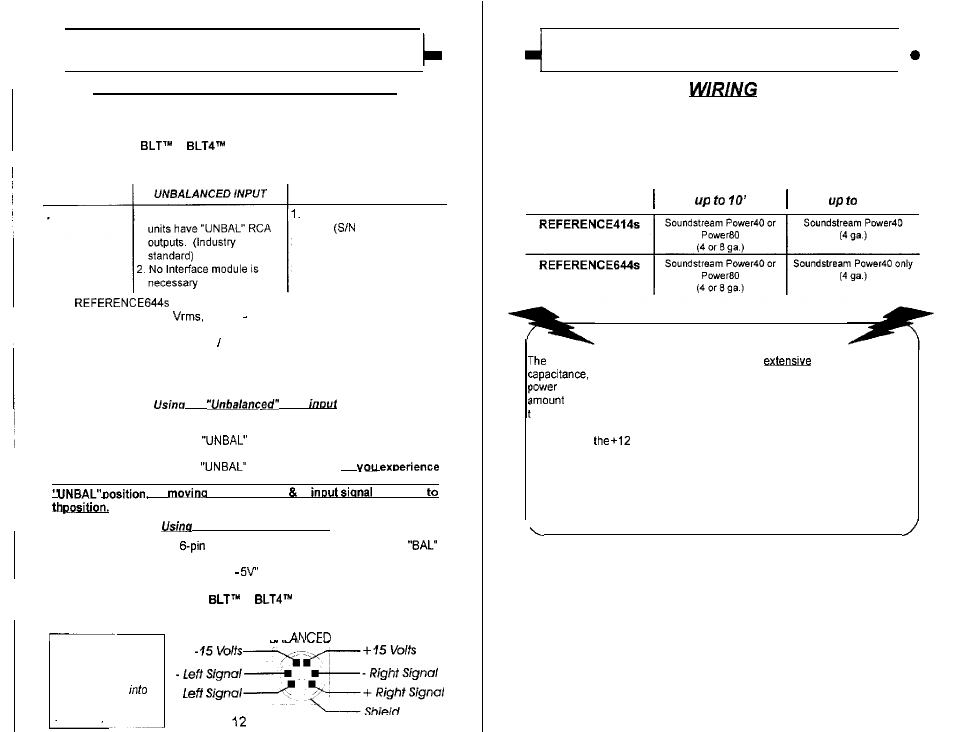
INSTALLATION STEP 3
POWER
AND
GROUND
To ensure maximum output from your REFERENCE amplifiers, use high quality,
low-loss power and ground cables. The REFERENCE amplifiers will accept up
to 4 gauge power and ground cables. Determine from the chart below the
minimum gauge power and ground wire for your application.
20
Read this, or sparks will f/y!
Soundstream REFERENCE amplifiers have
internal power supply
called the Ultra-Low ESR Capacitance Bank. Multiple small input
capacitors act as an internal “stiffening capacitor.
Because of the large
of internal capacitance, there may be a sizable spark when connecting
he power and ground lead to the amplifier for the first time.
In order to charge
he capacitor bank without a spark, we suggest you do the following:
1. Connect
volt cable to the amplifier and to the battery.
2. Connect one end of the ground cable to the chassis of the vehicle.
3. We have supplied a 150 ohm, 2 watt resistor with the amplifier. One leg of
the resistor has been connected to the ground terminal of the amplifier.
4. To charge the capacitor bank, touch the loose end of the ground cable to the
open leg of the resistor for at least 45 seconds.
5. Remove the resistor, and connect the ground wire.
CIRCUIT BREAKERS/FUSES
EXTERNAL
Like all audio components, the REFERENCE amplifiers must be fused near the
battery. A fuse or circuit breaker must be located within 18” of the battery. This
will prevent a fire in the event of a shaded cable. See the chart on the next page
to determine the correct fuse value.
(Continued on page 14)
13