Checking for blockages – Shark NH130 User Manual
Page 7
12
TOLL FREE:
1-800-798-7398
13
www.sharkclean.com
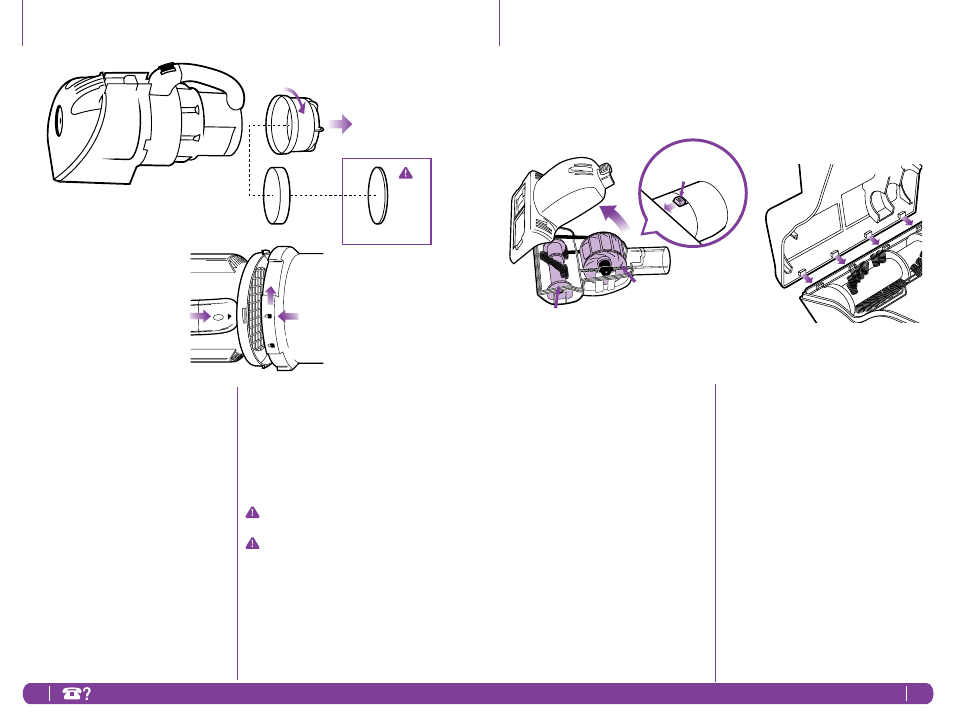
CLEANING THE POST MOTOR FOAM
FILTER
1
Lay the Vacuum down with the
Handle facing up.
2
Twist the Exhaust Filter
Compartment so that the Black
Triangle on the Handle aligns with
the ‘Unlock’ Symbol on the Exhaust
Filter Compartment and remove.
(
fig. a)
3
Pull out Foam Filter.
4
Rinse only the Foam Filter
thoroughly in lukewarm water until
the water runs clear.
5
Squeeze out excess water and let air-
dry for 24 hours before replacing; do
not use hair dryer or other heating
methods to dry.
6
Make sure the filter is completely dry
and insert it back into Exhaust Filter
Compartment.
DO
NOT
RINSE
Exhaust Foam Filter
Felt Filter
a
7
Grip Exhaust Filter Compartment
and align ‘Unlock’ Symbol with Black
Triangle on Handle of the Vacuum.
8
Push Exhaust Filter Compartment
into Vacuum and twist so that the
Black Triangle on the Handle aligns
with the ‘Locked’ Symbol on the
Exhaust Filter Compartment to lock
it into place. (
fig. b)
DO NOT operate the vacuum without
ALL the filters in place.
DO NOT operate the vacuum with
WET filters.
Checking for Blockages
Blockages may cause your vacuum to
overheat and shut down. To prevent
this from happening, check potential
blockage areas after heavy use or if you
detect a loss of suction or poor cleaning
performance.
1
DUST CUP
Dust Cup may be full. Empty Dust
Cup. For instructions on how to
empty the Dust Cup, see p. 10.
2
FILTERS (FOAM AND FELT)
Ensure that both the Pre and Post
Motor Filters are clean. For cleaning
instructions see p.11 & 12.
3
ACCESSORIES
•
Check intake openings:
• 2-in-1 Crevice/Dusting Tool
• Pet Hair Power Brush
• Long Reach Crevice Tool
CLEANING THE PET HAIR POWER
BRUSH
•
Turn the Pet Hair Power Brush
over, slide the locking latch forward
and tilt the cover upward to
remove. (
fig. c)
•
Inspect the rotating bristle brush,
turbine wheel and air passage.
(
fig. d)
•
Remove any blockage or debris
and carefully, without damaging
the bristles or belt, cut any build-up
of hair or string wrapped around the
rotating bristle brush with scissors.
•
To reassemble, first insert the tabs
on the front edge of the cover
into the matching holes in the top
half of the Pet Hair Power Brush and
tilt the cover back down pressing
until it clicks into place. (
fig. e)
b
c
Locking
Latch
Rotating
Bristle
Brush
Turbine
Wheel
e
d