Tuner setting, Cable box and/or dbs receiver control setting, Setting channels automatically — auto channel set – JVC HR-3911U User Manual
Page 7: Setting channels manually — manual channel set
— 7 —
Tuner Setting
Setting channels automatically
— Auto Channel Set
Perform Auto Channel Set only if channels have not been set
correctly by the Plug&Play setting.
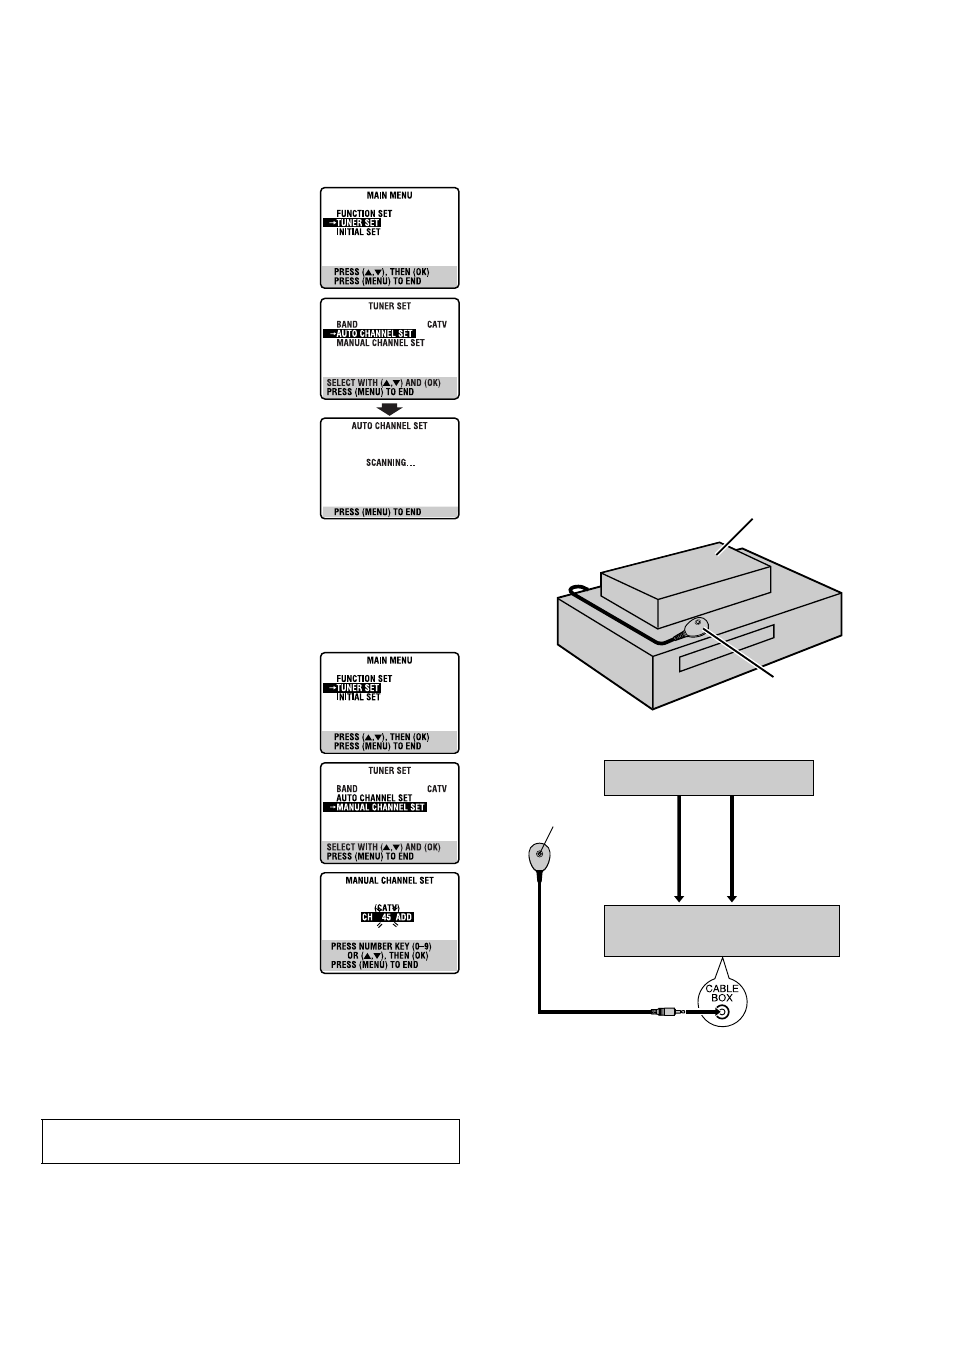
A
Access Main Menu screen, then Tuner
Set screen
Press MENU on the Remote. Press
rt
to
move the highlight bar (arrow) to “TUNER
SET”, then press OK or
e
.
B
Perform Auto Channel Set
Press
rt
to move the highlight bar
(arrow) to “AUTO CHANNEL SET”, then
press OK or
e
. The VCR selects the correct
band (TV or CATV) automatically during
Auto Channel Set.
● When Auto Channel Set is complete,
“SCAN COMPLETED” appears on
screen.
● If the scan was unsuccessful, “SCAN
COMPLETED–NO SIGNAL–” appears on
screen. Check the connections and start
again.
Press MENU to return to normal screen.
Setting channels manually
— Manual Channel Set
You can add the channels you want or delete the channels you do
not want manually.
A
Access Main Menu screen, then Tuner
Set screen
Press MENU on the Remote. Press
rt
to
move the highlight bar (arrow) to “TUNER
SET”, then press OK or
e
.
B
Access Manual Channel Set screen
Press
rt
to move the highlight bar
(arrow) to “MANUAL CHANNEL SET”,
then press OK or
e
.
C
Add or skip desired channels
To add channels
A
Press the Number keys on the Remote
to input a channel number you want to
add.
B
Press OK or
e
to set to “ADD”.
C
Repeat
A to B to add other channels.
Press MENU to return to normal screen.
To skip channels
A
Press
rt
or the Number keys to select a channel number you
want to skip.
B
Press OK or
e
to set to “SKIP”.
C
Repeat
A and B to skip other channels. Press MENU to return
to normal screen.
Cable Box and/or DBS Receiver Control
Setting
The following procedure is required if you receive your TV
channels through a cable box (descrambler) and/or if you receive
satellite channels through DBS (Direct Broadcast Satellite)
receiver. The Controller allows the VCR to automatically switch
the cable box or DBS receiver’s channel during timer recording.
NOTES:
● The Controller is not supplied with this unit. It can be requested
by mailing in the completed JVC Cable Mouse Certificate that is
included with the accessory package.
● For the cable box, the Controller is effective for VCR Plus+ or
Express timer programing.
● For the DBS receiver, the Controller is effective only for Express
timer programing.
● When connecting your cable box or DBS receiver, refer to its
instruction manual.
A
Situate Controller
If both a cable box and a DBS receiver are used, position the
Controller so its signal reaches the remote sensors on both the
cable box and DBS receiver.
B
Attach Controller
Fix securely using the adhesive strip attached on the back of the
Controller.
C
Connect cable box and/or DBS receiver to VCR
● If your cable box or DBS receiver does not have audio/video
output connectors, connect the RF output terminal on the unit to
the ANT. IN terminal on the rear of your VCR.
● If your cable box or DBS receiver has audio/video output
connectors, connect an audio/video cable between the AUDIO/
VIDEO IN connectors on the rear of the VCR and the audio/
video output connectors on the unit.
● If both a cable box and a DBS receiver are used, it is
recommended that you connect the DBS receiver to your VCR’s
AUDIO/VIDEO IN connectors and the cable box to your VCR’s
ANT. IN connector.
After a power failure occurs...
● Band selection will be reset to “CATV”.
Your VCR
Cable box or DBS receiver
Controller
(suggested locations)
Transmitter
Controller
Cable box or DBS receiver
To ANT. IN
To AUDIO/VIDEO IN
RF out
Audio/video output
VCR
CONTINUED ON NEXT PAGE