Controls, connectors and indicators, Introduction – JVC TK-C1480 User Manual
Page 5
E-8
INTRODUCTION
1
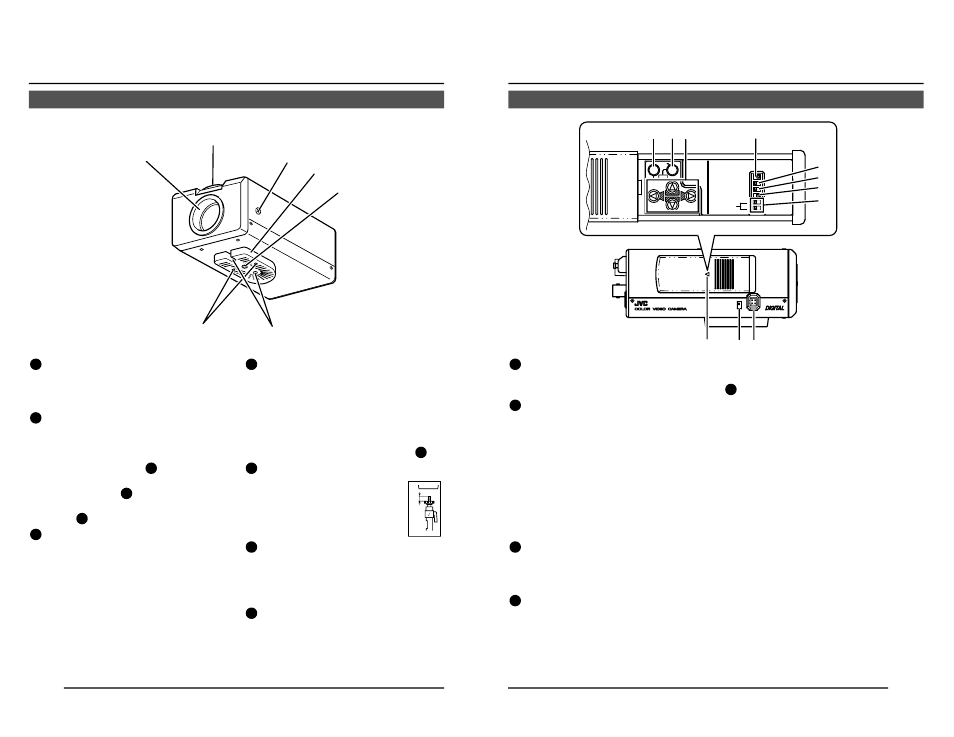
Lens mount
This means to attach the lens.
This is applicable to both the C-mount
lenses and CS-mount lenses.
2
Backfocus adjustment ring
Adjusting the back focus during lens
installation.
When readjustment is required, loosen
the locking screw
3
by turning it
counterclockwise and turn the back focus
adjustment ring
2
.
After the adjustment, tighten the locking
screw
3
again.
3
[BF LOCK] Back focus locking screw
This serves to fix the back focus-adjusting
ring.
4
Camera-mounting bracket
The bracket has been attached on the
bottom of the camera before shipment. It
can also be attached on the top
according to the circumstance.
To re-attach the bracket use the threaded
holes at the top, with the camera
mounting bracket locking screws
7
.
5
Camera-mounting screw hole (1/4
inch)
Use this hole when mounting
the camera onto a fixer, pan/
tilt unit, and the like. (Use a
screw shorter than 7 mm.)
6
Rotation-preventive hole
Make use of this rotation-preventive hole
to prevent any fall when mounting the
camera. Make sure that the camera is
securely mounted.
7
Camera mounting bracket fixing screws
(
×2: M2.6 × 6 mm)
Be sure to use a 6 mm long screw.
1
2
3
4
5
6
7
MAX.
7
mm
Controls, Connectors and Indicators
E-9
ON
SIMPLEX
ON
LL
SET
AWC
MENU
CAMERA
SETUP
EXT TERM-OFF
INT/GL
DUPLEX
RX TERM-OFF
NOT USED
VIDEO
DC
IRIS
#
$
@
!
%
^
&
*
0
9
8
8
Cover
The cover opens if it is pulled to the left
while being pushed.
9
[VIDEO/DC] Iris Selector Switch
This is set according to the type of lens
when an automatic iris control lens is
used.
VIDEO: In case of lens with EE amp built-
in.
DC:
In case of lens without EE amp
built-in.
(
At time of factory shipment
VIDEO: TK-C1480E and TK-C1481EG
DC:
TK-C1480U
)
10
[IRIS] Iris Terminal
This is connected to an automatic iris
control lens.
(
੬ Page 15)
11
[MENU] Menu Button
When the button is pressed, a menu
screen is brought up.
(
੬ Page 23)
12
[SET/AWC] Set. Auto White Control
Button
SET: Press this button to display a sub-
menu.
(
੬ Page 23)
AWC: If this button is kept pressed for
more than 1 second, a one-push-
auto-white-balance function works
and sets the white balance. Once
it is set, even if colour temperature
changes, white balance does not
change. It is also possible to make
fine adjustments on the set white
balance.
(
੬ Page 22)