Ab c a – JVC KD-AV7100 User Manual
Page 4
2
1
2
3
4
5
8
6
7
1
3
A
B
C
A
OE REMOTE
PARKING
AV OUT
SUB WOOFER
CENTER
FRONT
REAR
CAMERA
AV IN
B
iPod
ILLUMI
REVERSE
REMOTE
ACC
MEMORY
GND
P.ANTENNA
FRONT L+
FRONT L–
FRONT R+
FRONT R–
REAR L+
REAR L–
REAR R+
REAR R–
4
ENGLISH
ESPAÑOL
10 A fuse
Fusible de 10 A
Ignition switch
Interruptor de
encendido
Fuse block
Bloque de fusibles
White with black
stripe
Blanco con rayas
negras
White
Blanco
Gray with black stripe
Gris con rayas negras
Gray
Gris
Green with black stripe
Verde con rayas negras
Green
Verde
Purple with black stripe
Púrpura con rayas negras
Purple
Púrpura
Right speaker (front)
Altavoz derecho (delantero)
Left speaker (rear)
Altavoz izquierdo (trasero)
Right speaker (rear)
Altavoz derecho (trasero)
To a live terminal in the fuse block connecting to the car battery
(bypassing the ignition switch) (constant 12 V)
A un terminal activo del bloque de fusibles conectado a la batería
del automóvil (desviando el interruptor de encendido) (12 V
constantes)
To an accessory terminal in the fuse block
A un terminal accesorio del bloque de fusibles
For dimmer function. See page 11 of the INSTRUCTIONS.
Para el atenuador de luminosidad. Consulte la página 11 del MANUAL DE
INSTRUCCIONES.
Black
Negro
Yellow *
4
Amarillo *
4
Red
Rojo
Orange with white stripe
Naranja con rayas blancas
Purple with white stripe
Púrpura con rayas blancas
*
3
Left speaker (front)
Altavoz izquierdo (delantero)
*
2
Not used for this unit
*
3
Not included for this unit
*
4
Before checking the operation of this unit prior to installation, this lead must be connected, otherwise
power cannot be turned on.
To metallic body or chassis of the car
A un cuerpo metálico o chasis del automóvil
*
3
To the reverse lamp lead (see
B
on page 6)
Al conductor de la lámpara de marcha atrás (véase
B
en la página 6)
Blue with white stripe
Azul con rayas blancas
*
2
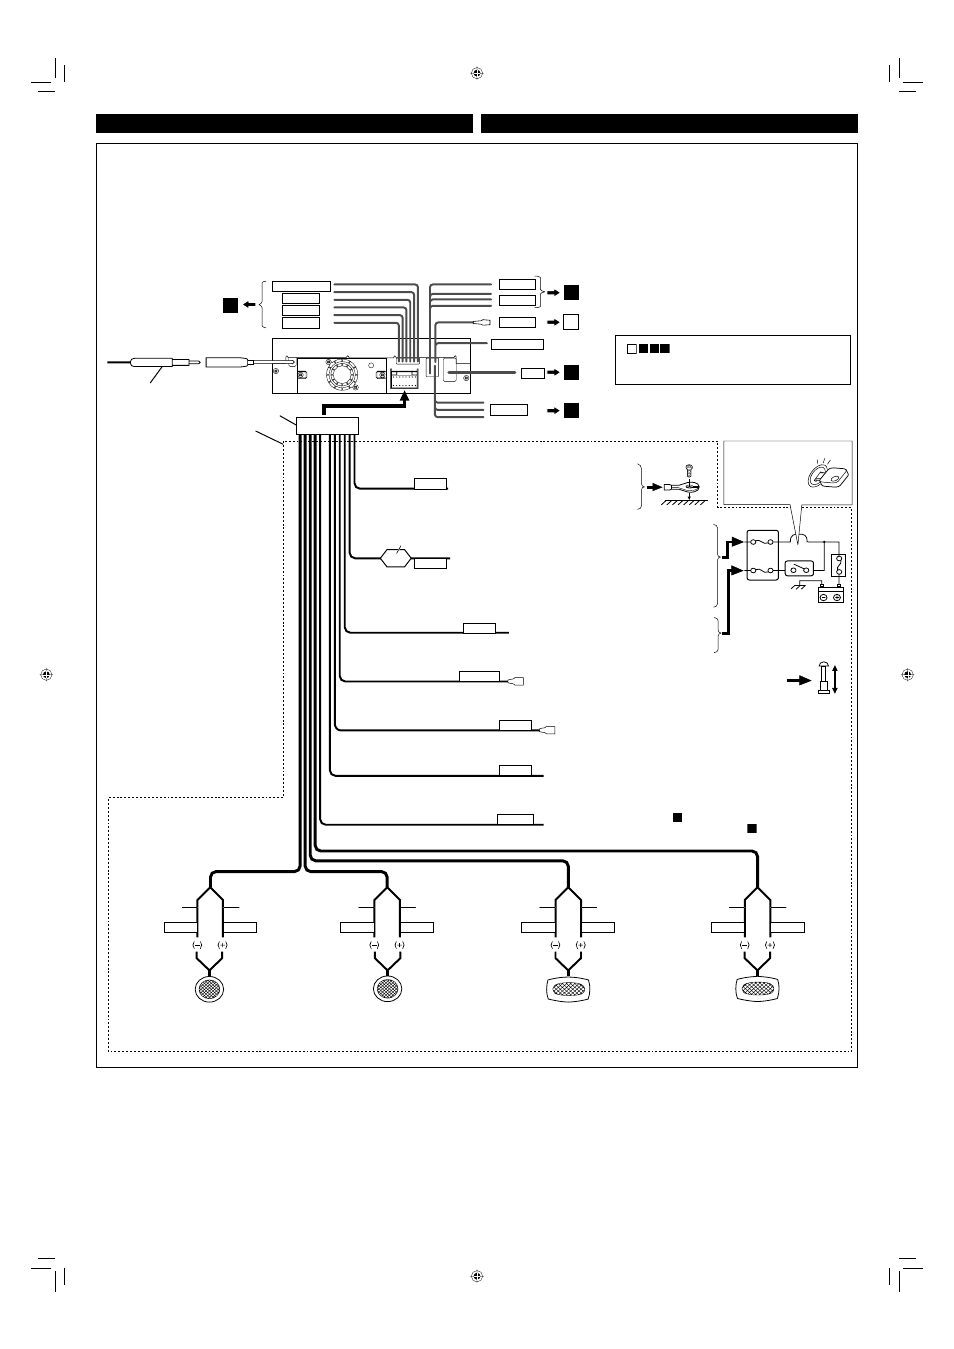
Typical connections
Before connecting: Check the wiring in the vehicle carefully. Incorrect connection may cause serious
damage to this unit.
The leads of the power cord and those of the connector from the car body may be different in color.
1
Connect the colored leads of the power cord in the order specified in the illustration below.
2
Connect the antenna cord.
3
Finally connect the wiring harness to the unit.
Conexiones tipicas
Antes de la conexión: Verifique atentamente el conexionado del vehículo. Una conexión incorrecta
podría producir daños graves en la unidad.
Los cordones del cable de alimentación y los del conector procedentes de la carrocería del automóvil
podrían ser de diferentes en color.
1
Conecte los conductores de color del cable de alimentación en el orden especificado en la ilustración de
abajo.
2
Conecte el cable de antena.
3
Por último, conecte el cable de alimentación a la unidad.
To automatic antenna if any (250 mA max.)
A la antena automática, si hubiere (250 mA máx.)
Blue
Azul
To the remote lead of other equipment (200 mA max.)
Al conductor remoto del otro equipo (200 mA máx.)
*
2
No se utiliza para esta unidad.
*
3
No suministrado con esta unidad
*
4
Antes de comprobar el funcionamiento de esta unidad previa a de la instalación, es necesario conectar
este cable, de lo contrario no se podrá conectar la alimentación.
A
A B C
See each diagram on pages 5 and 6.
Vea cada uno de los diagramas en las páginas 5 y 6.
Install2_AV7100JW.indd 4
Install2_AV7100JW.indd 4
08.6.9 1:06:40 PM
08.6.9 1:06:40 PM