Position title setup, Setting up the camera using rm-p2580 (continued), Select the camera. ( a rm-p2580 a instructions b ) – JVC LWT0254-001B-H User Manual
Page 41: Display the menu screen. ( a pg. 21, steps 2 to 4), Press the set button, Repeat steps 5 to 7 for each title character, Press the menu button
EN
41
Setting Up the Camera Using RM-P2580 (continued)
POSITION TITLE Setup
Use the POSITION TITLE screen to set the title of each
camera position. Each camera position can be given a title of
up to 16 characters.
1
Select the camera. (A RM-P2580
AINSTRUCTIONSB)
CAMERA buttonNNumeric key (Camera Number) NENTER button
●The picture of the selected camera is output.
2
Display the MENU screen. (A pg. 21, steps
2 to 4)
MENU button (3 sec.) N Select
ACAMERA..B using the PAN lever N
SET button.
●The AMENUB screen will be displayed.
3
Tilt the PAN lever up or down to move the cursor (
E) to
APOS. FUNCTION SET..B and press the SET button.
●The APOS. FUNCTION SETB screen is displayed.
4
Ensure that the cursor (
E) is moved onto the item
APOSITION TITLE..B item and press the SET button.
●The APOS.TITLE EDITB screen is displayed.
●The first character appears blinking and input is enabled.
5
Select a preset position. (A RM-P2580
AINSTRUCTIONSB)
POSITION buttonNNumeric key (position number)NENTER button
●The picture of the selected camera position is output.
●The next position can be selected simply by pressing the + button.
6
Use the PAN lever to select the first character of the title
from the character area.
●The selected character will appear blinking.
7
Press the SET button.
●The first character of the title is now confirmed, and the system gets
ready for the input of the second character is possible.
●If the WIDE button is pressed, the title input field moves to the left. Use
this to correct previously input characters.
8
Repeat steps
5 to 7 for each title character.
●When the next position is selected, the previous position tile is stored in
the memory.
●Complete the input of all position titles in the same way.
9
Press the MENU button.
●The screen returns to the previous menu.
MEMO
● Only displayed for the TK-C625E model.
SETUP
MENU
SET
SPEED
IRIS
AF
FOCUS
ZOOM
OPEN
FAR
TELE
CLEAR
/HOME
7
4
1
8
0
5
2
9
6
3
ENTER
AUTO
PAN
OPTION
1
OPTION
2
CAMERA
POSI-
TION
AUTO
PATROL
CLOSE
NEAR
WIDE
AUTO
F-1
F-2
F-3
PAN/TILT
LENS
CAMERA/POSITION
CAMERA
POSITION
REMOTE CONTROL UNIT
RM-P2580
ALARM
POWER
KEY LOCK
TELE
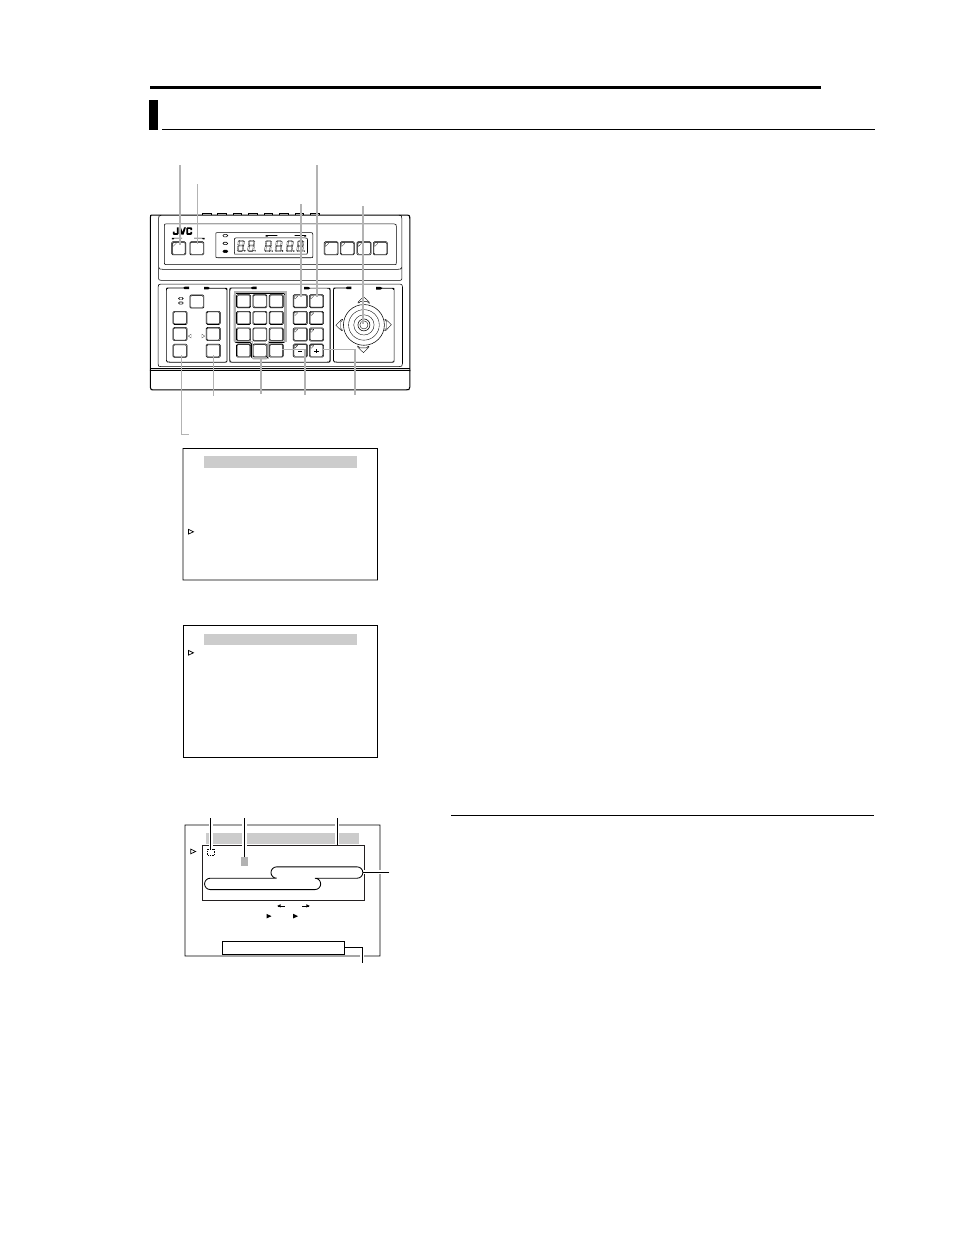
button
MENU button
CAMERA button
SET button
PAN lever
WIDE button
ENTER
button
POSITION button
Numeric
keys
+ button
MENU
CAM.FUNCTION1..
CAM.FUNCTION2..
CAM.TITLE/ALARM..
CAM.ALC/VIDEO..
AUTO PAN/PATROL/TRACE..
POS.FUNCTION SET..
FACTORY SETTINGS..
<
MENU
>
EXIT
<
SET
>
SUB MENU
MENU Screen
POS. FUNCTION SET
HOME
POSITION TITLE..
IRIS MODE
AUTO
AVERAGE : PEAK
8 : 2
BLC MODE
OFF
W . BALANCE
ATW
R GAIN
- - -
B GAIN
- - -
<
MENU
>
RETURN
<
SET
>
SUB MENU
POS. FUNCTION SET Screen
<
MENU
>
RETURN
<
SET
>
CHAR .SET
POS. TITLE EDIT
POS.
∗ ∗
0123456789ABCDEFGHIJKLMNO
PQRSTUVWXYZabcdefghijklmno
p q r s t u v w x y z ДЦЬКОФЫЗСдлпць
вк о ф ы б й н у ъ а и м т щ з с Я ¡ ¿ . , ’ - : /
( ) < >
CLR CANCEL [
]
[
]
INS DEL
W
T
[
]
POS.TITLE EDIT Screen Title input
field
Space
Blinking
Character area
A MENO