Installing the camlock, Reassembling the quad cane – Invacare 1048085 User Manual
Page 2
Quad Cane Camlock Replacement Kit
2
Part No 1055947
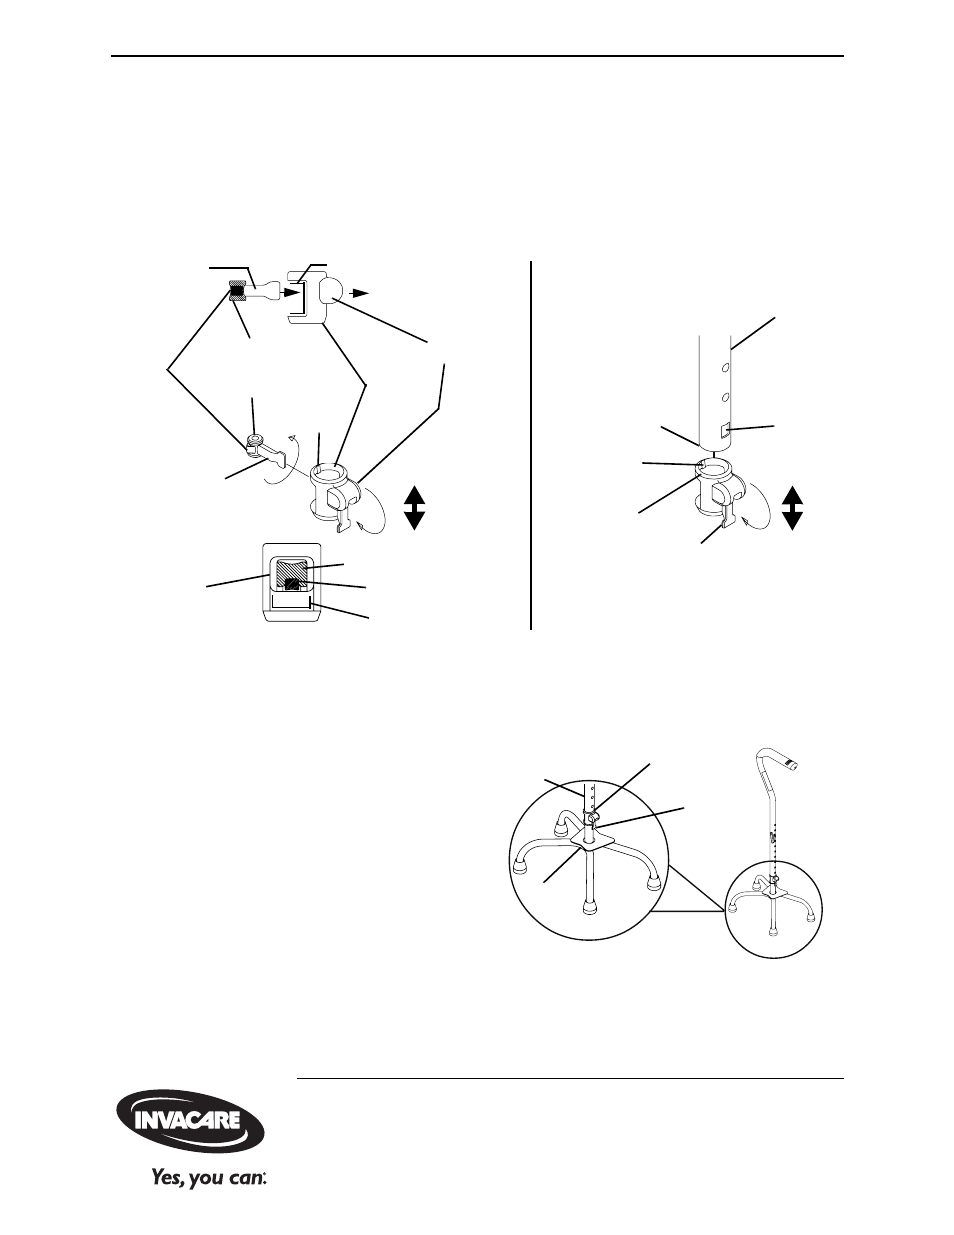
Installing the Camlock
NOTE: For this procedure, refer to Detail “B” of FIGURE 1.
1. Remove old camlock assembly from upper cane handle.
2. Slide camlock assembly onto bottom of upper cane handle ensuring small tab on top
front of camlock housing snaps into small notch on the bottom front of cane handle.
3. Operate cam lever up and down to ensure it opens and closes properly.
FIGURE 1 Assembling the Camlock
Reassembling the Quad Cane
NOTE: For this procedure, refer to FIGURE 2.
1. Raise cam lever before installing upper
cane handle onto base.
2. Re‐install cane handle with new
camlock assembly onto cane base.
3. Push cam lever down.
NOTE: This will engage the large tab on
bottom rear of cam lever into large notch on rear
of cane handle.
4. Test cane to ensure that cane and
camlock assembly are properly
secured, i.e., no rattle or looseness of
the cane base and upper cane handle.
FIGURE 2 Reassembling the Quad Cane
Cut out
Large
Tab
Cam
Lock
Housing
Cam Handle
Cam
Lever
(Rear)
Small
Tab
Recess
Cam Handle
Cam Lock
Housing
Cut out
Rear of Cam Handle
LOCK
UNLOCK
Large Tab
Small Notch on front
of Cane Handle.
(Not Shown).
Rear
Front
Upper Cane
Handle
Small Tab
NOTE: Raise Cam Lever before
installing Camlock Assembly
Large
Notch
Camlock
Assembly
LOCK
UNLOCK
Cam Lever
DETAIL “B” -
INSTALLING
CAMLOCK
DETAIL “A” -
ASSEMBLING
CAMLOCK
Camlock Assembly
Upper Cane
Handle
Base
NOTE: Push Cam Lever down after
re‐installing upper cane handle to base.
Cam
Lever
Invacare Corporation
www.invacare.com
USA
One Invacare Way
Elyria, Ohio USA
44036-2125
800-333-6900
Canada
570 Matheson Blvd E Unit 8
Mississauga Ontario
L4Z 4G4 Canada
800-668-5324
Invacare, Yes, you can. and the Medallion
Design are registered trademarks of
Invacare Corporation.
©2006 Invacare Corporation
Part No 1055947
Rev B - 10/12/06