Network settings, Setting projector name, Network password settings – MITSUBISHI ELECTRIC XD250U-ST User Manual
Page 27: Ip settings
EN-27
E
N
G
L
IS
H
Network settings
You can set the network of the projector using the menu.
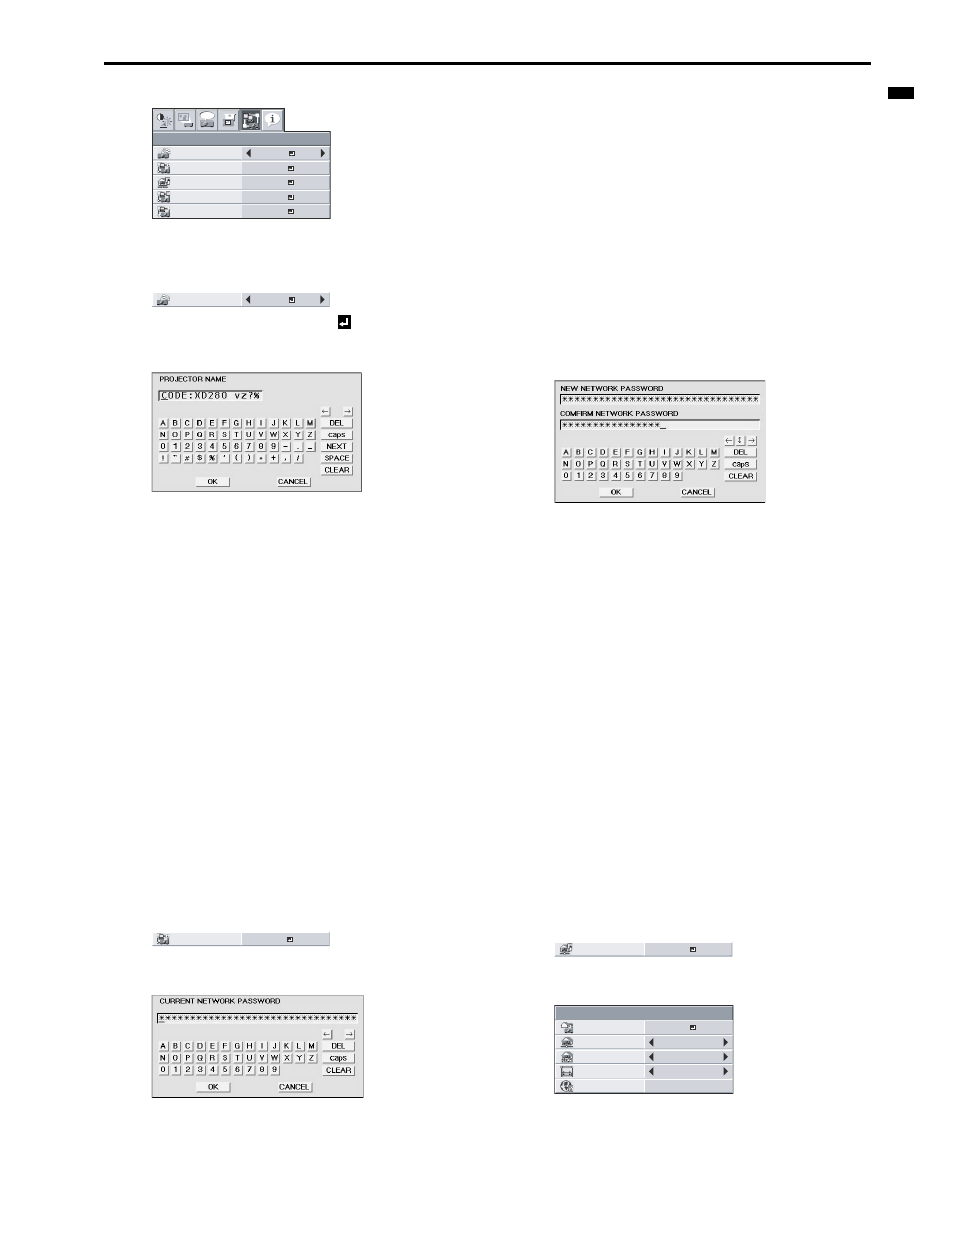
Setting Projector Name
1.
Display the NETWORK menu. (See page 27 for menu setting.)
2.
Press the S or T button to select PROJECTOR NAME.
3.
Press the W or X button to select SET
.
4.
Press the ENTER button.
•
PROJECTOR NAME screen appears.
5.
Press the direction buttons to move the key cursor, select the
characters or marks to enter, and press the ENTER button.
•
Projector Name can be set using up to 15 characters includ-
ing alphabets (capital/small), numeric characters, or marks.
m
key:
Shifting the position of enter cursor to the
left for each character.
o
key:
Shifting the position of enter cursor to the
right for each character.
DEL key:
Deleting the character in the position of
enter cursor for each character.
caps/CAPS key: Switching an alphabet character to CAPI-
TAL or small.
NEXT/PREV key:Switching the marks listed on the fourth
line.
SPACE key:
Inserting a space in the position of enter
cursor.
CLEAR key:
Deleting all the entered characters.
6.
When selecting OK, the setting is completed as the name
stored. However, when selecting CANCEL, the setting is com-
pleted without storing.
•
The display returns the NETWORK menu after selecting OK
or CANCEL.
•
It may take some time to reflect the settings.
Network Password Settings
1.
Display the NETWORK menu. (See page 27 for menu setting.)
2.
Press the S or T button to select NETWORK PASSWORD.
3.
Press the ENTER button.
•
CURRENT NETWORK PASSWORD screen appears.
4.
Press the direction buttons to move the key cursor, select the
characters or marks to enter, and press the ENTER button.
•
Password can be set using up to 32 characters including
alphabets (capital/small) or numeric characters.
m
key:
Shifting the position of enter cursor to the
left for each character.
o
key:
Shifting the position of enter cursor to the
right for each character.
DEL key:
Deleting the character in the position of
enter cursor for each character.
caps/CAPS key: Switching an alphabet character to CAPI-
TAL or small.
CLEAR key:
Deleting all the entered characters.
•
The default password is "admin".
5.
Select OK, and NEW NETWORK PASSWORD screen appears
if the entered password is correct.
•
If the entered password is not correct, CURRENT NET-
WORK PASSWORD screen appears again.
6.
Enter the NEW NETWORK PASSWORD and CONFIRM NET-
WORK PASSWORD.
•
Password can be set using up to 32 characters including
alphabets (capital/small) or numeric characters.
m
key:
Shifting the position of enter cursor to the
left for each character.
o
key:
Shifting the position of enter cursor to the
right for each character.
key:
Shifting the position of enter cursor
between NEW NETWORK PASSWORD
and CONFIRM NETWORK PASSWORD.
DEL key:
Deleting the character in the position of
enter cursor for each character.
caps/CAPS key: Switching an alphabet character to CAPI-
TAL or small.
CLEAR key:
Deleting all the entered characters.
7.
When NEW NETWORK PASSWORD and CONFIRM NET-
WORK PASSWORD are matched, the setting is completed after
changing the NETWORK PASSWORD.
•
If the entered content is not matched, NEW NETWORK
PASSWORD screen appears again after an error dialog is
displayed.
•
It may take some time to reflect the settings.
IP Settings
1.
Display the NETWORK menu. (See page 27 for menu setting.)
2.
Press the S or T button to select IP CONFIG.
3.
Press the ENTER button.
•
IP CONFIG menu appears.
opt.
NETWORK
PROJECTOR
NAME
NETWORK
PASSWORD
PJLink
CERTIFICATION
OK
SET
NETWORK RESET
OK
IP CONFIG
OK
ON
PROJECTOR
NAME
SET
NETWORK
PASSWORD
OK
l
IP CONFIG
OK
IP CONFIG
DHCP
IP ADDRESS
DEFAULT
GATEWAY
MAC ADDRESS
SUBNET MASK
xx-xx-xx-xx-xx-xx
192.168.0.10
255.255.255.0
10.132.1.1
ON