Digital x bus, X.200 – MACKIE X.200 User Manual
Page 10
10
X.200
Digital X Bus
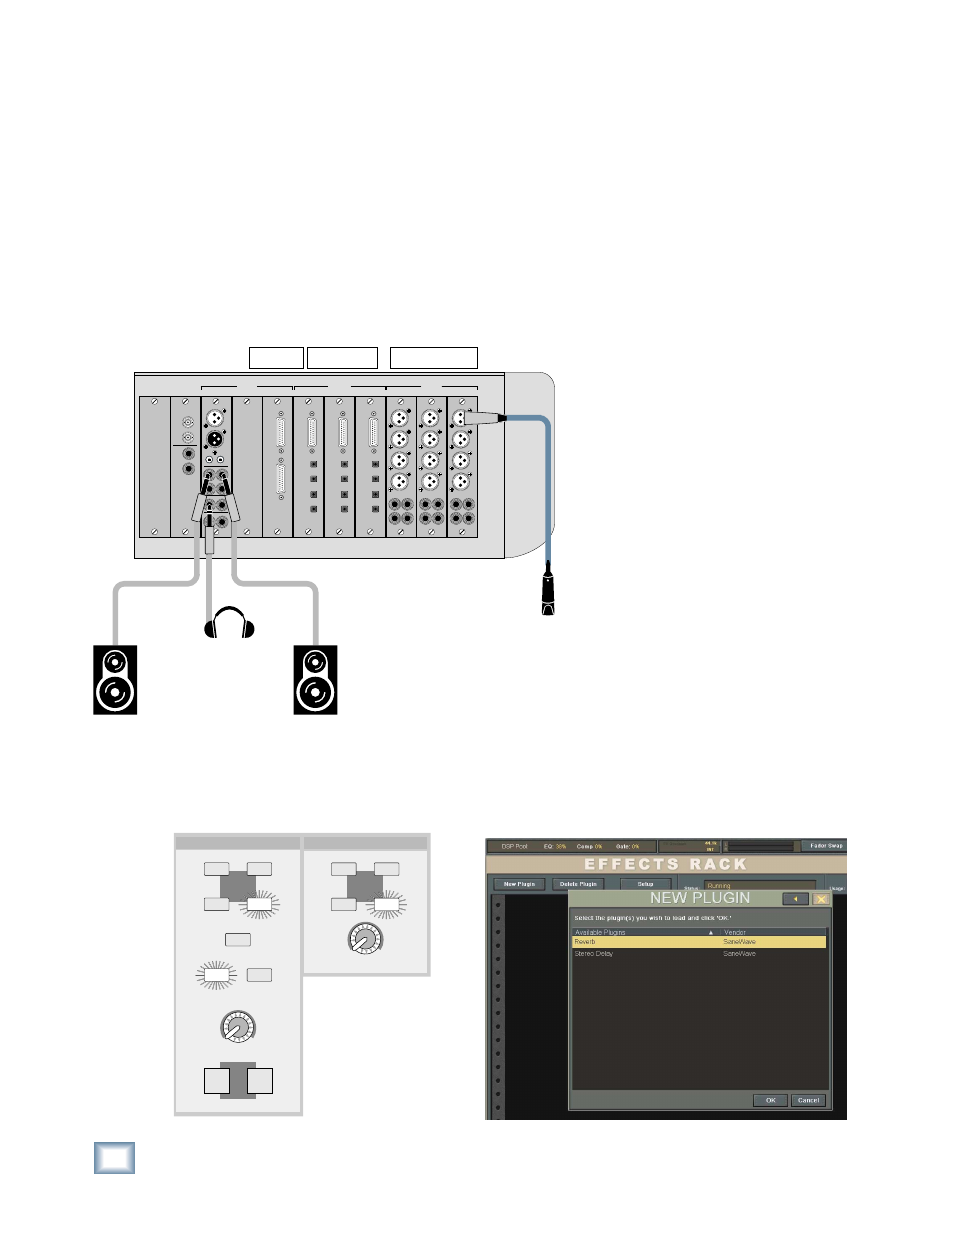
9. Connect the Left and Right Speaker Outs (A)
from the Mix Out card to the inputs of your ste-
reo power amplifi er (or powered monitor speak-
ers). These outputs are balanced when using a
TRS (tip-ring-sleeve) connector, or unbalanced
when using a TS (tip-sleeve) connector. Use
instrument/line-level cable for this connection. If
using a stereo power amplifi er/speaker combo,
connect the amplifi er outputs to the monitor
speakers using appropriate speaker cable.
10. If you don’t have an amplifi er and speakers
handy, you can connect a pair of headphones to
the Phones 1 output on the Mix Out Card.
12. If you are using headphones instead of speak-
ers, turn the Phones 1 level control all the way
down in the PHONES 1 section on the right side
of the console. Make sure L-R is selected as
the source in the CONTROL ROOM section, and
C/R is selected as the source in the PHONES 1
section.
13. Press the MSTRS button in the Banks section
of the console. Set the Mix L and Mix R faders
to unity (U). These two faders are stereo-linked
by default.
14. Set channel 1 fader to unity (U).
15. Set the Master fader to unity (U).
16. Turn on the power amplifi er (or
powered monitor speakers). Set the
level controls on the power amplifi er
to the manufacturers recommended
setting.
17. Talk or sing into the microphone
while slowly turning up the level
control in the CONTROL ROOM sec-
tion. You should hear sound in the
speakers and see the L/R meters at
the top of the touchscreen display
levels.
18. If you are using headphones,
turn the level control in the CON-
TROL ROOM section up about
halfway, then SLOWLY turn up the
level control in the PHONES 1 sec-
tion. You should hear sound in the
headphones.
To patch an effect into the signal path:
19. Open the Effects Rack (Windows > Effects Rack).
20. Click the New Plugin button and select Reverb
in the NEW PLUGIN window, then click OK.
WORD
CLOCK
SYNC CARD
IN
OUT
IN
OUT
SMPTE
A
B
MIX OUT CARD
SPDIF
SPEAKERS
PHONES
MIX OUT
IN
OUT
IN
L
R
1
2
L
R
L
R
OUT
AES/EBU
DIGITAL CARD
OPTICAL
TDIF
I/O
IN A
IN B
OUT A
OUT B
DIGITAL CARD
OPTICAL
TDIF
I/O
IN A
IN B
OUT A
OUT B
DIGITAL CARD
OPTICAL
TDIF
I/O
IN A
IN B
OUT A
OUT B
MIC/LINE 4 CARD
5
7
6
8
1
2
3
4
MIC/LINE 4 CARD
5
7
6
8
1
2
3
4
MIC/LINE 4 CARD
5
7
6
8
1
2
3
4
OUT
LINE CARD
IN
SYNC
C • SLOTS
D • SLOT
B • SLOTS
A • SLOTS
THREE
MIC/LINE 4 CARDS
THREE
DIGITAL CARDS
ONE
LINE CARD
Powered
Studio Monitors
for Control Room
Headphones
11. In the CONTROL ROOM section on the right
side of the console, turn the level control all the
way down (counterclockwise), and select L-R
for the source and NEAR (Speaker Out A) for
the output.
CONTROL ROOM
DIM
SETUP
1
2
SUR
MONO
MAIN
PHONES 1
1
2
SETUP
NEAR
L - R
C/R