Power connection, Fuse, Voltage selector – MACKIE 1202-VLZ3 User Manual
Page 12: Power switch, Phantom switch, 10-vlz3
1
10-VLZ3
1202-
VLZ3
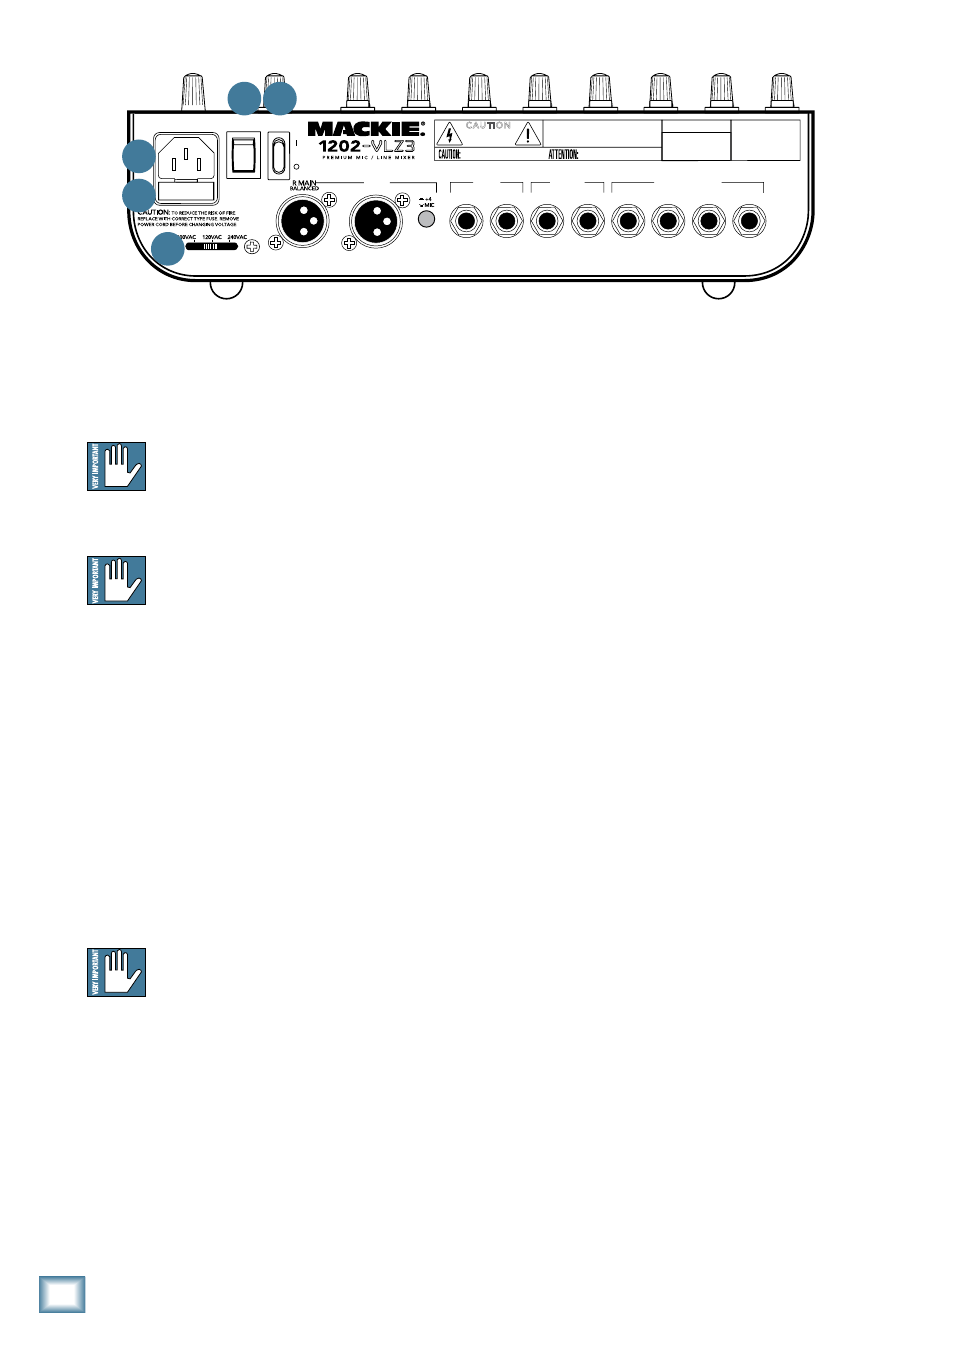
18. POWER CONNECTION
Just in case you lose the cord provided with the 1202-
VLZ3, its power jack accepts a standard 3-prong IEC
cord like those found on most professional recorders,
musical instruments, and computers.
WARNING: Before you plug the AC power cord
into the 1202-VLZ3, you must make sure that
the VOLTAGE SELECTOR [20] slide switch is
set to the same voltage as your local AC mains
supply.
WARNING: Disconnecting the plug’s ground
pin can be dangerous. Please don’t do it.
19. FUSE
The 1202-VLZ3 is fused for your (and its own) protec-
tion. If you suspect a blown fuse, disconnect the AC
mains power cord, pull the fuse drawer out (located
just below the cord receptacle) and replace the fuse
with a 500 mA (0.5 amps) SLO BLO 5x20mm, available
at electronics stores or your dealer. Use a 250 mA fuse if
your local voltage is 220-240 VAC.
If two fuses blow in a row, something is very wrong.
Please call our toll-free number 1-800-898-3211 from
within the U.S. (or the distributor in your country) and
find out what to do.
20. VOLTAGE SELECTOR
WARNING: Before you plug the AC power
cord into the 1202-VLZ3, you must make sure
that this slide switch is set to the same volt-
age as your local AC main supply. Only slide the voltage
switch with the power cord unplugged.
Use a flat headed screwdriver to slide the switch if
needed. The switch allows you to use the mixer in differ-
ent countries and voltages, meet interesting people from
other cultures, and entertain them with your unique
blend of Rockabilly Funkadelia Thrash Metal.
21. POWER SWITCH
Press the top of this rocker switch inwards to turn on
the mixer. The power LED on the top surface of the mix-
er will glow with happiness, or at least it will if you have
the mixer plugged in to a suitable live AC mains supply.
Press the bottom of this switch to put the mixer into
standby mode. It will not function, but the circuits are still
live. To remove AC power, either turn off the AC mains sup-
ply, or unplug the power cord from the mixer and the AC
mains supply.
As a general guide, you should turn on your mixer
first, before the power amplifier or powered speakers,
and turn it off last. This will reduce the possibilities of
any turn-on, or turn-off thumps in your speakers.
22. PHANTOM SWITCH
This global rocker switch controls the phantom power
supply for condenser microphones plugged into channel
MIC [1] inputs (see page 8).
Press the top of the switch inwards to engage phan-
tom power to the four MIC inputs. Press the bottom of
the switch to turn it off.
When turned on (or off), the phantom power circuitry
takes a few moments for voltage to ramp up (or down).
This is perfectly normal. Just like me. Oh, and my imagi-
nary friend Lazlo who helps me write all the manuals.
Say hello to the nice folks Lazlo.
POWER
ON
PHANTOM
ON
L MAIN
MAIN
OUTPUT
LEVEL
4
3
R/4
L/3
CHANNEL INSERT
BAL/UNBAL
BALANCED
BAL/UNBAL
ALT
OUTPUT
R
L
CONTROL
ROOM
SERIAL NUMBER
MANUFACTURING DATE
RISK OF ELECTRIC SHOCK
DO NOT OPEN
REPLACE WITH THE SAME TYPE FUSE AND RATING.
DISCONNECT SUPPLY CORD BEFORE CHANGING FUSE
UTILISE UN FUSIBLE DE RECHANGE DE MÊME TYPE.
DEBRANCHER AVANT DE REMPLACER LE FUSIBLE
WARNING:
TO REDUCE THE RISK OF FIRE OR ELECTRIC SHOCK, DO NOT
EXPOSE THIS EQUIPMENT TO RAIN OR MOISTURE. DO NOT REMOVE COVER.
NO USER SERVICEABLE PARTS INSIDE. REFER SERVICING TO QUALIFIED PERSONNEL.
CAUTION
AVIS:
RISQUE DE CHOC ELECTRIQUE — NE PAS OUVRIR
2
1
( PRE-FADER / PRE EQ TIP SEND / RING RETURN )
XDR
TM
EXTENDED DYNAMIC RANGE MIC PREAMPLIFIERS ARE PROPRIETARY TO MACKIE DESIGNS, INC.
-10
dBV
GAIN
+15dB -45dB
M
IC GAIN
0
U
60
LINE IN 1
MIC
1
LOW CUT
75 Hz
18dB/OCT
LOW CUT
75 Hz
18dB/OCT
LOW CUT
75 Hz
18dB/OCT
LOW CUT
75 Hz
18dB/OCT
BAL
OR
UNBAL
LINE IN 2
MIC
2
BAL
OR
UNBAL
LINE IN 3
MIC
3
BAL
OR
UNBAL
LINE IN 4
MIC
4
BAL
OR
UNBAL
AUX SEND
1
2
1
2
R
R
L
L /
MONO
ALL BAL/UNBAL
TAPE
INPUT
TAPE
OUTPUT
L
R
L
R
L
R
MAIN OUT
BAL/UNBAL
L
MONO
MONO
MONO
MONO
LINE IN 5–6
R
LINE IN 7–8
LINE IN 9–10
LINE IN 11–12
BAL
OR
UNBAL
L
R
BAL
OR
UNBAL
L
R
BAL
OR
UNBAL
L
R
BAL
OR
UNBAL
XDR
MIC PRE
XDR
MIC PRE
XDR
MIC PRE
XDR
MIC PRE
GAIN
+15dB -45dB
M
IC GAIN
0
U
60
-10
dBV
GAIN
+15dB-45dB
M
IC GAIN
0
U
60
-10
dBV
GAIN
+15dB -45dB
M
IC GAIN
0
U
60
-10
dBV
O
O
+15
O
O
+15
AUX
+15
-15
+15
-15
+15
-15
HI
12kHz
MID
2.5kHz
LOW
80Hz
HI
12kHz
MID
2.5kHz
LOW
80Hz
HI
12kHz
MID
2.5kHz
LOW
80Hz
HI
12kHz
MID
2.5kHz
LOW
80Hz
HI
12kHz
MID
2.5kHz
LOW
80Hz
HI
12kHz
MID
2.5kHz
LOW
80Hz
HI
12kHz
MID
2.5kHz
LOW
80Hz
HI
12kHz
MID
2.5kHz
LOW
80Hz
EQ
L R
1
MUTE
PAN
AUX
EQ
PAN
AUX
EQ
PAN
AUX
EQ
PAN
AUX
EQ
PAN
AUX
EQ
PAN
AUX
EQ
PAN
AUX
EQ
PAN
ALT 3–4
MUTE
ALT 3–4
MUTE
ALT 3–4
MUTE
ALT 3–4
MUTE
ALT 3–4
MUTE
ALT 3–4
MUTE
ALT 3–4
MUTE
ALT 3–4
PRE FADER
SOLO
LEVEL
2
PRE FADER
SOLO
LEVEL
3
PRE FADER
SOLO
LEVEL
4
PRE FADER
SOLO
LEVEL
5/6
PRE FADER
SOLO
LEVEL
7/8
PRE FADER
SOLO
LEVEL
9/10
PRE FADER
SOLO
LEVEL
11/12
PRE FADER
SOLO
LEVEL
POWER
RUDE
SOLO
LIGHT
LEVEL
SET
CONTROL
ROOM
SOURCE
ALT 3–4
TAPE
MAIN MIX
CLIP
LEFT RIGHT
0dB=0dBu
ASSIGN
TO MAIN MIX
MAIN MIX
/SUBMIX
CTL ROOM
+12dB
O
O
U
+12dB
O
O
U
+12dB
O
O
U
+12dB
O
O
U
+12dB
O
O
U
+12dB
O
O
U
+12dB
O
O
U
+12dB
O
O
U
MAX
O
O
U
+12dB
O
O
U
U
U
O
O
+15
O
O
+15
U
U
O
O
+15
O
O
+15
U
U
O
O
+15
O
O
+15
U
U
U
U
U
+15
-15
+15
-15
+15
-15
L R
U
U
U
+15
-15
+15
-15
+15
-15
L R
U
U
U
+15
-15
+15
-15
+15
-15
L R
U
U
U
+15
-15
+15
-15
+15
-15
L R
U
U
U
+15
-15
+15
-15
+15
-15
L R
U
U
U
+15
-15
+15
-15
+15
-15
L R
U
U
U
+15
-15
+15
-15
+15
-15
L R
U
U
U
O
O
+15
O
O
+15
U
U
O
O
+15
O
O
+15
U
U
O
O
+15
O
O
+15
U
U
O
O
+15
O
O
+15
U
U
20
10
7
4
2
0
2
4
7
10
20
30
18
19
21 22
20