7. checking and replacing alternator belt, Section 8-7 – Miller Electric OM-494 User Manual
Page 42
OM-494 Page 38
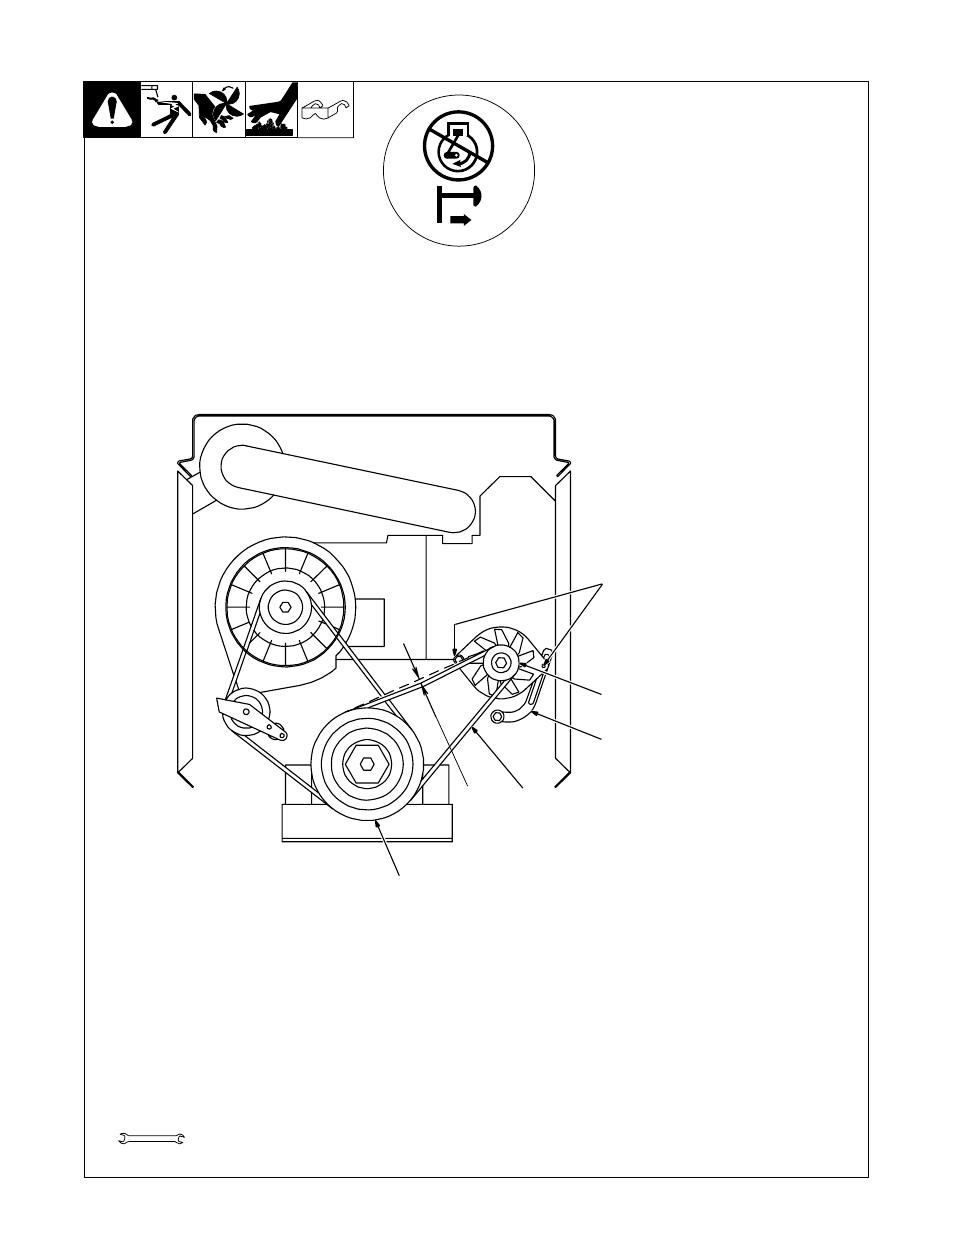
8-7. Checking And Replacing Alternator Belt
158 632 / Ref. 190 377
Y Stop engine.
To check belt tension:
Remove rear panel.
1
Alternator V-Belt
2
Crank Pulley
3
Alternator Pulley
Place straight edge along top of pul-
leys. Pull down belt as far as it will
go, then measure distance from
belt to straight edge.
If measurement is less than 1/2 in
(13 mm), belt is okay. If not okay,
adjust belt tension.
To adjust belt tension:
4
Hex Nuts (2)
5
Alternator Bracket
Loosen nuts. Pivot alternator until
belt is tight. Tighten nuts. Recheck
tightness of belt. Readjust if
necessary.
Replace belt if damaged or
cracked.
To replace belt:
Loosen hex nuts and pivot alterna-
tor clockwise. Remove belt.
Install new belt, pivot alternator until
belt is tight, and tighten nuts. Re-
check tightness of belt after running
engine 15 minutes.
Reinstall rear panel.
1
1/2, 11/16 in
1/2 in
(13 mm)
Max
4
3
5
2
Tools Needed:
- OM-2241 (32 pages)
- ICE-27C (36 pages)
- Arc Welding Power Source (4 pages)
- INVISION 456 CC (44 pages)
- Welder (132 pages)
- SS-75D12 (44 pages)
- Load Bank LBP-350 (2 pages)
- OM-193 084E (36 pages)
- 750MPa (2 pages)
- APT-1000 (20 pages)
- OM-220 390F (48 pages)
- 271 (48 pages)
- Welding (32 pages)
- DC (72 pages)
- OM-129 (70 pages)
- XLi (24 pages)
- S-64 (36 pages)
- ICE-27T (36 pages)
- PipePro 304 (76 pages)
- AA40GBU (28 pages)
- D-64 (40 pages)
- Auto Arc XLT 165 (48 pages)
- 185 DX (56 pages)
- S-32S (4 pages)
- Big 40 DC/TIG 55500 A (8 pages)
- Big Blue 600D (60 pages)
- Millermatic 140 (60 pages)
- pmn (36 pages)
- LMSW Series (2 pages)
- 1250 (46 pages)
- Trailblazer Pro 350 D (8 pages)
- TS (76 pages)
- S-22P12 (28 pages)
- 602 (40 pages)
- Axcess 300 (56 pages)
- MOG-400 (40 pages)
- WC-24 (20 pages)
- Big Blue 502P (64 pages)
- Dimension 1000 (44 pages)
- DS-74DX12 (52 pages)
- 350 VS (36 pages)
- 24A (32 pages)
- GA-16C (12 pages)
- Big Blue 502D (116 pages)
- OM-229 038D (36 pages)