En g lis h, 6 installation of 5.25” front device bay, 7 installation of 3.5” front device bay – GIGABYTE 230 User Manual
Page 12: 8 installation of 3.5” internal device bay
12
En
g
lis
h
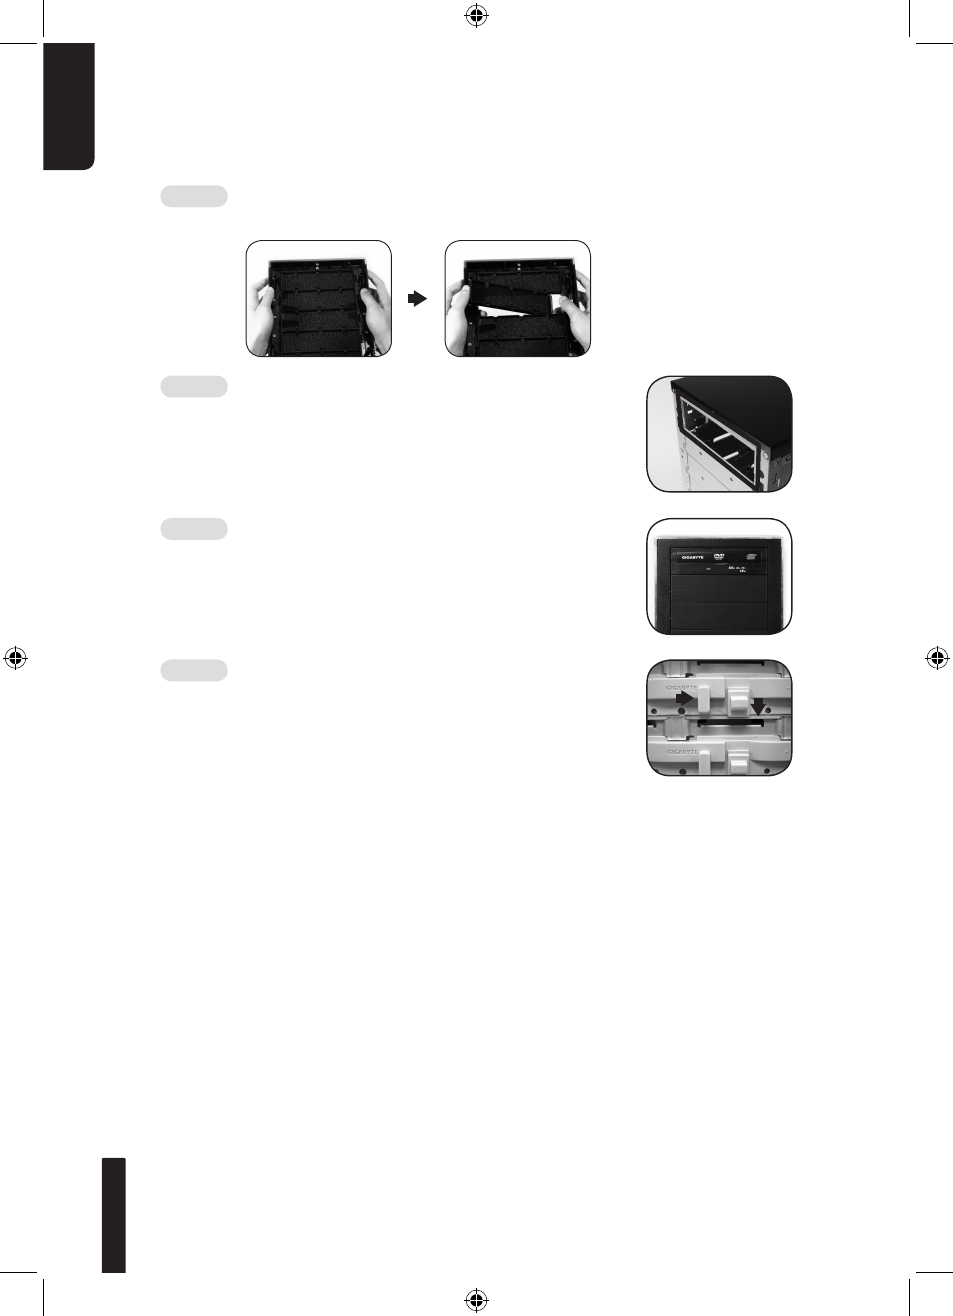
4-6 Installation of 5.25” Front Device Bay
4-6.1 Detach the front panel (see step 1-3.2 on page 5) and remove
the mesh drive rail from the front panel.
4-6.2 Remove the front EMI plate and attach the
front panel onto the chassis.
4-6.3 Slide the 5.25” device into the drive bay
from the front of the chassis.
4-6.4 Secure the 5.25” device with the internal
latch. Refer to the figure for installation
procedure.
4-7 Installation of 3.5” Front Device Bay
Installation of 3.5” front device is the same as 5.25” front devices,
please refer to step 4-6.
4-8 Installation of 3.5” Internal Device Bay
The iSolo 230 provides built-in bays to accommodate up to 3 hard
disc drives. The internal device bays require securing runners,
which can be found in the accessory box.
Required tools: Securing runners (2 per hard disc drive)
Lock
- GA-8I915GM (80 pages)
- AGP 4X(1.5V) (112 pages)
- GA-M68MT-D3P (40 pages)
- Xeon Processor Motherboard GA-5YXS1-RH (54 pages)
- GA-MA770T-UD3P (100 pages)
- GA-K8VM800M (96 pages)
- GN-AP101B (39 pages)
- GA-P31-ES3G (84 pages)
- GA-K8NS ULTRA-939 (96 pages)
- GA-8I865GME-775-RH (64 pages)
- GA-EP45-UD3L (112 pages)
- GA-8I915MD-GV (80 pages)
- GA-8S661FXM-775 (88 pages)
- GN-B41G (84 pages)
- LGA775 Socket Motherboard for Intel GA-73PVM-S2H (100 pages)
- GA-965GM-S2 (88 pages)
- GeForceTM 6600 Graphics Accelerator GV-N66128DP (34 pages)
- GN-FE605(M) (62 pages)
- GN-FE605(M) (38 pages)
- 4635 (26 pages)
- GA-8VM800M-775 (88 pages)
- AMD Socket 939 Processor Motherboard GA-K8N51PVM9-RH (96 pages)
- GA-8ANXP-D (88 pages)
- 5230 (97 pages)
- 7VM333M-RZ (36 pages)
- AMD Socket 754 Processor Motherboard GA-K8NE-RH (80 pages)
- Pentium 4/D Processor Motherboard GA-5EASV-RH (88 pages)
- GN-WPKG (26 pages)
- Intel Pentium 4 Processor Motherboard GA-8VM800M (80 pages)
- 8S648FXP-RZ (40 pages)
- AirCruiser G GN-WB01GS (26 pages)
- PHASER 4500 (128 pages)
- GV-R487D5-1GD (34 pages)
- GA-8IP775 Series (80 pages)
- GN-A11G (57 pages)
- GA-K8VT800 (80 pages)
- GA-8I945PLGE-RH (80 pages)
- SmartSetup 3 (4 pages)
- GA-K8U-939 (88 pages)
- GA-K8NE (80 pages)
- GA-M61PME-S2P (88 pages)
- 7VM400M-RZ (36 pages)
- GA-K8NF-9 (88 pages)
- Pentium II / III Processors 6ZMM (23 pages)