Timer recording, Timer program setting, Timer recordings – GoVideo DV1030 User Manual
Page 14
25
VCR
OPERA
TION
24
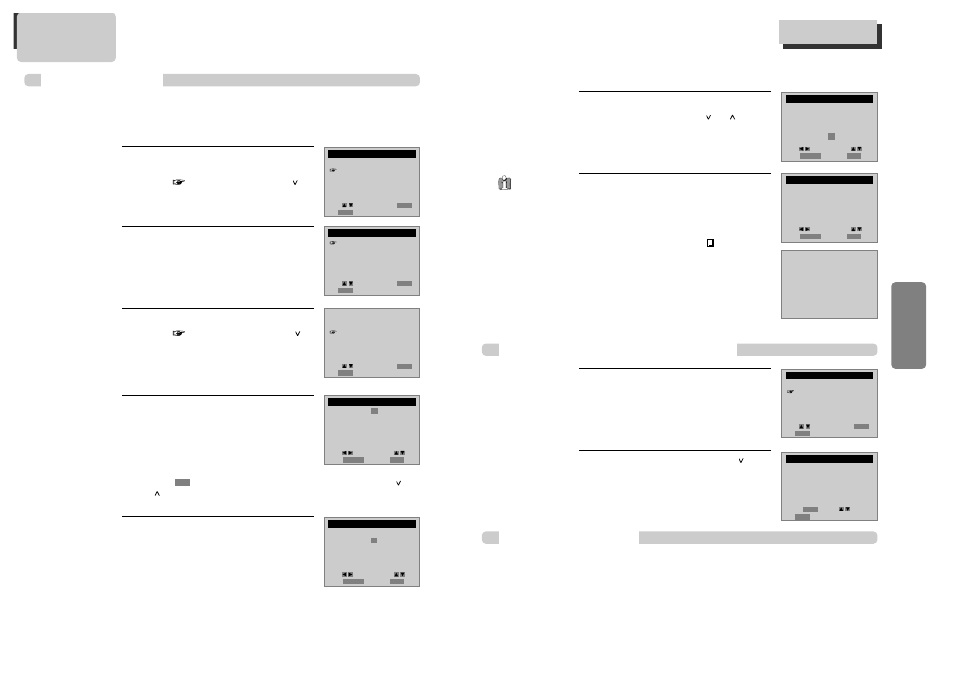
Set "Tape Speed".
Select either SP or SLP with [ ] or [ ].
For more information on recording speed, see
“Using video cassette” on page 26.
6
6
Press [SETUP] to complete the Timer
Recording.
“Program # has been saved. For program
recording, insert a cassette....” message is
displayed.
TIMER RECORDING indicator, is displayed on
the operation display window.
At the scheduled time, the Timer Recording will
begin.
7
7
To Confirm or Cancel TIMER RECORDINGS
Select “Review/Cancel Programs”.
1
1
Confirm Timer Recording details with [ ] and
press [CLEAR] to delete specific details.
2
2
PROGRAM1 (ONE TIME)
Channel
104 Cable
Start Date
06 / 04
Start Time
10 : 10 AM
End Time
11 : 10 AM
Tape Speed SP
PROGRAM1 (ONE TIME)
Channel
104 Cable
Start Date
06 / 04
Start Time
10 : 10 AM
End Time
11 : 10 AM
Tape Speed SP
PROGRAM 1 (ONE TIME)
Channel
104 Cable
Start Date
06 / 04
Start Time
10 : 10 AM
End Time
11 : 10 AM
Tape Speed SP
PROGRAM 1 has been saved.
For program recording,
insert a cassette.
To leave your cable box
on and tuned to preset
channel.
TIMER RECORDINGS
Make a New Program
Review/Cancel Programs
Move:
Input:
Video:
End:
SETUP
OUTPUT
Move:
Input:
Video:
End:
SETUP
OUTPUT
Move:
Select:
End:
SETUP
ENTER
Cancel:
Move:
End:
SETUP
CLEAR
If the unit is not
ready (e.g., a
recordable tape is not
inserted, the tape is
currently playing or
the unit is powered
off), an error message
will appear on screen.
Timer Recording
Timer Program Setting
Press [PROGRAM] in VCR mode.
This is a shortcut to view the Timer Recording menu.
Before setting a Timer Recording, the clock should be set correctly and VCR mode
should be selected.
Timer Recording
TIMER RECORDINGS
Press [SETUP] and select “TIMER
RECORDINGS”.
Move
to “TIMER RECORDINGS” with [ ]
and press [ENTER].
Select “Make a New Program”.
Press [ENTER] to select “Make a New Program”.
1
1
2
2
Set How Often to Record.
Move
to desired recording type with [ ]
and press [ENTER].
For details, see “Types of Timer Recordings” on
the page 26.
3
3
Select a Show to Record.
Select the desired channel with [0-9].
**If Converter Box and DVD+VCR are connected
with an audio/video cable, select “EXTERNAL
INPUT” as the TIMER REC CH with the [INPUT]
button.
4
4
Set Date and Time to Record.
Select the date, start time and end time to
record using [0-9].
5
5
■
Power on TV.
■
Make sure the current time is set correctly.
■
Insert a recordable tape with recording tab.
■
Press [VCR] to select VCR mode.
When
moves to “Cable”, select either “Cable” or “Antenna” with [ ] or
[ ].
SETUP
CLOCK SET
TIMER RECORDINGS
CHANNEL SET
FUNCTIONS
LANGUAGE SELECT
TIMER RECORDINGS
Make a New Program
Review/Cancel Programs
PROGRAM1 (ONE TIME)
How often do you want
to record program?
One Time
Daily (Sun-Sat)
Weekdays (Mon-Fri)
Weekly (Once a Week)
Channel
0 4 Cable
Start Date
- - / - -
Start Time
- - : - - AM
End Time
- - : - - AM
Tape Speed SP
PROGRAM1 (ONE TIME)
Channel
104 Cable
Start Date
- - / - -
Start Time
- - : - - AM
End Time
- - : - - AM
Tape Speed SP
Move:
Select:
End:
SETUP
ENTER
Move:
Select:
End:
SETUP
ENTER
Move:
Select:
End:
SETUP
ENTER
Move:
Input:
Video:
End:
SETUP
OUTPUT
Move:
Input:
Video:
End:
SETUP
OUTPUT