GSW 73992 User Manual
Page 19
- 19 -
General
Do not attempt to repair water heater. Call your authorized
dealer for service. Shut off the electric power whenever the
water supply is turned off. Before calling for service, check
that:
1. The heater is properly filled.
2. The electrical supply has not been interrupted.
Draining,
Flushing and Sediment
Removal
Water may contain fine particles of soil and sand which set-
tle to the bottom of a tank and thus form a layer of sediment.
If not removed, the sediment could reach the heating ele-
ments and cause them to fail. It is recommended that the
tank be drained and flushed on a regular basis to remove
any sediment that may buildup during operation. Some
maintenance and service procedures require that the heater
be drained and empty. The water heater should also be
drained if being shut down for an extended period of time.
To drain and remove the sediment from the tank:
1. Turn the electrical supply to the heater “OFF”.
2. Close the cold water supply valve.
3. Attach hose to the drain valve and route to an adequate
drain.
CAUTION!
The water being drained can be extremely
hot! The drain hose should be rated for at least 93°C
(200°F). If the drain hose does not have this rating, open the
cold water supply valve and a nearby hot water faucet
served by the system until the water flow is no longer hot.
Close the cold water supply valve and resume.
4. Open the drain valve using a flat-blade screwdriver. A
nearby hot water faucet must be opened to allow the
tank to be fully drained.
5. Open the cold water supply valve and flush the tank as
needed to remove sediment and any other foreign mat-
ter that may have entered the system. Close the cold
water supply valve when clean water flows.
6. If the heater is to remain empty for an extended period
of time, it is suggested the drain valve be left open.
When draining is complete, the hose may be removed.
7. Perform any other servicing as required.
8. Close the drain valve, disconnect hose.
9. Follow instructions for “Filling the Water Heater” and
“Startup” when heater is ready to be put back into serv-
ice.
NOTE: If the water heater is going to be shut down for an
extended period, drain the tank as directed in “Draining,
Flushing and Sediment Removal”. Ensure that the cold
water supply valve is closed and the drain valve left open.
T
emperature and Pressure (T&P) Relief
Valve Check
CAUTION!
THE WATER COMING FROM THE VALVE
MAY BE EXTREMELY HOT.
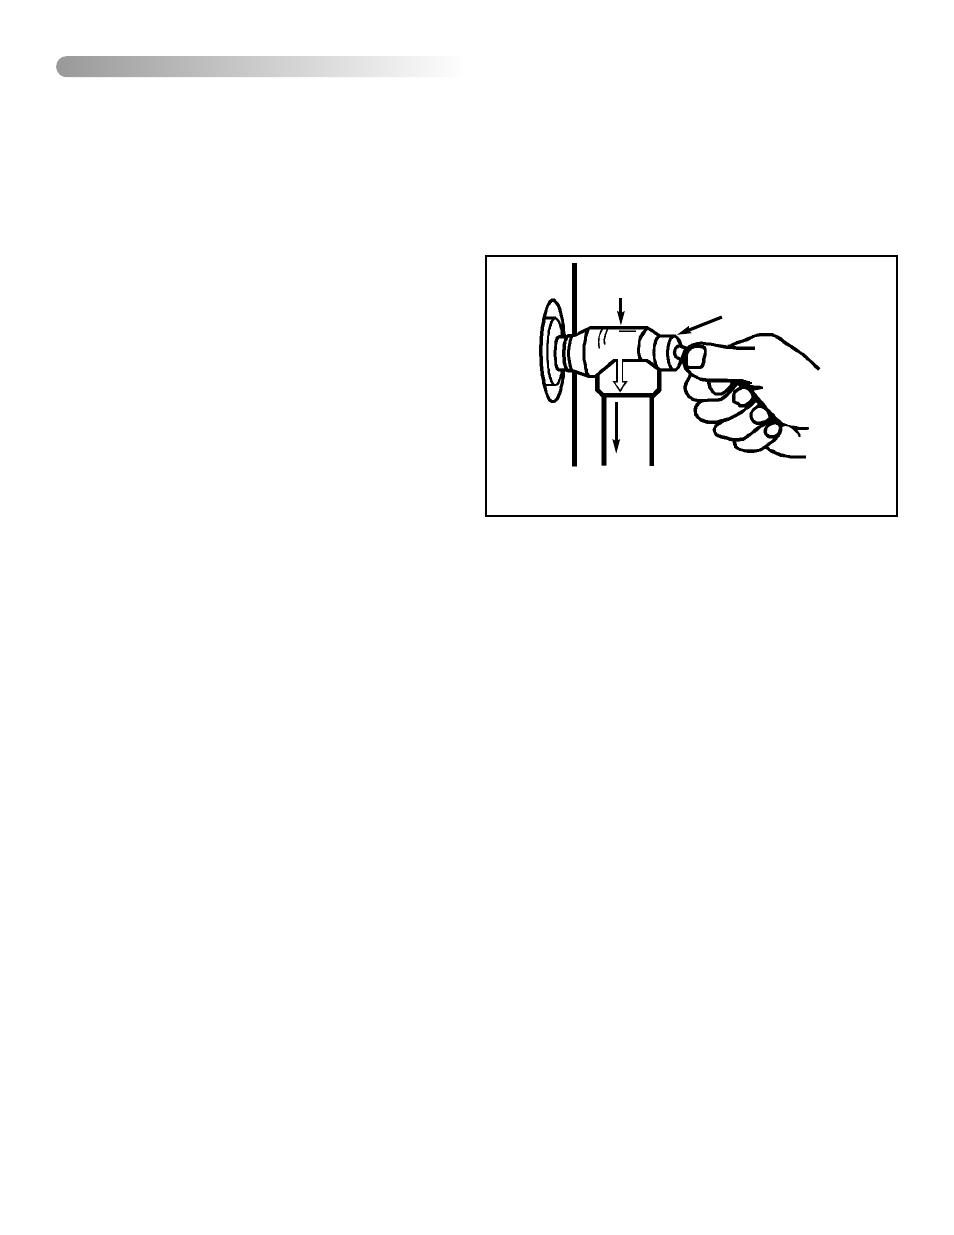
Manually operate the temperature and pressure relief valve
at least once a year to make sure it is working properly. To
prevent water damage, the valve must be properly connect-
ed to a discharge line which terminates at an adequate
drain. Stand clear of the outlet (discharged water may
be hot) and slowly lift and release the lever handle on the
temperature and pressure relief valve (see Figure 20) to
allow the valve to operate freely and return to its closed
position. If the valve fails to completely reset and continues
to release water, immediately turn “OFF” the power and
close the cold water inlet and call a qualified service techni-
cian.
Cathodic Protection
Your water heater has been equipped with one or more
anodes that protect the glass-lined tank from corrosion and
prolong the life of the water heater. Over time, as the
anode(s) works, it slowly dissolves, exposing the steel inner
core. Once the anode(s) is depleted, the tank will start to
corrode, eventually developing a leak. Depending on water
conditions, an anode(s) can last from one to ten years.
Many localities treat their water and this can have a signifi-
cant effect on the life of your heater. Water conditioning,
such as over-softening, can accelerate the rate at which the
anode(s) is consumed. As with any water heater, it is good
practice to check the anode(s) annually to see if it needs
replacing. Do not remove this anode(s) permanently as
it will void any warranties, stated or implied. Rapid
depletion or failure to maintain the anode can leave a heater
unprotected and may result in premature failure of the
heater due to corrosion and leaks.
Hot Water Odour
On occasion, and depending on your location, hot water
may develop a strong odour. This can be especially prob-
lematic in regions where the water contains sulphur, which
results in hot water having a "rotten egg" odour. If this
occurs, drain the system completely, flush thoroughly and
refill the tank. If the water odour or discoloration persists, the
anode(s) may need to be changed from magnesium to one
made of aluminum. Aluminum anodes may reduce, but not
eliminate, water odour problems. The water supply system
may require special filtration equipment from a water condi-
tioning company to successfully eliminate all water odour
problems. In certain cases chlorinating and flushing of the
water heater may be required. Contact your dealer or water
supplier.
FIGURE 20: T&P Valve Test
Temperature and Pressure
Relief Valve
Manual Relief
Valve
Discharge line to drain
VII) MAINTENANCE