Using the turret for precision depths, Basic routing, Fixed depth – Festool Plunge Router I User Manual
Page 12: Feed direction rules, Refer to the, Section on pag, 12 for, Ge 12, E “basic routing
Using the Turret for Precision Depths
This procedure is very helpful when you have day-to-day
plunging operations that use the same depth relative to a
basepoint. You can quickly reset the depth even after
changing the router bit.
Before using this procedure, make sure you perform the
“Calibrating the Turret Posts” procedure on page 11 to set
the difference between turret posts to the precise depth you
need.
For example, using the calibration procedure, you could set
the difference between posts as follows:
►
1
st
to 2
nd
post to ¼ inch
►
2
nd
to 3
rd
post to ½ inch
►
1
st
to 3
rd
post to ¾ inch
1.
Unplug the router for safety.
2.
Decide which two posts provide the difference in height
necessary for the operation.
3.
Rotate the turret to the higher of the two posts.
4.
Lower the router down until the router bit touches the
surface of the workpiece.
5.
Lock the depth stop at this depth.
6.
Rotate the turret to the lower of the two posts.
7.
Operate the router as described in the “Basic Routing”
section below.
Basic Routing
Fixed Depth
Fixed depth routing is typically performed with router bits
with a guide bearing that rides along the edge of a workpiece.
The depth of cut is fixed before the router is engaged.
1.
Verify that the router bit is properly secured, and the
router is ready for operation.
12
OF 1400 EQ Router
2.
Secure the workpiece to a stable surface.
3.
Lower the router to the desired depth and tighten the
plunge lock knob.
4.
Set the router speed according to the speed settings
table on page 13.
5.
Place the router on the workpiece, but make sure the bit
is not touching the wood.
!CAUTION:
Starting the router with the bit in contact with
the workpiece may cause a loss of control and injury.
6.
Firmly grasp both handles of the router and pull up on
the power switch.
7.
Advance the router through the cut according to the
feed direction rules below.
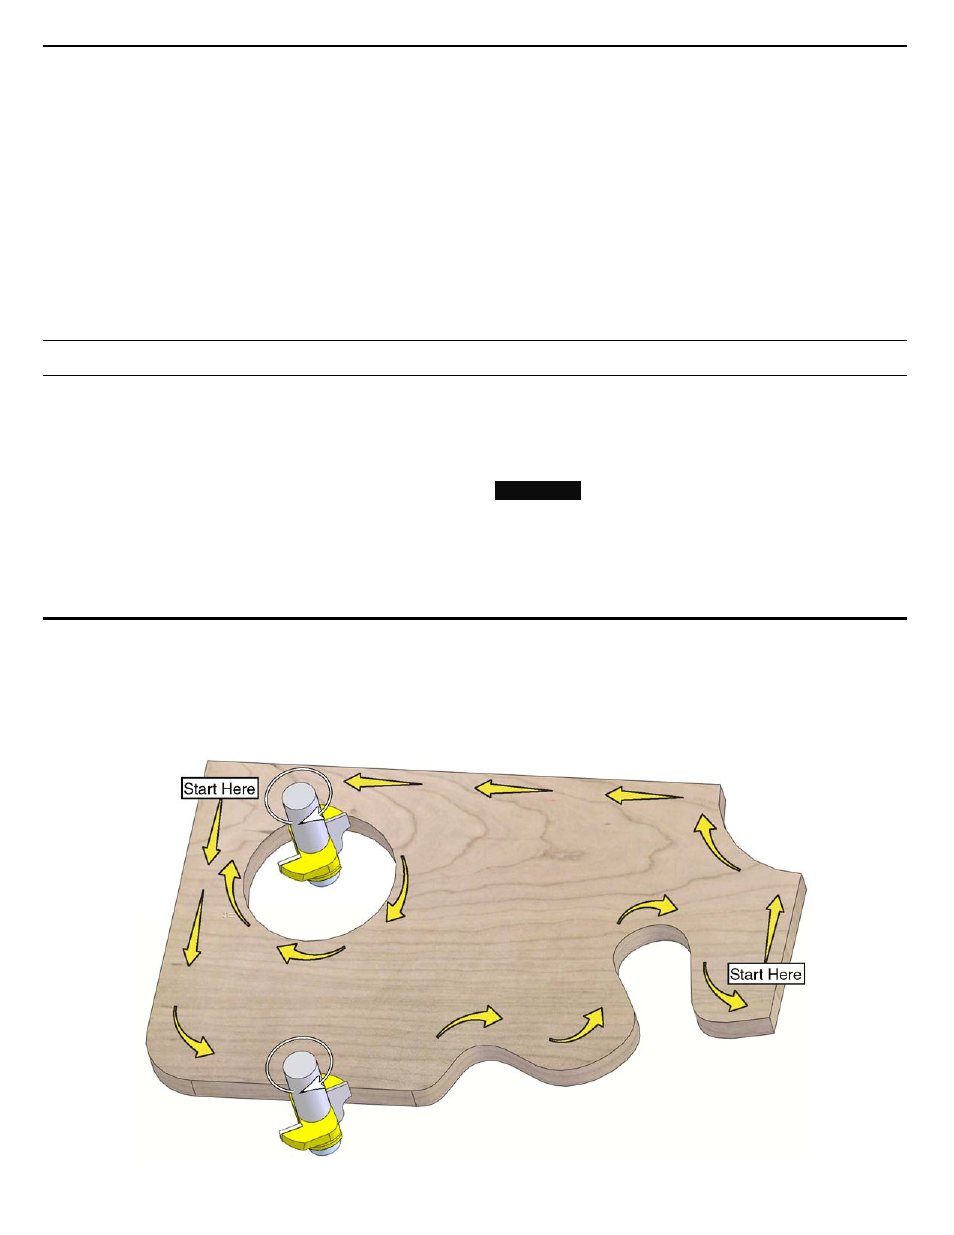
Feed Direction Rules
►
Always feed the router against the rotation of the bit. This
prevents the router from grabbing the wood and self-
feeding, resulting in a loss of control.
►
When routing around the exterior of a shape, feed the
router counterclockwise.
►
When routing around the interior of a shape (such as the
circle shown below), feed the router clockwise.
►
Begin routing across the end grain first (as indicated with
"Start Here" in the figure below). This reduces tearout at
the corners.