Fisher & Paykel DD24ST User Manual
Page 6
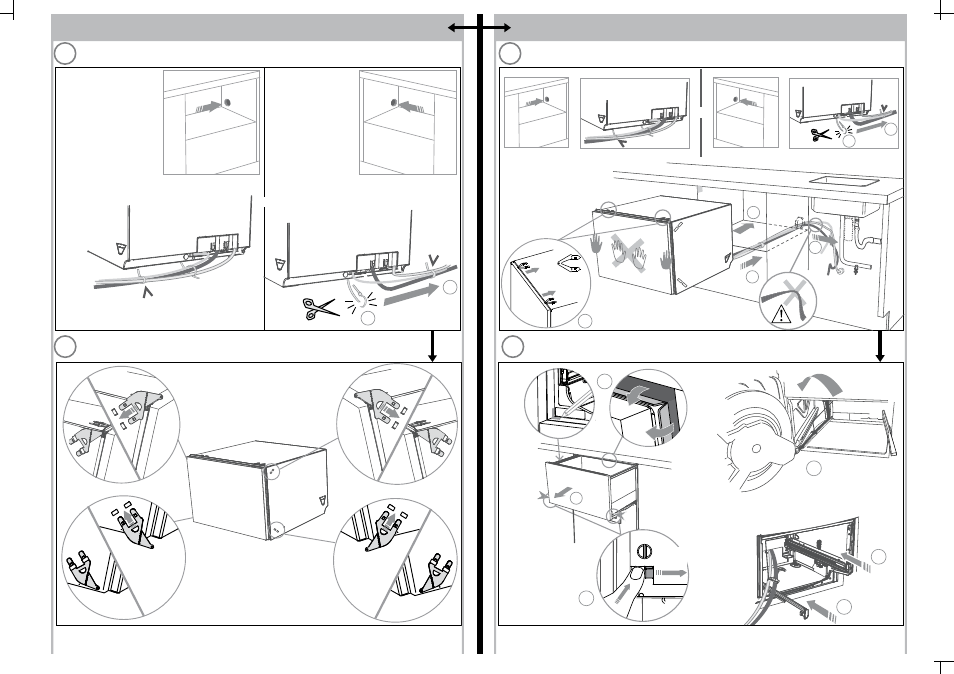
ROUTE THE HOSES
ROUTE THE HOSES AND MOVE INTO CAVITY
ATTACH SIDE MOUNTING BRACKETS
REMOVE DRAWER
8
8
9
9
1
2
3
3
5
2
1
4
(x2)
2
30 mm
1
5
5
3
4
1
3⁄16
”
(30 mm)
Ensure the drawer is
removed and then rotated
counter-clockwise to
prevent kinked hoses.
Ensure hoses and
cord are not kinked
or twisted.
optional *
RECOMMENDED METHOD - SECURE WITHOUT
DRAWER REMOVAL
(FRAMELESS CABINETRY ONLY)
ALTERNATIVE METHOD -
SECURE BY DRAWER REMOVAL
Tie together to avoid kinking.
Clip all four side mounting
brackets into their slots
using a flat-bladed
screwdriver. Ensure they’re
securely fitted before
sliding product into cavity.
The mounting slots are in pairs, one
on each side diagonally across the
product. ‘A’ bracket must match ‘A’
slot and ‘B’ bracket must match ‘B’ slot.
‘B’
‘B’
‘B’
‘B’
‘B’
‘A’
‘A’
‘A’
‘A’
‘A’
‘A’
‘B’
Tie together to avoid
kinking
OR
OR
If top mounting
brackets are being
used *, ensure
they’re securely
fitted before
sliding product
into cavity.
* If cavity bracket for 18
7⁄8
”(480 mm)
cavity is fitted, the top mounting
brackets cannot be used.
(1,2) -2- 599754C DD24S TALL installA2 USCA.indd 15/4/09 2:34:43 PM
(1,2) -2- 599754C DD24S TALL installA2 USCA.indd 15/4/09 2:34:43 PM