Menu operations main menu, Camera title menu, Check the present settings at the main menu – Hitachi KP-E500 User Manual
Page 9: Display character input
1) Press the SET button for at least 2 seconds to display
the main menu on the monitor screen.
2)
Check the present settings at the main menu.
3) Shift the cursor vertically by pressing the UP and DOWN
buttons, then press the SET button to enable changing the
setting of the selected item.
4) If changes are unnecessary, shift the cursor to “END” and
Press the SET button to return to the normal screen.
5) When an item indicated by a
↵
mark is selected, pressing
the SET button shifts to the next menu.
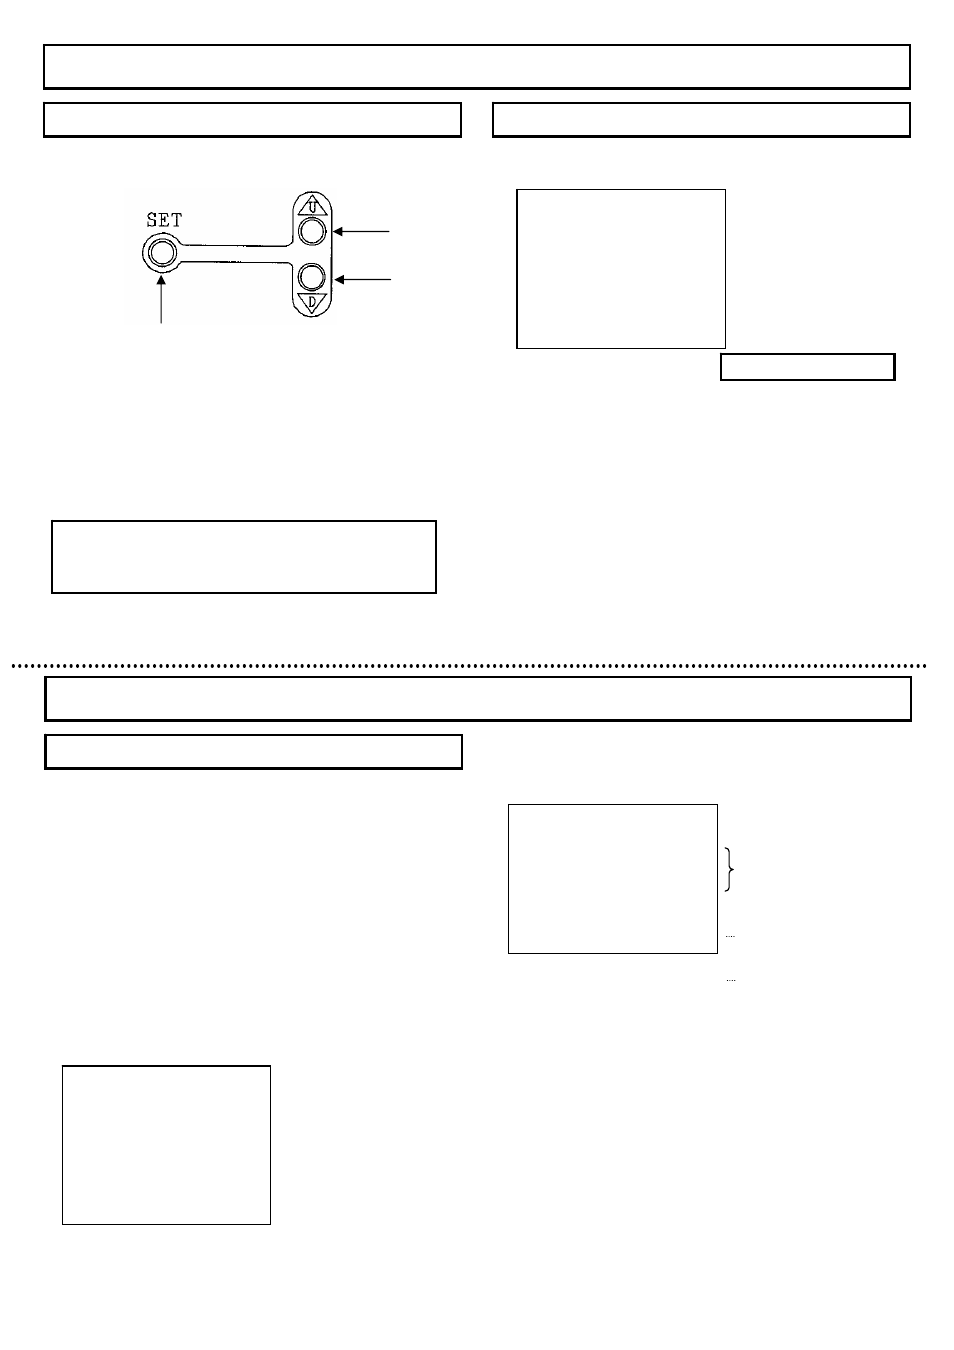
Three rear panel setup buttons are used to shift the cursor and
select items from the menus.
①
Up button
: Shift the cursor in the upward direction or
increase an adjustment value.
②
Down button
: Shift the cursor in the downward direction
or decrease an adjustment value.
③
Set button
: Press to display the main menu or to
change a setting.
Menu operations
Main Menu
MAIN MENU
◆◆
MAIN MENU
◆◆
>
CAMERA TITLE :OFF
↵
LIGHT CONTROL:OFF
↵
AGC :ON
↵
SHUTTER SPEED:OFF
SENS UP :OFF
B/W MODE :OFF
WHITE BALANCE:ATW
↵
SUB MENU
↵
END
……
Camera title setting menu
……
Light control setting menu
……
AGC setting menu
……
Shutter speed setting
……
Sensitivity enhance Setting
……
B/W mode setting (*)
……
White balance mode setting menu (*)
……
Sub menu
……
End of menu display
Note:
lf no button is pressed, the menu display extinguishes
automatically after about 5 minutes.
①
②
③
(*) Note: KP-E500 is not displayed.
One line of up to 22 alphanumeric characters can be displayed
on the screen. The display on/off and position are selected at the
camera title menu.
1) Press the SET button for longer than 2 seconds to display
the main menu.
2) Use the UP and DOWN buttons to shift the cursor to
“CAMERA TITLE”, then press the SET button to display the
camera title menu.
3) While the cursor is at “MODE”, press the SET button to shift
the mode in the sequence “OFF”, “TOP”, “BOTTOM”.
OFF
:
Characters not displayed. (Factory setting)
TOP
:
Characters displayed at top of screen.
BOTTOM :
Characters displayed at bottom of screen.
Camera Title Menu
Display character input
1) When the mode is Top or Bottom, the characters indicated in
the figure can be used.
2) Press the DOWN button, then use the UP and DOWN
buttons to shift the flashing cursor sequentially among the
usable characters.
3) When the SET button is pressed, the selected character is
entered in sequence beginning with the left-most of 22 dots
shown at the bottom of the screen.
Afterwards, each newly selected character is entered
sequentially toward the right.
The item under character input selecting department uses it in
the following manner.
SPACE :
To add a blank space, shift the flashing cursor to
“SPACE”, then press the SET button.
◆
CAMERA TITLE MENU
◆
>
MODE :OFF
RET
END
……
Display On/OFF and position
( OFF / TOP / BOTTOM )
……
Return to the main menu
……
End of menu display
CAMERA TITLE MENU (MODE: OFF)
◆
CAMERA TITLE MENU
◆
>
MODE :TOP
0123456789
ABCDEFGHIJKLM
NOPQRSTUVWXYZ
!?#&( )、 .
:;~*%
+-x/=“‘
SPACE ← → RESET
POSITION RET END
CAMERA NO.1・・・・・・・・・・・
……
Display On/OFF and position
( OFF / TOP / BOTTOM )
Input character select table
……
Blank, cursor shift (left / right), character delete
……
Display position, return, end
……
Input character display
CAMERA TITLE MENU (MODE: TOP or BOTTOM)
13
14