Hkts 60bq, Speaker placement, Speaker connections – Harman-Kardon 60BQ User Manual
Page 7
7
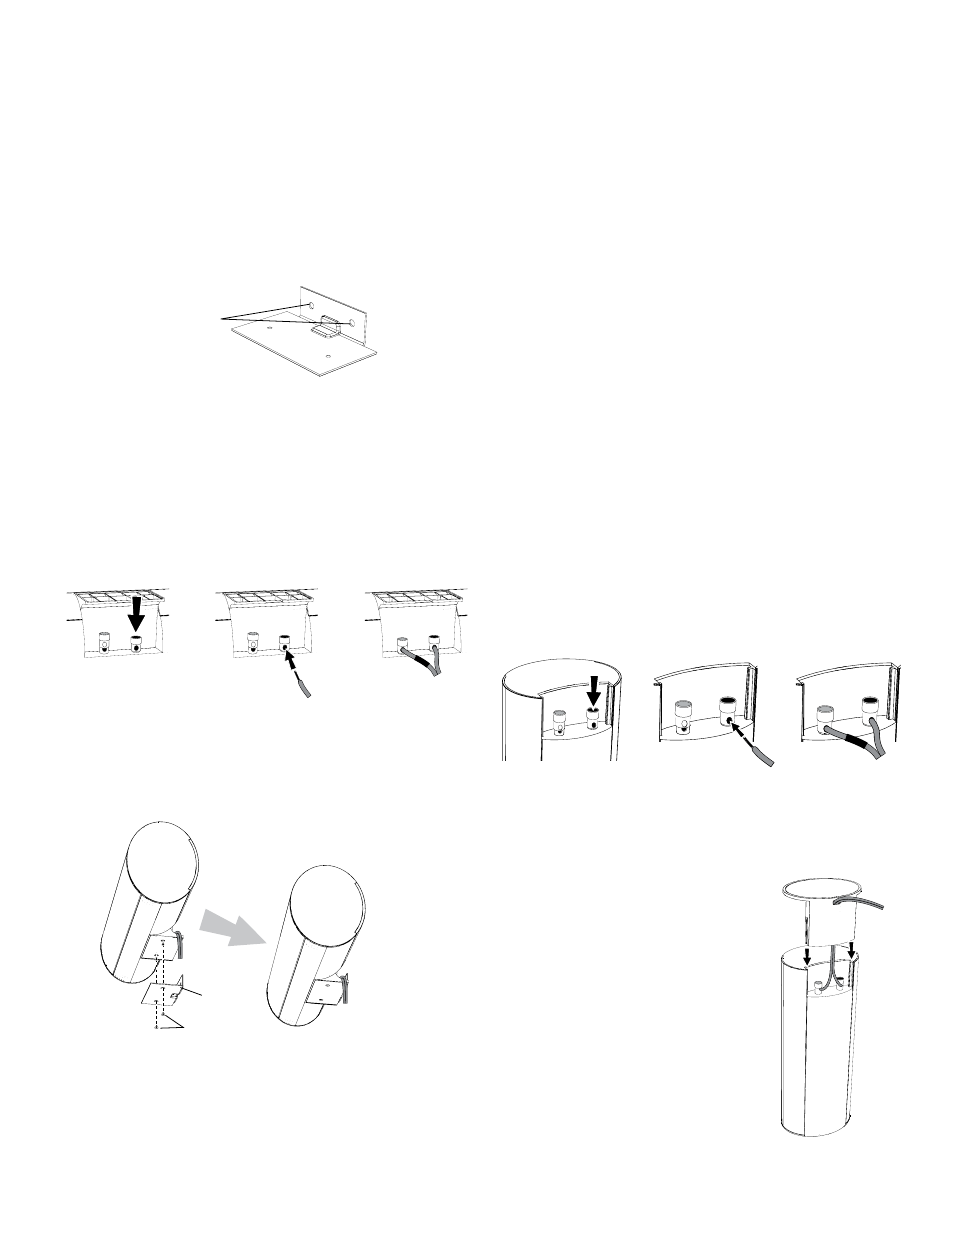
Wall-Mounting: Center Speaker
1. Decide on the location for the speaker.
2. Attach the center speaker wall-mount bracket to the wall using hardware that is
appropriate for the wall’s construction and materials. Attach the anchors through
the holes shown in the illustration.
Use These Holes
to Attach Bracket
to Wall
NOTE: The center speaker weighs 3.3 lb (1.5kg). Be sure to use hardware that can
support this weight.
CAUTION: Before making speaker connections, be sure that your receiver or ampli-
fier is turned OFF and its AC cord is unplugged from the AC power source.
3. Connect the speaker wire to the speaker terminals. Press down on the top of the
terminal to open the connection hole, insert the wire’s bare end all the way into
the hole and release the terminal to secure the wire. Insert the conductor with the
colored band into the speaker’s red ( + ) terminal, and insert the other conductor
into the speaker’s black ( – ) terminal, as shown in the illustration.
+
–
A. Push Down on Cap
to Open Hole
B. Insert Bare Wire
into Open Hole
C. Release Cap
to Secure Wire
Important: Make sure the ( + ) and ( – ) bare wires do not touch each other or the
other terminal. Touching wires can cause a short circuit that can damage your
receiver or amplifier.
4. Using two of the supplied screws, attach the center speaker to the bracket, as
shown in the illustration.
Supplied Screws
Wall-Mount
Bracket
Speaker Connections
CAUTION: Before making speaker connections, be sure that your receiver or
amplifier is turned OFF and its AC cord is unplugged from the AC power outlet.
Speakers and receivers/amplifiers have corresponding ( + ) and ( – ) connec-
tion terminals. Most electronics manufacturers, including Harman Kardon, use
red to denote the ( + ) terminal and black for the ( – ) terminal. Newer Harman
Kardon receivers conform to the CEA standard and therefore use a color other
than red to denote the ( + ) terminal for some speaker positions. See the table
in Color-Coding System, on page 4.
Each speaker wire included with your system has colored bands at both ends
of the ( + ) conductor, and the subwoofer cable has purple connectors that
correspond to the color of the HKTS200SUB’s LFE jack. This system helps
ensure that the speaker in each location is connected to the correct receiver or
amplifier terminals. In addition to the colored bands at each end, each speaker
wire’s ( + ) terminal has ribs molded into its insulation to help you identify it.
It is very important to connect each speaker identically: ( + ) on the speaker to
( + ) on the receiver or amplifier, and ( – ) on the speaker to ( – ) on the receiver
or amplifier. Miswiring one or more speakers results in thin sound, weak bass
and a poor stereo image. With the advent of multichannel surround-sound sys-
tems, connecting all of the speakers in your system correctly is very important
to achieving the proper ambience and directionality of the program material.
To connect the speaker wire to the terminals on the satellite and center speak-
ers, press down on the top of the terminal to open the connection hole, insert
the wire’s bare end all the way into the hole, and release the terminal to secure
the wire. Insert the conductor with the colored band into the speaker’s red ( + )
terminal, and insert the other conductor into the speaker’s black ( – ) terminal,
as shown in the illustration.
IMPORTANT: Make sure the ( + ) and ( – ) bare wires do not touch each other
or the other terminal. Touching wires can cause a short circuit that can damage
your receiver or amplifier.
+
–
A. Push Down on Cap
to Open Hole
B. Insert Bare Wire
into Open Hole
C. Release Cap
to Secure Wire
Connecting Satellite Speakers With Supplied
Wall-Mount Brackets
Follow the instructions in Wall-Mounting: Satellite Speakers,
on page 5, and Wall-Mounting: Center Speaker, opposite.
Connecting Satellite Speakers with Supplied
Bases
1. Remove the speaker’s base (see Shelf Placement,
on page 5).
2. Pass the speaker wire through the opening in the
speaker’s base.
3. Connect the speaker wire as described above.
4. Reattach the speaker’s base, as shown in the il-
lustration.
Speaker Placement
HKTS 60BQ