Mounting the tank connecting faucet to tank – InSinkErator C1300 User Manual
Page 4
7
6
Mount tank vertically in an area that
allows clearance on the underside of the
tank for drainage, if necessary.
DO NOT over tighten screws.
Pre-drill 1/8" pilot holes at marks.
Turn screws into pre-drilled holes,
leaving 1/4" exposed.
Hang the tank on the screws.
Tighten the screws with only
1/2 turn clockwise.
b
1
2
3
Brass Nut
Ferrule
Brass Insert
Brass Nut
1/4"
copper tube
Ferrule
A
Select a spot under the sink to mount
tank vertically within reach of both
plumbing and electrical connections.
The tank should be within 16" or less
of faucet water lines and within 30"
or less of a standard grounded outlet.
While holding tank in place on
the spot selected for installation,
use a pencil to mark locations for
2 hanging screws.
Property Damage: tank must be located
within 16" of faucet and within 30" or less
of a standard grounded outlet. Do not extend
plumbing or electrical lines.
3
1
2
3
Brass Nut
Ferrule
Brass Insert
Brass Nut
1/4"
copper tube
Ferrule
1
2
3
Brass Nut
Ferrule
Brass Insert
Brass Nut
1/4"
copper tube
Ferrule
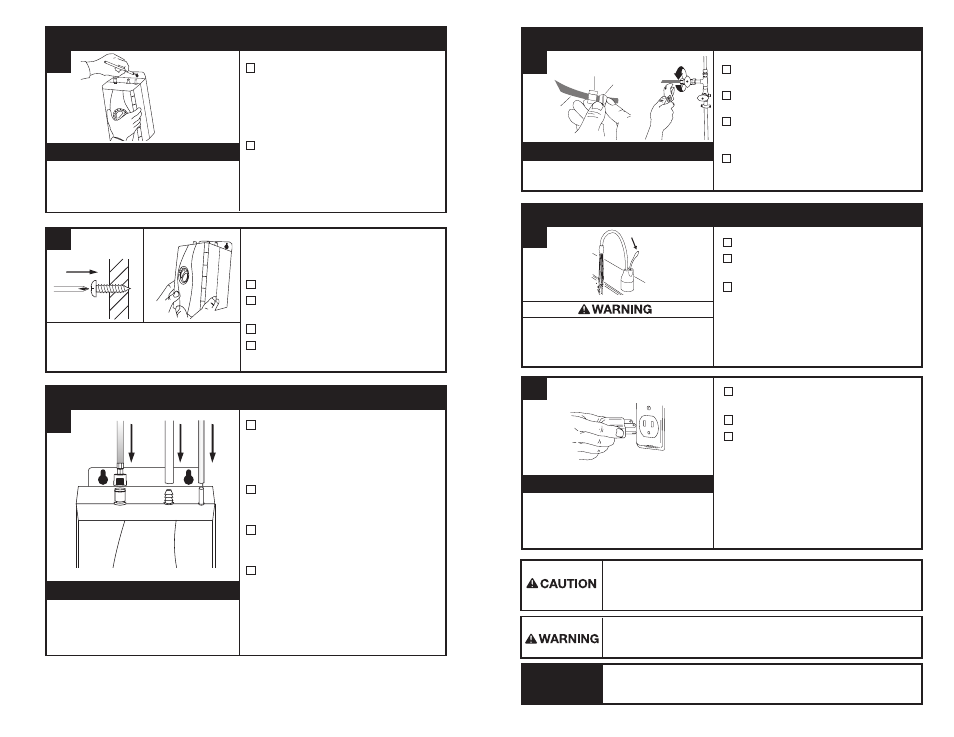
Without depressing the gray button,
place the snap-connect fitting at
the end of the blue 1/4" tube onto
the left fitting on the tank, pushing
until it clicks into place. (1)
Slip the flexible white 7/16" tube
over barbed middle fitting and slide
down approximately 1/2". (2)
Slip the clear 5/16" tube over the far
right smooth fitting and slide down
approximately 1/2". (3)
Visually check for pinched or
crimped tubes.
4
A
Property Damage: pinched or blocked water
lines may cause damage to the dispenser tank.
Check to make sure tubes are connected properly
and are pushed down as far as possible.
Screws provided are for use in wood
studs or cabinets only. Use wall anchors
(not supplied) for installation into drywall.
Leave 1/4" for
hanging tank.
tank must be
mounted level
to ensure
proper operation.
Hose clamps are not needed for any
of the connections.
(1)
(2)
(3)
MOUNTING THE TANK
CONNECTING FAUCET TO TANK
NOTICE
NOTICE
Fire Hazard: To minimize possibility of fire, DO NOT store flammable items such as
rags, paper or aerosol cans near the tank. DO NOT store or use gasoline or other
flammable vapors and liquids in the vicinity of this or any other appliance.
--
Scalding Hazard: the faucet dispenses
near boiling (212ºF) water, which can
instantly cause scalds or burns. use care
when operating this appliance.
Property Damage: Join remaining
tube to cold water supply only.
1
2
3
Brass Nut
Ferrule
Brass Insert
Brass Nut
1/4"
copper tube
Ferrule
b
1
2
3
Brass Nut
Ferrule
Brass Insert
Brass Nut
1/4"
copper tube
Ferrule
Turn on the cold water supply.
Depress the dispenser handle and
hold it until water flows from the spout.
Run the water for at least 2 minutes to
flush lines.
A
A
6
Check all connections to ensure they
are tight and that there are no leaks.
Plug in instant hot water tank.
To avoid permanent damage to the
product, only operate the tank after
it is filled with water.
Water will be cold at first.
Allow 12-15 minutes for water to reach
target temperature.
Gurgling or hissing is normal during the initial
heating cycle.
5
1
2
3
Brass Nut
Ferrule
Brass Insert
Brass Nut
1/4"
copper tube
Ferrule
Install a T-fitting
(not included)
onto the cold water supply line.
Install dedicated water control valve
with 1/4" compression fitting.
At the end of the copper 1/4" tube,
slide the fitting’s brass nut and ferrule
(not included) over the tube.
Insert the copper tube into the 1/4"
compression fitting and tighten.
1
2
3
Brass Nut
Ferrule
Brass Insert
Brass Nut
1/4"
copper tube
Ferrule
Property Damage: Do not use an extension
cord set with the dispenser. (a standard
grounded outlet within 30" of the dispenser is
required under the sink.)
Property Damage: To avoid water damage, periodically inspect the unit for any
signs of leakage and immediately remove from service any unit suspected of
leaking and contact an authorized InSinkErator Service agent.
Personal Injury: This tank is a non-pressurized tank. DO NOT modify this system.
DO NOT close vent tube or connect other type dispensers or valves to the tank. Use
only the InSinkErator dispenser faucet supplied. Use only parts provided. Contact an
authorized InSinkErator Service agent for repairs or replacement components.
FILL TANK & THEN CONNECT POWER
FINAL WATER CONNECTION
NOTICE
NOTICE
NOTICE