Installation and assembly, 30” pedestal fan – ProTemp PT-30P-DDF-A User Manual
Page 6
Installation and Assembly
REQUIRED TOOLS:
Pliers
Knife
Phillips head screwdriver
Flat head screwdriver
10mm / adjustable wrench
6mm hex wrench (included)
PARTS INCLUDED IN BOX:
Rubber Base Ring
Base
Front Grille
Rear Grille
Motor Assembly
Fan Blade Assembly
Spring
Support Pole Assembly
1. Attach Rubber Base Ring (item 16 on page 7) to outer
edge of Base (item 15). Be sure ribbed side of Base
Ring is facing down.
2. Remove 5 screws from Flange on bottom of Lower
Support Pole (item 16).
3. Completely extend Upper Support Pole (item 21) from
Lower Support Pole and insert Spring into bottom of
Lower Support Pole.
4. Attach Support Pole Assembly to Base. Tighten
hardware using star parttern to insure a tight, uniform
fit.
5. Stand assembly on Base, and press down Upper
Support Pole and then tighten Height Adjustment Knob
(item 3).
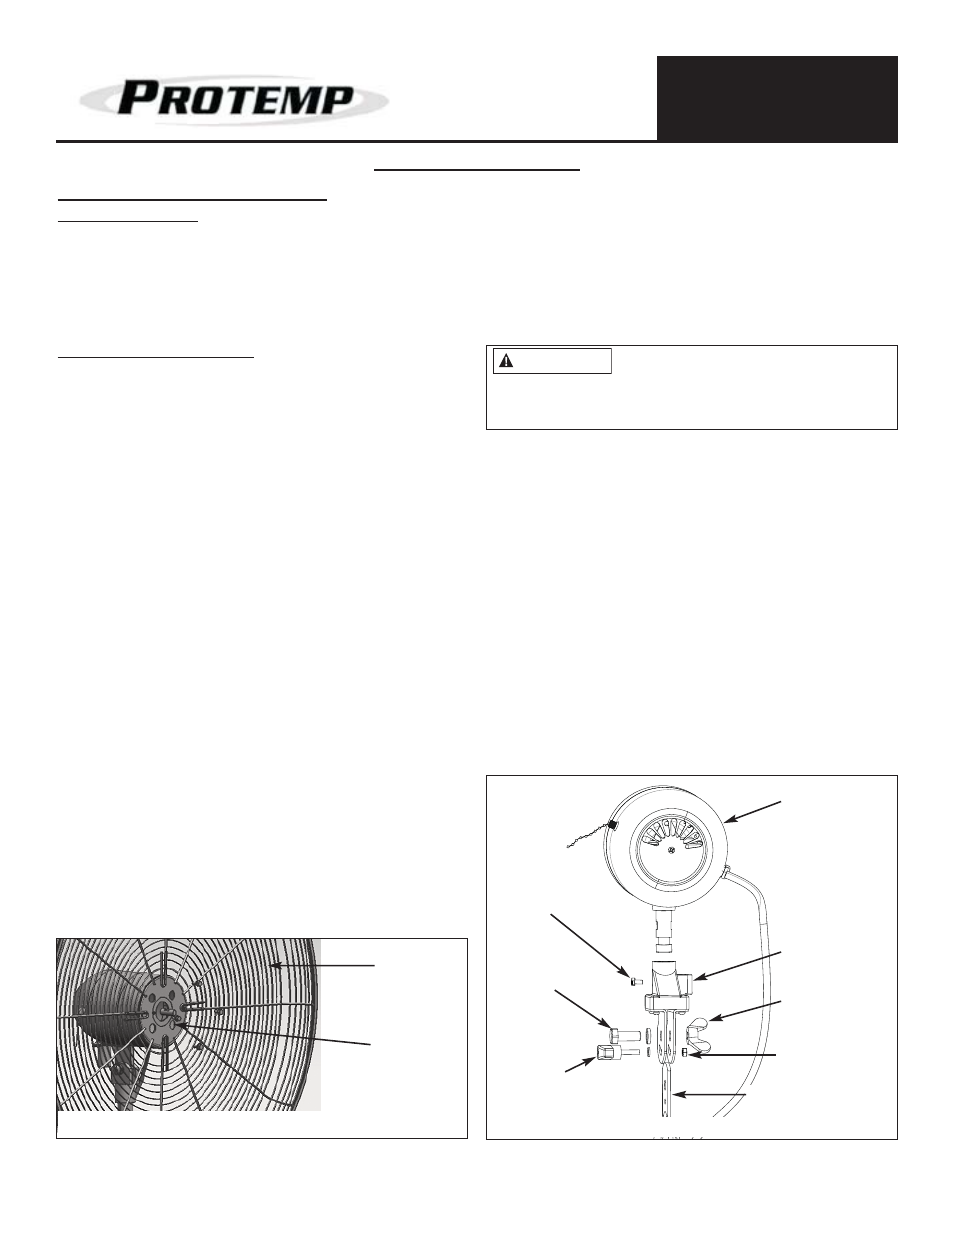
6. Attach Motor Support Assembly to Motor Assembly
(see figure 5).
7. Place Motor Support into Upper Support Pole.
- Insert Pivot Bolt and tighten.
- Insert Tilt Adjustment Knob and tighten.
8. Remove 4 screws on motor, and attach the Rear Grille.
Tighten screws only after all 4 screws are reattached to
the motor.
9. Remove the screws on the Motor and attach the Rear
Grille onto groove in motor shaft, and replace screws
(See figure 4).
10. Loosen the set screw on the back of the Fan Blade
Assembly and slide onto the motor shaft.
11. Position set screw over flat groove on motor shaft and
tighten set screw using 6mm hex wrench (included). Be
sure set screw is on the groove, and the front of Fan
Blade Assembly is flush with front of shaft before
tightening.
12. Attach Front Grille by first aligning the top hooks of the
Front Grille onto the top of the Rear Grille edge. Work
your way around the grille, placing the Front Grille
hooks over the Rear Grille edge. If necessary, use a
flat head screwdriver to help pry the Front Grille hooks
over the Rear Grille edge. Continue until all hooks are
completely attached to the Rear Grille edge.
Do NOT slide fan blade screw
beyond the groove on the shaft!
This will cause the fan blade to not spin properly and
can cause damage to your fan! Be sure that fan shaft
is flush with front of fan blade assembly.
CAUTION
30” PEDESTAL FAN
NEVER LEAVE A FAN
UNATTENDED WHILE
OPERATING OR WHILE
CONNECTED TO A POWER
SOURCE
© 2011, Pinnacle Products International, Inc.
6
HVF Air Circulator User’s Manual
Motor Assembly
Machine Screw
Pivot Bolt
Tilt
Adjustment
Knob
Motor Support
Assembly
Wing Nut
Nut
Upper Support Pole
Figure 4: Attaching Rear Grille to Motor
Rear Grille
Motor
Figure 5: Attaching Motor to Motor Support Assembly