Attaching the sawtoothed racks, Positioning the scales – INCRA Track & Shop Stop User Manual
Page 3
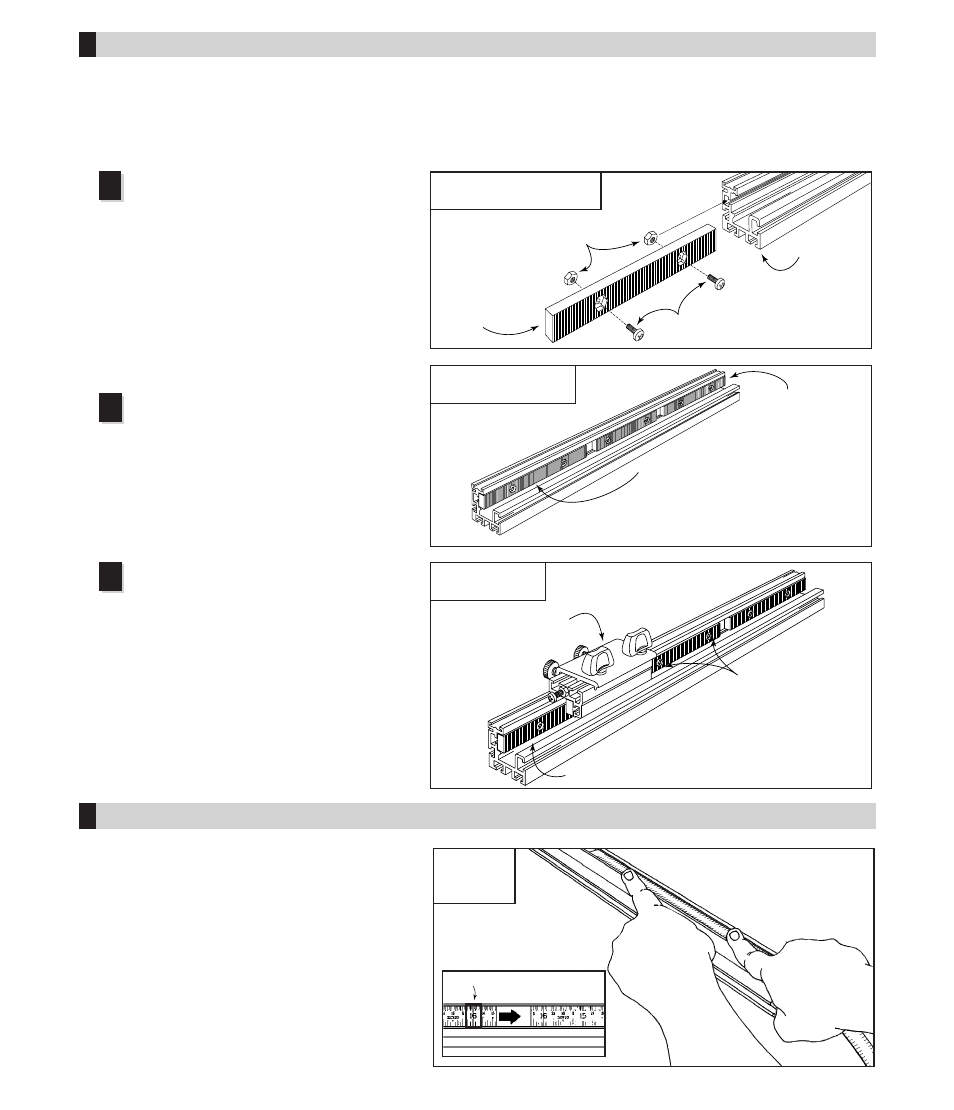
Insert the #8-32 x
3
⁄
8
" machine screws through
the INCRA racks as shown and loosely install the
hex nuts. Slide the hex nuts into the T-slot on your
INCRA Track.
Note:
Some track sections may include both 4" and
6" racks. Use all racks supplied in any order. (Fig. 5)
Note:
If you will be using the slotted hole mounting as
described in Fig. 1, always screw the INCRA Track to
your application before adding the INCRA saw-
toothed racks.
After sliding all of the supplied racks onto
your INCRA Track, align the rack at one end
flush with the end of the track and tighten the
screws for this rack only. Evenly space the
remaining racks along the length of your track.
This is not a critical alignment, just eyeball the
spacing. (Fig. 6)
INCRA Track System Owner’s Manual
3
FIG. 5
Loosely install INCRA racks
1
2
FIG. 6
Slide racks onto Track
FIG. 7
Clamp Shop Stop
All INCRA Track scales come in 16" lengths (0-16",
16-32", 32-48", etc.) To position the 0-16" scale, zero
your Shop Stop to the cutter as described in the
Shop Stop owner’s manual, then slide the 0-16"
scale to read 0" directly under the end of the gold
stop cap on the Shop Stop. For longer INCRA Track
sections you'll now need to slide the 16-32" scale
into the track, overlapping the two scales at the 16"
mark. You'll notice on the 16-32" scale a rectangular
shaped window at the 16" mark. This window makes
it easy to perfectly align the two scales. Adding the
32-48" scale is done in the same way using the
rectangular shaped window at the 32" mark.
ATTACHING THE SAWTOOTHED RACKS
POSITIONING THE SCALES
#8-32 hex nuts
#8 -32 x
3
/
8
machine screws
INCRA
Track
INCRA
Rack
First: Align 1st rack flush with end of
Track and tighten two mounting screws
Second: Evenly space remaining racks
Last rack
should be flush
with track end
First: Bridge the gap
between the 1st and
2nd racks with the
Shop Stop
Second: Tighten
the two screws on
the second rack
Third: Repeat the bridge and
tighten process down the
length of the INCRA Track
1st rack already tightened
FIG. 8
Slide scales
in channel
Overlap the two scales
at the 16" mark
Now clamp your Shop Stop to the INCRA
Track so that it bridges the gap between the
already tightened first rack and the loose second
rack. Tighten the screws on the second rack.
Continue this bridge and tighten process down
the length of your INCRA Track. (Fig. 7)
3
In your INCRA Track package you'll find a number of
black sawtoothed racks. Once attached to your INCRA
Track, these racks are what give the INCRA Shop Stop
the ability to clamp to your track so accurately. You see
the teeth on the Shop Stop and the INCRA Track will
only mesh every
1
⁄
32
". This is why the INCRA tools will
so easily duplicate any setting that is a multiple of
1
⁄
32
".
You might think that with all this accuracy, attaching the
racks to your INCRA Track would be a demanding job.
Quite the contrary – it is really easy.
Clear rectangular window