General mounting instructions – INCRA Track & Shop Stop User Manual
Page 2
GENERAL MOUNTING INSTRUCTIONS
Your INCRA Track is designed to provide a variety of mounting options to meet the requirements of your applications.
Each mounting option offers certain benefits. When considering a mounting preference, check the benefits of each
option. In some applications, you may find combinations of two or more mounting options are useful.
Option #1:
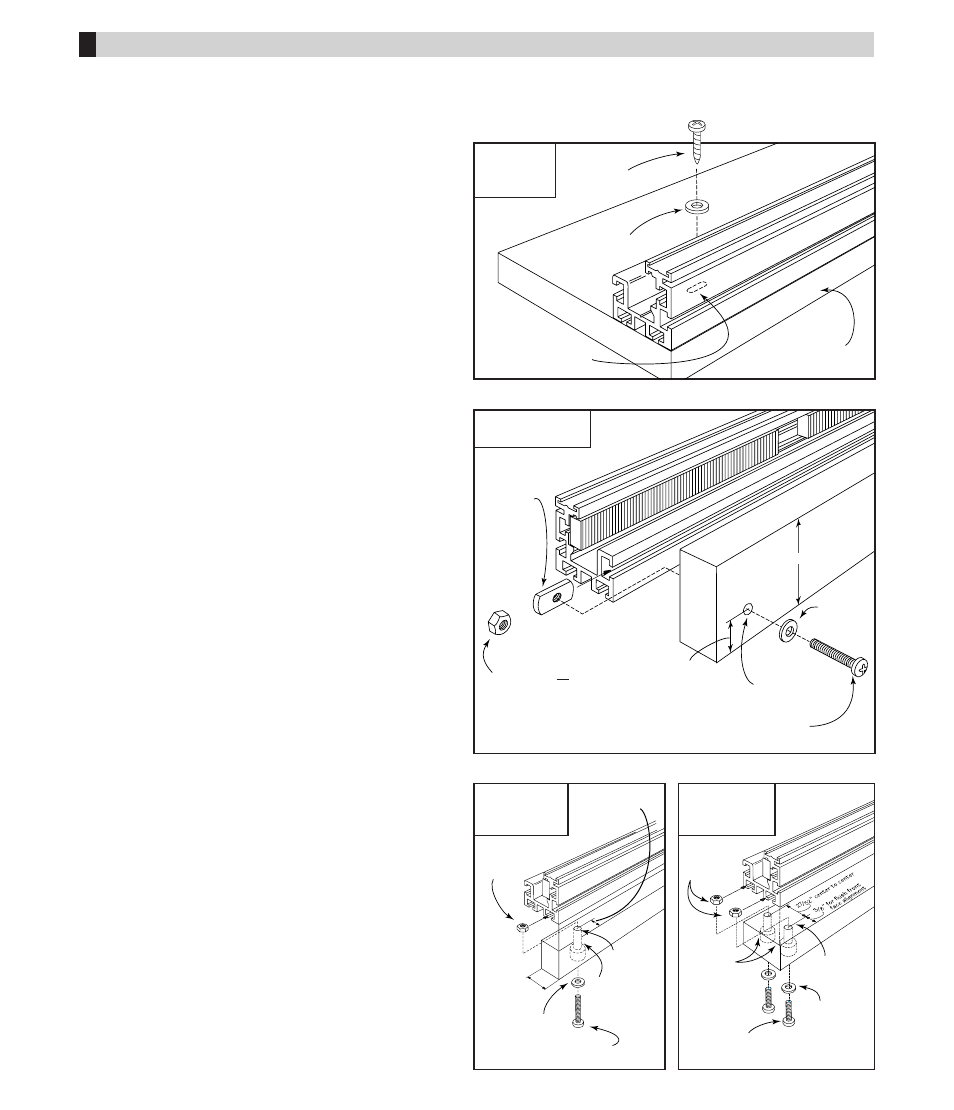
Slotted Hole Mount –
(Fig. 1)
Benefits:
◆
Quick and easy mounting
◆
Good for fixed INCRA Track applications
Applications: . . . . . . . . . . . . . . . . . . . . . . . . . . . .Page
◆
Jigs & Fixtures . . . . . . . . . . . . . . . . . . . . . . . . . 6
◆
Sliding Crosscut Boxes . . . . . . . . . . . . . . . . . . . 6
◆
Drill Press Fence . . . . . . . . . . . . . . . . . . . . . . . 7
◆
Miter and Compound Miter Saws . . . . . . . . . . . 7
Note:
When using the slotted hole mounting, always screw
the INCRA Track to your application before adding the
INCRA saw toothed racks.
Option #2:
Rear T-slot Mount –
(Fig. 2)
Benefits:
◆
Allows for sliding the INCRA Track relative to applications
◆
Good for applications where the ability to slide the fence
toward or away from the cutter is important
◆
Enables quick removal of INCRA Track from application
Applications: . . . . . . . . . . . . . . . . . . . . . . . . . . . .Page
◆
Miter Gauge . . . . . . . . . . . . . . . . . . . . . . . . . . . 5
◆
Jigs and Fixtures . . . . . . . . . . . . . . . . . . . . . . . 6
◆
Radial Arm Saw . . . . . . . . . . . . . . . . . . . . . . . . 7
◆
Compound Miter Saw . . . . . . . . . . . . . . . . . . . . 7
Note:
When using any T-slot mount, first install screws and
washers through your application and loosely attach nuts.
Then slide nuts into the T-slots on the INCRA Track.
Note:
If your application requires a vertical attachment point
for the INCRA Track that is taller than 1
3
⁄
4
", just place a
1
⁄
2
" thick spacer block no taller than 1
3
⁄
4
" between the
application and the rear of the INCRA Track.
Option #3:
Bottom T-slot Mount –
(Figs. 3 & 4)
Benefits:
◆
Allows mounting to the
3
/
4
" edge of a piece of plywood
◆
Good for applications requiring a taller fence
◆
Use for fixed or sliding track applications
Applications: . . . . . . . . . . . . . . . . . . . . . . . . . . . .Page
◆
Miter Gauge . . . . . . . . . . . . . . . . . . . . . . . . . . . 5
◆
Jigs & Fixtures . . . . . . . . . . . . . . . . . . . . . . . . . 6
◆
Drill Press Fence . . . . . . . . . . . . . . . . . . . . . . . 7
Note:
When using any T-slot mount, first install screws
and washers through your application and loosely
attach nuts. Then slide nuts into T-slots on the
INCRA Track.
FIG. 1
Slotted hole
mount
FIG. 2
Rear T-slot mount
FIG. 3
Bottom T-slot
mount (single)
FIG. 4
Bottom T-slot
mount (double)
#10-32
rectangular nut
(supplied)
1
/
4
-20 hex or square nut
(If using
1
/
4
-20 mounting
hardware, drill
5
/
16
" thru hole)
or
1
/
4
"
thru hole
#10 flat
washer
#10-32 machine screw
(Adjust length for application)
#10-32
hex nut
3
/
4
"
3
/
8
"
(for flush
front face
alignment)
#10-32 machine screw
(Adjust length for application)
#10 flat washer
#10 flat
washer
#10-32
hex nuts
#10-32 machine screw
(Adjust length for application)
9
/
16
" or
5
/
8
" dia.
counterbore
1
/
4
" dia.
thru hole
1
/
4
" dia.
thru hole
1
3
/
4
" max.
#10 x 1"
wood screw
#10 flat
washer
Slotted holes
5
/
8
"
2
INCRA Woodworking Tools & Precision Rules
Plywood or
hardwood base
9
/
16
" or
5
/
8
" dia.
counterbore