Waterstone POTFILLERS 3200 User Manual
Page 3
A
B
D
E
E
C
C
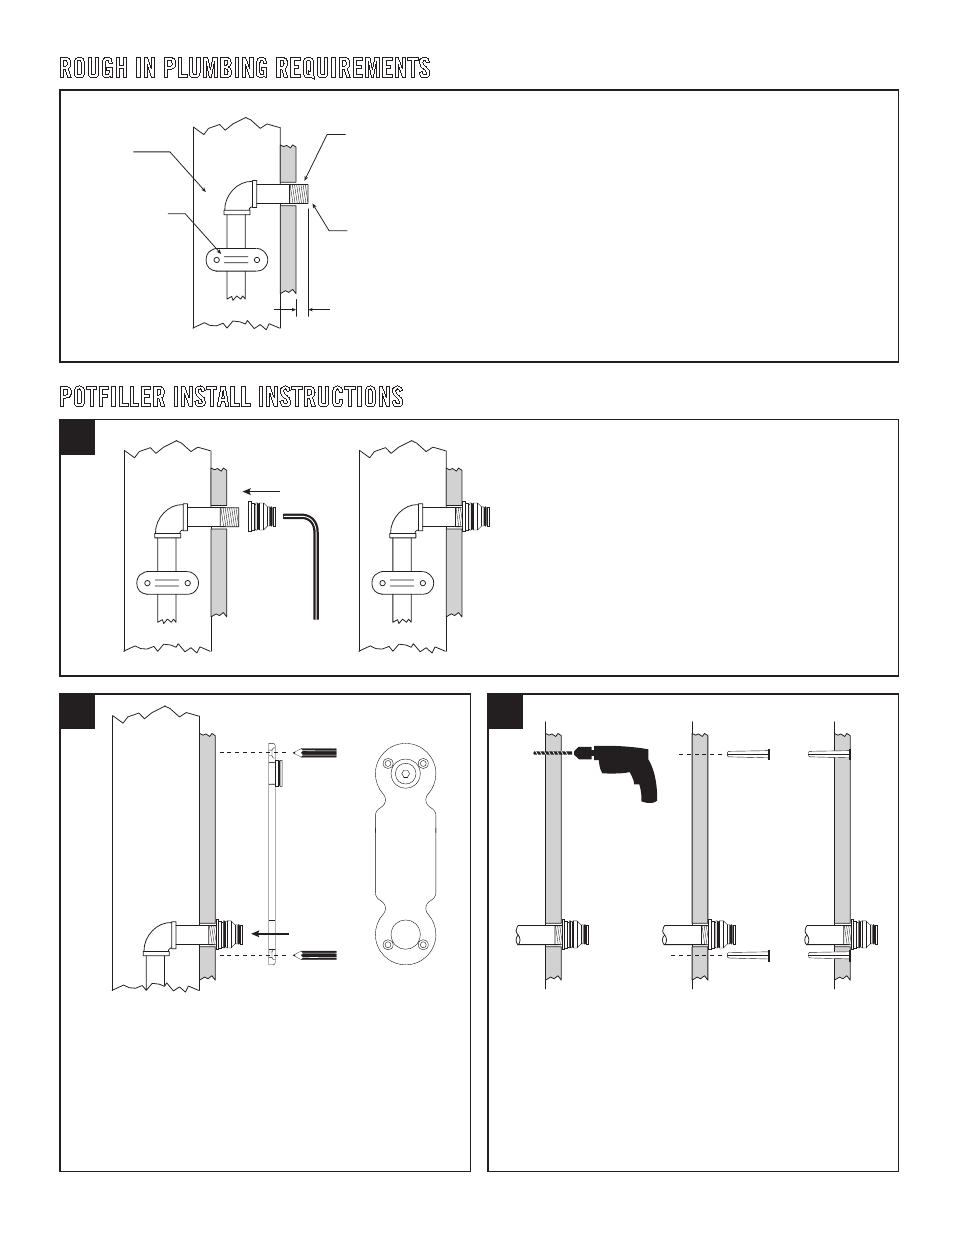
9/16" MINIMUM
THREAD LENGTH
FRONT
SIDE
LEAVE STRAPPING
LOOSE TO ALLOW
FOR 1/8” PLAY
BOTH WAYS
WALL STUD
1.
2.
3.
1/2"
USE 1/2” NPT PIPE
ROUGH IN PLUMBING REQUIREMENTS
POTFILLER INSTALL INSTRUCTIONS
Once position of potfiller has been determined, plumb STUB OUT PIPE
(A) from your household water source. Use a 1/2” NPT PIPE nipple for
rough in plumbing stub out. Extend end of STUB OUT no more than 1/2”
beyond mounting surface. Loosely strap pipe behind to allow some
play; between 1/8” and 1/4 “ of in and out movement. Height of STUB
OUT PIPE should be approximately 13 inches above cooking surface. This
allows adequate clearance for most larger cook pots. With the rough in
plumbing complete, your potfiller can now be installed.
Tools mentioned do not apply to the rough in plumbing process.
Make sure water source is off. Using 1/4” hex wrench (B)
provided, attach PIPE ADAPTER (C) to STUB OUT PIPE nipple
on wall. Use Teflon tape on threads to get a good, watertight
seal. Tighten PIPE ADAPTER. Check to make sure you can
push the back of PIPE ADAPTER flush to wall.
Place MOUNTING PLATE (D) over PIPE ADAPTER (C). Adapter should be
positioned in hole at bottom of the plate. Plate should fit flat to wall
surface. Using a level, or a carpenters square, position plate straight
up and down. Hold plate in place. With a pencil, mark four mounting
screw hole positions on wall. Remove plate.
ATTACH PIPE ADAPTER
ALIGN MOUNTING PLATE
DRILL FOUR MOUNTING HOLES
WARNING – Before drilling, take precautions to not drill into any
electrical or water lines behind surface of wall. Predrill four holes
using a 1/4” drill bit on four mounting screw marks. Insert four
plastic WALL ANCHORS (E) into drilled holes. Make sure head of the
WALL ANCHOR does not protrude above surface of wall, or faucet
assembly will not attach correctly to plate.