Timer recording, Press [g-code, Press the numbered buttons to enter the g – Panasonic DIGA DMR-EH65 User Manual
Page 24: Number, Press [enter, Using g, System to make timer recordings
24
RQT8380
Timer recording
See also “Important notes for recording” (
➡ 8).
Depending on the type of disc used for recording or the type of
broadcast, there may be restrictions on the title you are trying to
record.
[HDD] [RAM] [-R] [-RW‹V›] [+R] [+RW]
≥You can enter up to 32 programmes up to a month in advance.
(Each daily or weekly programme is counted as one programme.)
Preparation
≥Turn on the television and select the appropriate video input to suit
the connections to this unit.
≥If recording to DVD, insert a disc that you can use for recording
(
➡ 20).
≥Make sure that the clock settings are correct (
➡ 64).
[For]Australia]and]N.Z.]
[For]Australia]and]N.Z.]
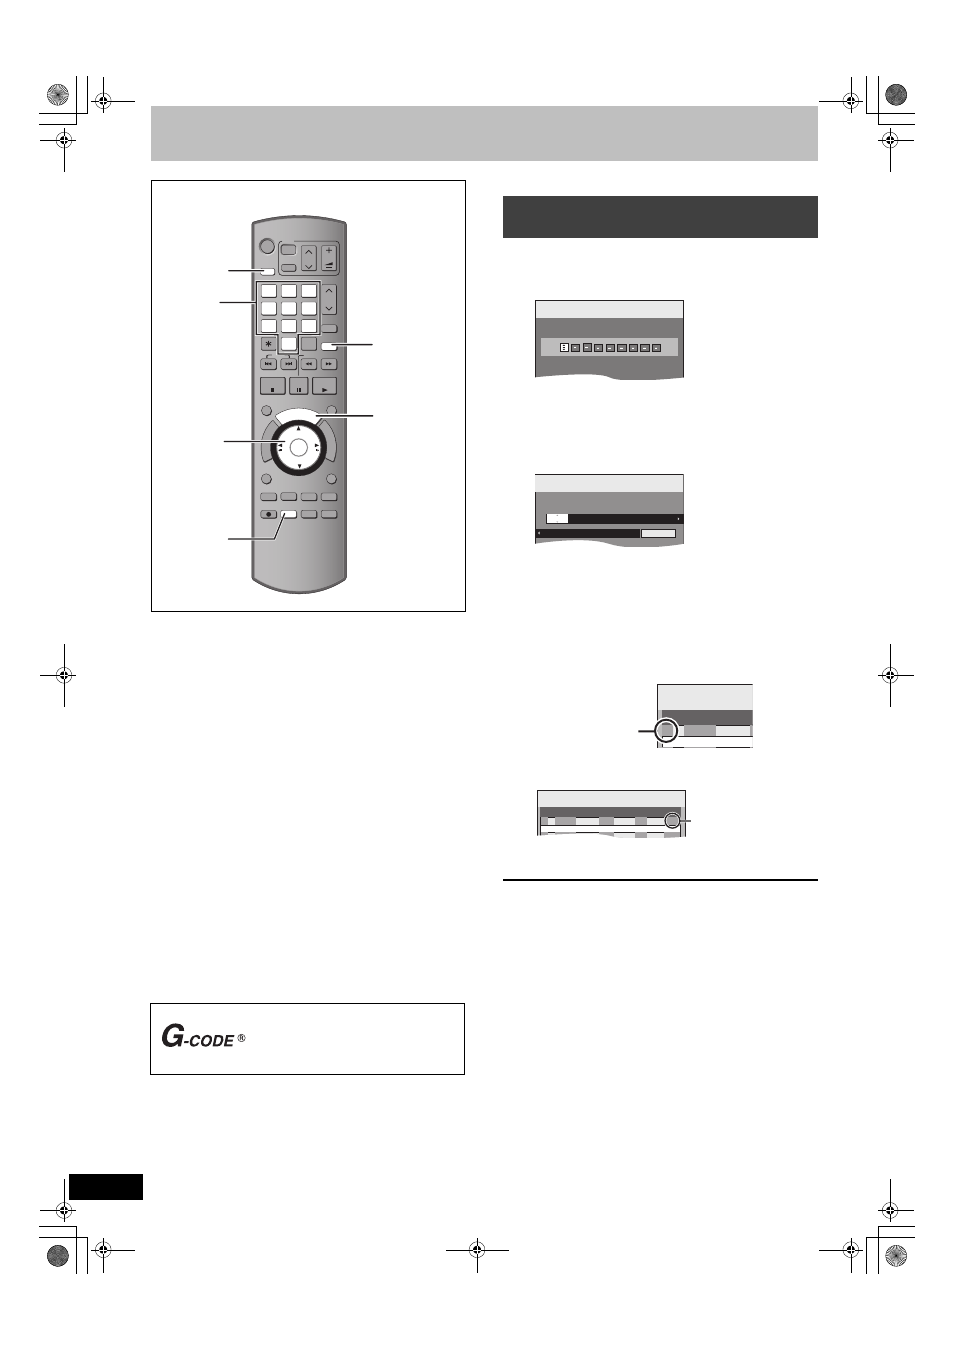
Entering G-
CODE
numbers is an easy way of timer recording. You can
find these numbers in TV listings in newspapers and magazines.
1
Press [G-Code].
2
Press the numbered buttons to enter
the G-
CODE
number.
Press [
2] to move back to correct a digit.
3
Press [ENTER].
≥Confirm the programme and make corrections if necessary
using [
3, 4, 2, 1] (
➡ 25, step 3).
≥When “-- ---” appears in the “Name” column, you cannot set
timer recording. Press [
3, 4] to select desired programme
position. After you have entered the information of a TV
station, it is kept in the unit’s memory.
4
Press [ENTER].
The settings are stored and the timer programme is on.
Timer icon is displayed in left column.
“
F” lights on the unit’s display to indicate timer recording
standby has been activated.
Repeat steps 1–4 to programme other recordings.
∫ To cancel recording when recording has already
begun (
➡ 26)
∫ To release the unit from recording standby
(
➡ 26)
∫ Notes on timer recording (
➡ 26)
G-
CODE
is a registered trademark of
Gemstar Development Corporation. The
G-
CODE
system is manufactured under
license from Gemstar Development
Corporation.
PROG/CHECK
DISPLAY
DISPLAY
STATUS
STATUS
AUDIO
AUDIO
DELETE
DELETE
F Rec
F Rec
REC MODE
REC MODE
REC
REC
CREATE
CREATE
CHAPTER
CHAPTER
ENTER
ENTER
FU
NC
TIO
NS
DI
RE
CT
NA
VIG
AT
OR
PROG/CHECK
RETURN
RETURN
SUB MENU
SUB MENU
S
MANUAL SKIP
MANUAL SKIP
PLAY/x1.3
PAUSE
PAUSE
STOP
STOP
SLOW/SEARCH
SLOW/SEARCH
SKIP
SKIP
G-Code
G-Code
INPUT SELECT
INPUT SELECT
CH
CH
0
9
8
7
6
5
4
3
2
1
VOLUME
VOLUME
CH
CH
AV
AV
Í
TV
TV
DRIVE
DRIVE
SELECT
SELECT
Í
DVD
-/--
-/--
TIME SLIP
TIME SLIP
A
B
C
G-Code
3,4,2,1
ENTER
DRIVE
SELECT
REC MODE
Numbered
buttons
e.g.,
[Australia]and]N.Z.]
Using G-
CODE
system to make timer
recordings
G-Code
Record
1:58 SP
DVD
30:24 SP
HDD
Remain
12:53:00 15. 7. TUE
Input G-Code Number 0-9, and press ENTER.
G-Code
Record
1:58 SP
DVD
30:24 SP
HDD
Remain
12:53:00 15. 7. TUE
Input G-Code Number 0-9, and press ENTER.
Timer
Recording
1:58 SP
DVD
30:24 SP
HDD
Remain
12:54:00 15. 7. TUE
Mode
Stop
Start
Name
Date
HDD
DVD
20:00
19:00
15. 7. TUE
SP
HDD
1 ARD
Programme Name
Timer
Recording
Remain
No.
Date
Name
ARD
15. 7. TUE
01
New T
F
Timer icon
Timer
Recording
1:58 SP
DVD
30:24 SP
HDD
Remain
12:56:00 15. 7. TUE
Mode
Stop
Start
No.
Date
HDD
DVD
HDD
Name
Drive
space
SP
OK
20:00
19:00
ARD
15. 7. TUE
01
New Timer Programme
F
Check to make sure “OK”
is displayed (
➡ 27).
EH65.book Page 24 Monday, April 3, 2006 5:10 PM