Electrical connection, Cy-v7100u phones, English – Panasonic CX-DH801U User Manual
Page 35: Cx-dh801u, Continued), Cy-ac300
SOURCE
SEL
VOL
SOURCE
1
2
3
4
DR COM
P POSI
SPC
DIM
MUTE
AC300
super
brigh
t mult
i-colo
r disp
lay & 30w P
ower
Amp
lifier fo
r Cen
ter Sp
eaker
DIGITA
L
PRO L
OGIC
DIGATAL SURROUND PROCESSOR
POSIT
ION
DIMM
ER
SPACE
PWR
L
L L
R R
R
ACC
BATTERY 5A
CENTER
AMP-CONT MAX 0.1A
VTR IN
ACC
ACC
H
A
M4X5mmMAX
B
C
V
H.A
H
C
V.A.B
V
B
C
BATTERY 5A
PARKING BRAKE
VIDEO-CNT
CH/AUX IN
PRE-OUT FRONT
VIDEO OUT
CY-V7100U
PHONES
REMOTE-IN
69
CX-DH801U
42
English
68
CX-DH801U
41
English
DVD Changer
CX-DH801U
(rear)
DVD Changer
CX-DH801U
(left)
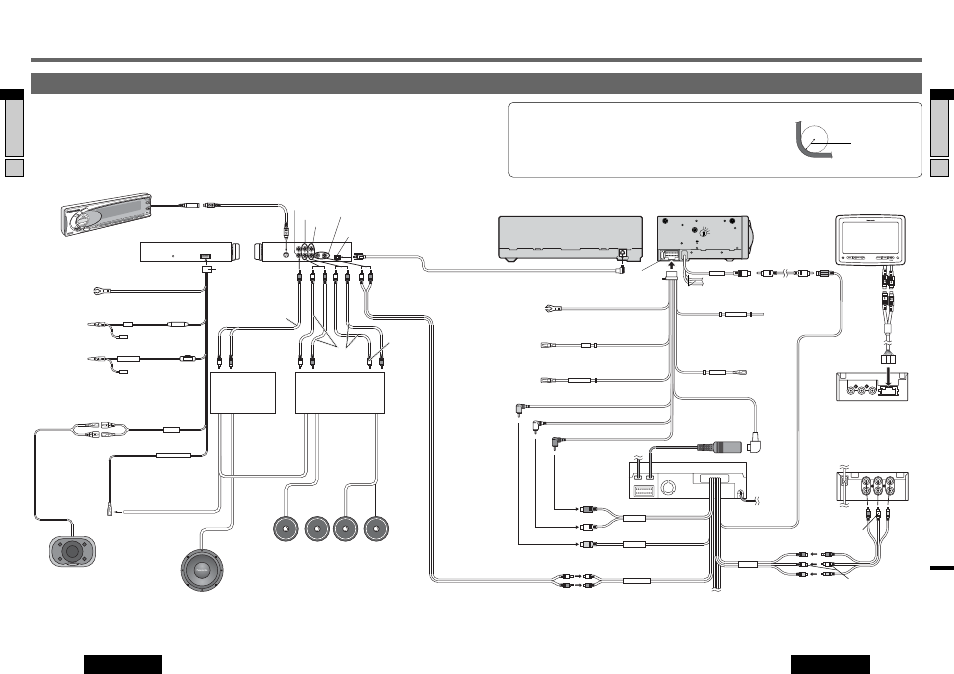
Electrical Connection
(Continued)
Connection with Digital Surround Processor (CY-AC300, option) and Power Amplifiers (option).
Note: Refer to the operating instructions for the connected devices, in addition.
Connection with Digital Surround Processor (CY-AC300)
Digital Surround Processor
CY-AC300
(option)
External Power
Amplifier
(option)
External Power
Amplifier
(option)*
Battery Lead
To the car battery,
continuous +12 V DC
Center Speaker Cord
External
Amplifier
Control Power
Lead
(Blue/white stripe)
(Connect to AMP-CONT)
Center Speaker
EAB-CF2
(option)
Sub-Woofer
(option)
Left
Speaker
(Rear)
*
For use as a monaural amplifier (Bridge connection)
Right
Speaker
(Rear)
Left
Speaker
(Front)
Right
Speaker
(Front)
ACC (or IGN) Power Lead
To ACC power,
+12 V DC
Amplifier Control
Power Lead
(Blue/white stripe)
Amplifier Control Power Lead
(Blue/white stripe)
Ground Lead
To a clean, bare metallic part of the
car chassis
Operating Unit/Main Unit
Connecting DIN Cord
(Supplied with CY-AC300)
SUB•W (MONO)
ANALOG-IN
DIGITAL-IN
Optical Fiber Cable
(CA-LRD60, option)
(R)
(R)
(R)
(L)
(L)
(L)
(L)
(L)
(R)
(R)
REAR
FRONT
CY-AC300
Main Unit (Rear)
Power
Connector
(Supplied with
CY-AC300)
RCA Cable (option)
RCA Cable
(option)
(Front)
(Black)
Resistor (220
Ω)
(When a Y-shaped
cord is used)
Fuse (5 A)
(Yellow)
(Black/green stripe)
(Black)
(Red)
(L)
(R)
RCA Cable
(option)
Note on handling optical fiber cable:
¡Do not allow the cable to be damaged by getting it caught in the door,
placing a heavy object on it, etc.
¡Make sure that the cable is not strained when it is connected.
¡Do not bend the cable sharply.
¡Install the DVD changer in where it prevents the optical fiber connector
from hitting its surroundings.
25 mm or more
(option)
Electrical Connection
Extension Cord
u
(BRAKE/VIDEO-CONT/ACC/BATT/DIN/RCA/GND)
Ground
Lead
To a clean, bare metallic part of
the car chassis
Battery Lead
To the car battery, continuous + 12 V DC.
(Black)
(Red)
(Yellow)
Parking Brake Lead
(Blue/yellow stripe)
Display Unit
CY-V7100U (option)
Be sure to wire the parking brake for
safety and preventing accident.
Video control Lead (output)
(Green/yellow stripe) Not used.
RCA Cable
Audio Output
Fuse 5 A
Not used.
(R) (Red)
(L) (White)
Pre-out Connector (Front)
Video Output (Yellow)
CQ-VD7001U
(option)
DIN Cable (Black)
To the changer
connector.
DIN Connector
Audio Output (L) (White)
Audio Output (R) (Red)
(R) (Red)
(L) (White)
Changer/AUX/XM
receiver Input Connector
(Yellow)
Video Input Terminal
RCA Cable (option)
Remote-out
(Black)
RCA Cable
(option)
Video Output
Terminal
(R) (Red)
(L) (White)
(Yellow)
(R) (Red)
(Yellow)
(L) (White)
Hide-away Unit (rear)
CY-V7100U (option)
Hide-away Unit (front)
CY-V7100U (option)
DIN
Connector
Power
Lead Not used. Do not connect the Power Lead
(ACC) if the control unit is equipped.
Note: Select [VTR] in [CH INPUT] of the [INPUT/OUTPUT] menu in advance if you would like to watch the display of the
DVD changer with CQ-VD7001U (
a
page 9).
Note: Never use
both Remote-Ins
(one is mini-pin
jack, the other is
RCA jack) at the
same time. Failure
to observe this may
cause misoperation.
Remote-In
(RCA) (Black)