Safety label, Warning, Minimum clearances to combustibles – Lopi Direct Vent Freestanding Stove User Manual
Page 36: Berkshire
3 6
Safety Label
Travis Industries
1 0 0 - 0 1 1 8 7 _ 0 0 0
4 0 7 0 2 1 9
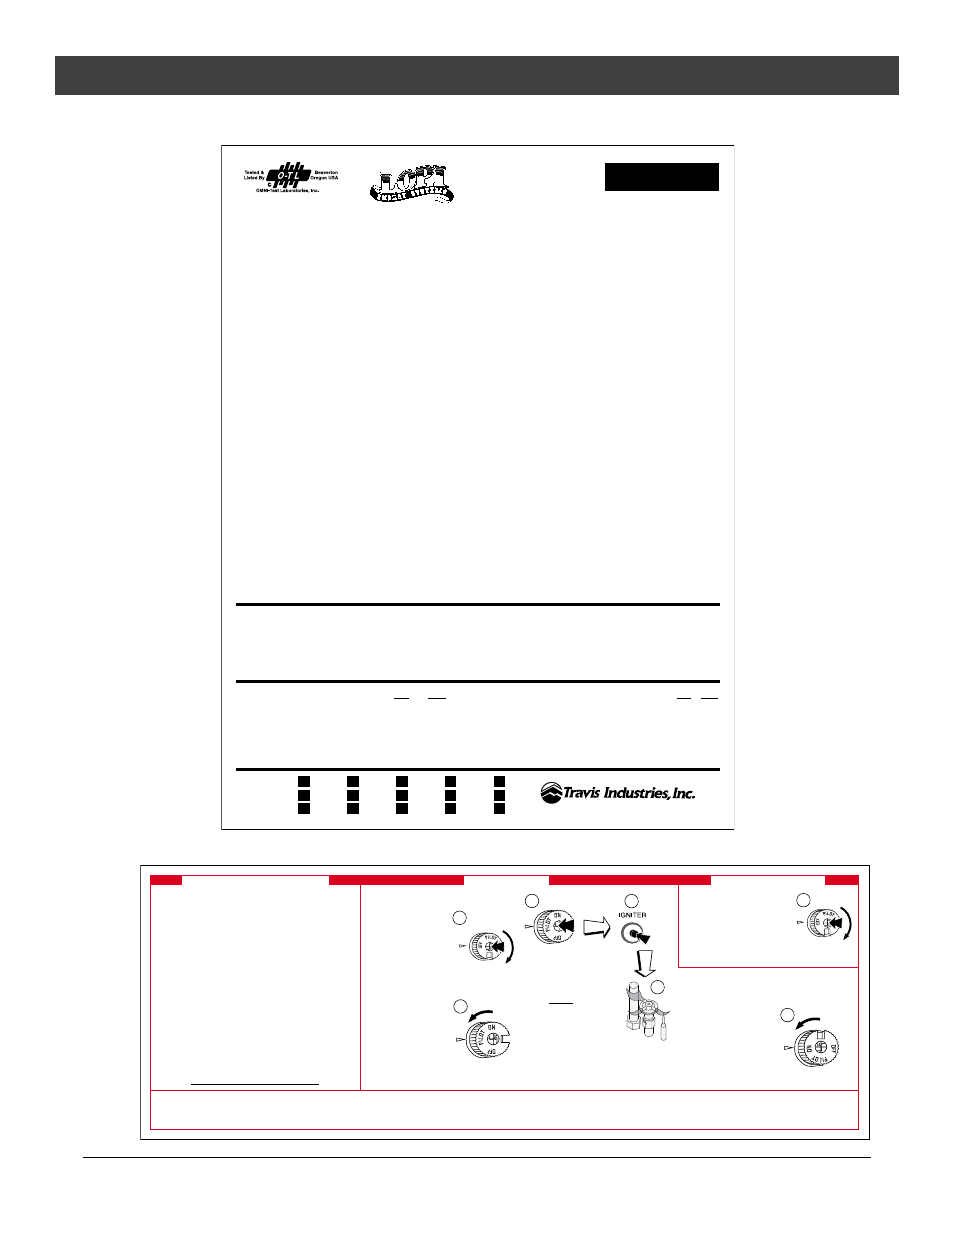
A copy of the safety (listing) label (adhered to the back of the stove) is shown below.
Berkshire
Vented Gas
Fireplace Heater
Report No. 028-S-28-5
Certified for USA & Canada
Tested to: ANSI Z21.88b-1999/CSA 2.33-M99 “Vented Gas Fireplace Heater”, CAN/CGA 2.17-M91 “Gas-Fired Appliances for use at High Altitudes”,
and UL307b-1995 “Gas Burning Heating Appliances for Manufactured Homes”
Must be installed in accordance with the manufacturer’s installation instructions and all local codes, if any; if not, follow current ANSI Z223.1,
NFPA 54 and CGA B149. This vented gas fireplace heater is equipped at the factory for use with natural gas. If conversion to propane (LP) fuel is
desired, the optional factory conversion kit must be used. This appliance uses a millivolt-type control system consisting of a gas control valve/reg-
ulator, a standing pilot burner assembly, a thermopile, a piezo ignitor, and the ON/OFF switch. THIS UNIT DOES NOT REQUIRE 110 VOLT POWER
TO OPERATE. All exhaust gases must be vented outside the structure of the living-area. Combustion air is drawn from outside the living-area
structure. This appliance is only for use with the type of gas indicated on the rating plate and may be installed in an aftermarket, permanently
located, manufactured (mobile) home where not prohibited by local codes. See owner’s manual for details. This appliance is not convertible for
use with other gases, unless a certified kit is used. May be installed in a bedroom - in Canada install with a listed thermostat, in the USA install
per local codes.
This vented gas fireplace heater is not for use with air filters.
WARNINGS:
Improper installation, adjustment, alteration, service or maintenance can cause injury or property damage. Refer to the information in the
owner’s and installation manual provided with this appliance. For assistance or additional information consult a qualified installer, service
agency or the gas supplier.
Installation and repair should be performed by a qualified service person. The appliance should be inspected before use and at least annually
by a qualified service person. More frequent cleaning may be required where excessive lint from material like carpeting and bedding is present.
The control compartment, the burner compartment and all circulating air passageways of the appliance must be kept clean and clear at all
times. See installation instructions accompanying appliance.
Due to high temperatures, the appliance should be located out of traffic and away from furniture and draperies.
This appliance must not be connected to a chimney flue servicing a separate solid fuel burning appliance.
Operation of this appliance when not connected to a properly installed and maintained venting system or tampering with the blocked vent
shutoff system can result in carbon monoxide (CO) poisoning and possible death.
Vented gas fireplace heater - Not for use with solid fuel.
Children and adults should be alerted to the hazards of high surface temperature and should stay away to avoid flesh burns or clothing ignition.
Young children should be carefully supervised at all times when they are in the same room as the appliance.
CAUTION:
Do not operate this appliance with glass removed, cracked or broken. Replacement of the panel(s) should be done by a licensed or qualified
service person.
Hot while in operation. Do not touch. Keep children, clothing, furniture, gasoline and other liquids having flammable vapors away.
Risk of electrical shock. Switch the household breaker off or remove fuse before servicing unit.
Use Simpson DURA-VENT direct vent system (Model GS) to vent this appliance to the exterior (direct discharge only without duct connection).
10850 117th Pl. N.E. Kirkland, WA 98033
Minimum Clearances to Combustibles
Stove Top to Sidewall .........................
10”
Alcove Min. Height....................................
58”
Stove Top to Backwall ........................
5”
Alcove Max. Depth....................................
45”
Stove Top to Cornerwall.....................
5”
Alcove Min Width...................................... 46-3/4”
Glass Front of Unit..............................
36”
L.P.
N.G.
L.P.
N.G.
Input Rate on “HI” (BTU/Hr)* . . . . . . 31,000
31,000
Minimum Inlet Pressure (inches W.C.) . . . . . . . .
11”
5.5”
Input Rate on “LO” (BTU/Hr)* . . . . . 23,000
24,900
Maximum Inlet Pressure (inches W.C.) . . . . . . . .
13”
7”
Manifold Pressure on “HI” (inches W.C.) . . . . . .
10”
3.5”
This appliance is equipped only for altitudes 0-2000 ft. (0-610 m) in USA; in Canada, 0-4500 ft. (0-1370 m).
Electrical Rating: 115v, 1.5 Amps, 60 Hz
Manufacture
2000
Jan.
Apr.
Jul.
Oct.
Date:
2001
Feb.
May
Aug.
Nov.
2002
Mar.
Jun.
Sep.
Dec.
0371
A copy of the instruction label (on a tag near the gas control valve) is shown below.
If the pilot will not stay lit after several tries, turn the gas control knob to
"OFF" and call your service technician or gas supplier.
9. Turn the gas control knob counterclockwise to "ON".
10. Turn on the blower (room air
fan) on the appliance.
11. Set the thermostat to desired
setting (if applicable) or use
the ON/OFF rocker switch or
remote control to operate the
main burner.
1. STOP! Read the safety information to the left and at the bottom
of this label before proceeding.
2. Set the thermostat to lowest
setting (if applicable).
3. Turn off the blower (room air fan)
on the appliance (if applicable).
4. Push the gas control knob in
slightly and turn it clockwise to
the "OFF" position.
NOTE: The knob will not turn
from "ON" to "OFF" unless the
knob is depressed slightly. Do
not force.
5. Wait five (5) minutes to clear out
any gas. Then smell for gas,
including near the floor. If you
smell gas, STOP! Follow "B" in
the safety information to the left
on this label. If you don't smell
gas, go to the next step.
6. Turn gas control knob
counterclockwise to the "PILOT" position.
7. A) Press the knob in and hold.
B) Immediately press the igniter
button repeatedly until the pilot is
lit. WARNING: If the pilot does
not light after 15 seconds, release
the knob and call your dealer
for service.
C) Keep the gas control knob
depressed for 30 seconds once
the pilot is lit.
8. Release the gas control knob. If the pilot goes out, repeat step 7.
• If the knob does not pop up when released, stop and
immediately call your service technician or gas supplier.
A. This appliance is equipped with an ignition device which must be lighted by hand.
When lighting the pilot, follow these instructions exactly.
B. BEFORE LIGHTING, smell all around the appliance area for gas. Be sure to smell next
to the floor because some gas is heavier than air and will settle on the floor.
WHAT TO DO IF YOU SMELL GAS:
• Do not try to light any appliance.
• Do not touch any electric switch; do not use any phone in your building.
• Immediately call your gas supplier from a neighbor's phone. Follow the gas
supplier's instructions.
• If you cannot reach your gas supplier, call the fire department.
C. Use only your hand to push in or turn the gas control knob. Never use tools. If the
knob will not push in or turn by hand, don't try to repair it, call a qualified service
technician. Force or attempted repair may result in a fire or explosion.
D. Do not use this appliance if any part has been under water. Immediately call a qualified
service technician to inspect the appliance and to replace any part of the control
system and any gas control which has been under water.
E. Do not block any control compartments, screens or circulating air passageways.
These areas provide air necessary for safe operation.
DO NOT REMOVE THIS INSTRUCTION PLATE
1. Set the thermostat to lowest setting
(if applicable).
2. Turn off the blower (room air fan) on the
appliance.
3. Push the gas control knob in slightly and
turn it clockwise to the "OFF" position.
NOTE: The knob will not turn from "ON" to
"OFF" unless the knob is depressed slightly.
Do not force.
FOR YOUR SAFETY READ BEFORE LIGHTING
LIGHTING INSTRUCTIONS
TO TURN OFF GAS TO APPLIANCE
6
9
3
7C
7A
7B
4
WARNING:
IF YOU DO NOT FOLLOW THESE INSTRUCTIONS EXACTLY, A FIRE OR EXPLOSION MAY RESULT, CAUSING PROPERTY DAMAGE, PERSONAL
INJURY OR LOSS OF LIFE. WHEN LIGHTING OR RE-LIGHTING THE PILOT, THE DOOR MUST BE OPEN OR THE GLASS REMOVED. AFTER THE PILOT
IS LIT, CLOSE AND LATCH THE DOOR OR REPLACE THE GLASS BEFORE LIGHTING THE BURNER.
0330