Step 5, Step 7, 6k g – Hotpoint WF645 User Manual
Page 2: 3k g, Step 4, Step 6, Step 8
Using y
our Machine
STEP 5
On-O
ff / S
elec
ting a pro
g
ramme
...
T
o
st
op or change a pro
g
ramme
...
P
ro
g
ress indic
at
or lights
...
P
rogr
amme listing
D
o
or L
o
ck
ed indica
tor ligh
t
P
ro
gr
ess indica
tor ligh
ts
‘S
tar
t/C
anc
el’
butt
on
P
rogr
amme selec
tor dial
V
a
riable Spin Speed butt
on
V
a
riable T
emper
a
tur
e
butt
on
Option butt
ons
‘On/O
ff
’butt
on
Digital Displa
y
T
he machine is swit
ched on b
y
pr
essing the
‘On/O
ff
’butt
on f
or 2 sec
onds
.
A
ll the indica
tor ligh
ts will ligh
t up f
o
r a f
ew sec
onds and
the ‘
D
o
or L
o
ck
ed
’indica
tor ligh
t will flash onc
e
.
T
u
rn
the pr
ogr
a
mme selec
tor dial t
o
the desir
ed pr
ogr
amme
.
L
oad
the laundr
y and det
er
gen
t.
S
elec
t the options y
ou r
equir
e
.
P
ress the
‘S
tar
t/C
anc
el
’b
utt
on f
or 2 sec
onds t
o
star
t the pr
ogr
amme
.
P
ress the
‘S
tar
t/C
anc
el
’butt
on f
or 2 sec
onds
.
S
e
lec
t
‘P
ump Out
’on the pr
ogr
a
mme selec
tor dial.
W
hen the machine has finished empt
ying
,tur
n the pr
ogr
a
mme selec
tor dial t
o
the new pr
ogr
amme (y
ou ma
y need t
o
add
det
er
gen
t).
P
ress the
‘S
tar
t/C
anc
el
’butt
on t
o
star
t the pr
ogr
amme
.
●
If
y
ou canc
el a hot w
ash pr
ogr
amme
,tak
e car
e
when r
emo
ving the
laundr
y,
it migh
t still be v
e
ry
hot.
T
hese will ligh
t up when y
o
u choose a pr
ogr
amme
,t
o indica
te the
pr
ogr
ess of the selec
ted pr
ogr
amme
.
W
hen star
te
d
,the first ligh
t in
the c
y
cle will sta
y lit and as the pr
ogr
a
mme
pr
ogr
esses
,succ
essiv
e ligh
ts will c
ome on un
til the
pr
ogr
amme finishes
.
Dur
ing a w
ash pr
ogr
amme the displa
y will sho
w the time r
emainin
g
to
the end of the pr
ogr
amme
.
D
o
or L
o
ck
ed indic
at
or light
...
●
T
he ‘
D
o
or L
o
ck
ed
’indica
tor ligh
t will c
ome on t
w
o sec
onds af
ter
y
ou pr
ess the
‘S
tar
t/C
anc
e
l’
butt
on and will sta
y lit thr
oughout the
pr
ogr
amme
.
A
shor
t time af
ter the pr
ogr
a
mme has finished the
indica
tor ligh
t will go out and y
ou can then open the door
.
●
S
e
lec
ted pr
ogr
ammes will not star
t if the door is not closed
pr
oper
ly
,the ‘
D
o
or L
o
ck
ed
’indica
tor ligh
t will flash t
o
sho
w
this
.
T
he displa
y will also sho
w the w
o
rd
‘do
or
’.
P
ush the door shut un
til y
ou hear the ca
tch click.
The machine will sho
w on the display if there is a problem:
H20
A pr
oblem with the w
a
ter supply
.
C
heck tha
t the taps ar
e tur
ned on and w
o
rk
ing
.
do
or
P
lease close the machine door pr
oper
ly
.
F000
Indica
tes a machine fault.
P
lease not
e the number sho
wn and r
e
fer t
o
STEP8
W
ARNINGS:
●
In the unlik
ely
ev
en
t of something
not w
o
rk
ing
,see
‘T
roubleshooting
’
STEP 8.
A T
ypic
al
W
a
sh
P
ro
g
ramme
S
o
rt
laundr
y in
to
gr
oups b
y
w
ashcar
e
labels
.
L
oad the machine
,
mak
ing sur
e tha
t the
laundr
y is not
tr
apped in the door
.
C
lose the door b
y
pushing it un
til it
clicks
.
2
S
e
lec
t an
y optional
w
ash f
e
a
tur
e(s) tha
t
y
ou ma
y r
equir
e b
y
pr
essing the
appr
opr
ia
te
butt
on(s),
indica
tor ligh
ts will
sho
w wha
t y
ou ha
v
e
chosen (see STEP 6).
Reduc
e
the w
ash
temper
a
tur
e if y
o
u
wish using the v
a
riable
temper
a
tur
e butt
on
(see STEP 6).
6
Dur
ing the w
ash,
the
pr
ogr
ess indica
tor
ligh
ts will sho
w wha
t
stage in the c
y
cle the
pr
ogr
a
mme has
reached
.
T
he digital displa
y
will sho
w the time
remaining t
o
the end
of the pr
ogr
amme
A shor
t time af
ter the
pr
ogr
amme has
finished the
‘Doo
r
Lo
ck
e
d
’indica
tor ligh
t
will go out and y
o
u
can open the door
.
W
e
r
e
commend that
y
ou swit
ch off the
elec
tricit
y and w
a
te
r
supply
.
A
dd det
er
gen
t (and
fabr
ic c
onditioner if
requir
ed) t
o
the
dispenser dr
a
w
er (see
STEP 3).
R
e
fer t
o
the det
er
gen
t
manufac
tur
er
’s
dosage instruc
tions
.
P
ress the
‘On/O
ff
‘
butt
on.
T
u
rn
the pr
ogr
amme
selec
tor dial t
o
the
pr
ogr
amme r
equir
ed
(see STEP
4).
Reduc
e
the spin
speed if y
o
u wish
using the v
a
riable spin
speed butt
on (see
STEP 6).
1
8
9
4
5
W
hen all selec
tions
ha
v
e
been made
pr
ess the
‘S
tar
t/C
anc
el
’b
utt
on.
T
o
st
op a pr
ogr
amme
bef
o
re
it has finished:
pr
ess the
‘S
tar
t/C
anc
el
’b
u
tt
o
n
again.
T
u
rn
the pr
ogr
amme
selec
tion dial t
o
‘P
ump Out
’.
W
hen the machine has finished empt
ying
y
ou can selec
t a new pr
ogr
amme
.
P
ress the
‘S
tar
t/C
anc
el
’butt
on t
o
star
t the
new pr
ogr
amme
.
STEP 7
A
u
tomatic F
eatures
...
A
u
to
half load
A
u
to
half load sa
v
es y
ou time and money when w
ashing smaller lo
ads
.
W
a
ter lev
els ar
e aut
oma
tically adjust
ed t
o
ca
ter f
or the diff
er
en
t loads
.
Unbalanc
ed load
Y
our machine has an inbuilt f
e
a
tur
e t
o
pr
ev
en
t it spinning with
an unbalanc
ed load
.
T
his will minimise e
x
cessiv
e vibr
a
tion and
pr
olong the lif
e of the machine
.
B
ef
or
e each spin the machine
‘s
enses
’the load within the drum and if the machine c
onsiders the
load t
o
be unbalanc
ed
,it will not
aut
oma
tically spin.
Inst
ead the machine will tr
y t
o
r
edistr
ibut
e
the load t
o
achiev
e
balanc
e b
y
tumbling back
w
a
rds and f
o
rw
ar
ds
.
If it is unable t
o
balanc
e the
load af
ter the six
th a
tt
empt the machine will abor
t the spin
pr
oc
ess
.
If
this saf
et
y f
e
a
tur
e is enc
oun
te
red y
ou can spin the load af
ter first opening the door
,r
edistr
ibuting the load and selec
ting
a fast or
slo
w
,spin only pr
ogr
amme
.
In the case of small loads or single i
te
ms y
ou ma
y tr
y adding some e
x
tr
a it
ems of a c
ompar
able siz
e t
o
help balanc
e the load
.
3
7
P
ro
g
ramme S
elec
tor Dial
IMPOR
T
ANT INFORMA
TION:
T
he t
emp
er
atur
e of the inc
oming w
a
ter supply and selec
tion of a
ny O
ptional
W
ash F
eatur
e,
ie
.T
ime S
a
ve
r,
will affec
t the pr
ogr
amme times*.
S
tar
t the pr
o
g
ramme b
y
f
ollo
wing the instuc
tions in S
tep 5:
‘On-
O
ff/S
elec
ting a pr
o
g
ramme
...
’
Handw
ash W
o
ol
A
ppro
v
ed
‘T
he w
o
ol w
ash c
ycle on the
WF series of Hotp
oint w
ashing
machines has b
een t
est
ed and
appr
o
ved b
y the
W
o
olmark
C
ompany for w
ashing gar-
ments lab
elled as
“hand w
ash
”,
pr
o
vided that the garments
ar
e w
ashed in acc
or
danc
e t
o
the instruc
tions issued b
y the
manufac
tur
er of this w
ashing
machine
.’
WEIGHT OF
W
ASH L
O
AD
T
w
o e
xamples of
maximum w
ash loads
for diff
er
en
t t
y
pes of
fabr
ic:
2
B
a
th T
o
w
els
1
Hand T
o
w
e
l
6
S
hir
ts
6 Blouses
1
P
air of P
y
jamas
4
It
ems of
Under
w
ear
COT
T
O
N
= 6k
g
2
C
hildr
en
’s
Dr
esses
4
S
hir
ts
4 Blouses
1
P
air of P
y
jamas
4
It
ems of
Under
w
ear
SYNTHETIC
= 3k
g
W
ash
F
abric
Temp
.
M
ax.
A
ppr
o
x
.
S
pin
lab
el
˚C
dr
y
p
ro
gr
amme sp
eed
w
eigh
t
time*
load
M
ix
ed P
rew
ash
30
6kg
20 minut
es
Slo
w
W
hit
e C
ott
on & Linen
without special finishes
.
9
5
6
kg
2 hours 20minut
es
Fast
Sup
er W
ash
60
6kg
2
hours 10minut
es
Fast
W
hit
e C
ott
on & Linen
C
olour
fast C
ott
on,
Linen
or
V
isc
ose without special
60
6kg
1
hour 50minut
es
Fast
finishes
.
Fast
W
ash
C
olour
fast C
ott
ons & Linen
60
5kg
1
hour
Fast
Non-c
olour
fast C
ott
ons
,
Linen &
V
isc
ose
40
6kg
1
hour 45minut
es
Fast
C
olour
ed S
y
n
thetics:
colour
ed N
ylon,
P
oly
est
er
,
A
c
rylic and C
ott
on mix
tur
es
,
C
ott
on or
V
isc
ose with special
50
3kg
1
hour 10minut
es
Slo
w
finishes
.
colour
ed P
oly
est
er and C
ott
on
mix
tur
es
.
A
c
rylics:
A
c
rylics and tr
i-ac
eta
te
blends
40
3kg
1
hour 5minut
es
Slo
w
of these fabr
ics with
W
o
ol,
P
oly
est
er and
W
o
ol blends
.
Handw
ash W
o
ol
40
1.5kg
50minut
es
Slo
w
Silks
30
3kg
55minut
es
G
e
n
tle
Fast W
ash
30
3kg
30minut
es
Slo
w
Handw
ash
25
3kg
45minut
es
G
e
n
tle
R
inse and Spin
M
ix
e
d
3
kg
30minut
es
Slo
w
Fast Spin
C
ott
on
6kg
15minut
es
Fast
Slo
w
Spin
D
elica
tes
3kg
13minut
es
Slo
w
P
ump Out
A
ll
2minut
es
A
B
C
D
E
F
G
H
J
K
L
M
STEP 4
Options
STEP 6
R
educ
e Cr
eases
Butt
on S
elec
tion:
To
selec
t an option,
pr
ess the butt
on and y
ou will see a ligh
t c
ome on alongside the butt
on.
P
ress again t
o
canc
el,
and the ligh
t will go out.
NO
TE:
If
the option selec
ted is not av
ailable with the pr
ogr
amme
,the
light will flash briefly
.
R
educ
es w
ash ac
tion and spin sp
eed
,meaning less ironing for
delic
at
e clothes
.
●
T
his option is only a
v
ailable with pr
ogr
ammes C,
E
,G,
H and
R
inse & Spin.
M
ini L
oad
...
F
or w
ashing a smaller load
.
In addition t
o
r
educing ac
tual w
ashing time
,this option will
reduc
e w
a
ter and ener
gy c
onsumption b
y
up t
o
50%.
Not
e
:Y
ou c
an r
educ
e the amount of det
er
gent y
ou use with this
w
ash.
●
T
his option is not a
v
ailable with pr
ogr
ammes A,
F,
J,
K,
L,
M
and Spin Only
.
T
ime S
a
v
e
r
S
a
v
e
s up t
o
a third on the pro
g
ramme time
.
●
T
his option is only a
v
ailable with pr
ogr
ammes B
,D
,G and H.
R
inse Hold
Clothes will b
e
held in the final rinse w
a
te
r,
k
eeping them fres
h
until y
ou are ready t
o
c
omplet
e the pro
g
ramme
.
C
omplet
e the final spin b
y
pr
essing the R
inse Hold butt
on when
the ligh
t is flashing
.
●
T
his is not a
v
ailable with pr
ogr
ammes A,
J,
L M,
R
inse & Spin
or Spin Only
.
T
ime D
elay
...
(Mo
dels WF645,
WF640
and WF630
only)
This option c
an delay the star
t of y
our w
ash pro
g
ramme b
y
up
to
24 hours
.
T
he display will sho
w
the delay y
ou ha
v
e
chosen.
Each pr
ess of the option butt
on will add a dela
y of one hour
.
If
y
ou pr
ess af
ter 24 sho
ws on the displa
y the machine will r
eset
the time dela
y and sho
w
‘OFF’
in the displa
y,
an
y pr
ess af
ter thi
s
will star
t c
oun
ting again fr
om one hour
Ex
tr
a R
inse
...
(Mo
del WF620
only)
F
o
r lar
ge w
ash loads and it
ems for y
oung children or p
eople
with sensitiv
e sk
in.
T
his option adds a r
inse
.
●
T
his is not a
v
ailable with pr
ogr
ammes A,
J,
K,
L,
M or Spin
Only
.
V
a
riable Spin Sp
eed
T
his allo
ws y
ou t
o
r
educ
e the spin sp
eed
belo
w the maximum f
or the pr
ogr
a
mme y
o
u
ha
v
e
chosen.
Each pr
ess of the butt
on will r
educ
e the spin
speed t
o
the ne
x
t lo
w
er band
.T
he new spin
speed will be sho
wn in the displa
y.
If
y
ou pr
ess again af
ter
‘OFF’
has been
displa
y
e
d
,the machine will r
e
v
e
rt
t
o
the
or
iginal higher spin speed
.
T
his allo
ws y
ou t
o
r
educ
e the w
ash
temp
er
a
tur
e
belo
w the maximum f
or the
pr
ogr
a
mme y
o
u ha
v
e
chosen.
Each pr
ess of the butt
on will r
educ
e the
w
ash t
emper
a
tur
e b
y
5˚C.
T
he new w
ash
temper
a
tur
e will be sho
wn in the displa
y.
If
y
ou pr
ess again af
ter
‘OFF’
has been
displa
y
e
d
,the machine will r
e
v
e
rt
t
o
the
or
iginal higher w
ash t
emper
a
tur
e
.
V
a
riable T
emp
er
atur
e
W
ARNINGS:
●
DO NO
T allo
w
childr
en t
o
pla
y
with the applianc
e
or tamper with the
co
nt
ro
ls
.
●
DO
NO
T o
v
er
load
the applianc
e!
It
ma
y damage
the laundr
y and
reduc
e the
qualit
y of the
w
ash.
●
DO
NO
T tr
y t
o
open the door
when the
‘D
o
or
Lo
ck
e
d
’
indica
tor
ligh
t is on.
●
Dur
ing the w
ash
c
y
cle
,r
emember
tha
t the door
glass ma
y
bec
ome hot t
o
the t
ouch.
●
DO
NO
T open the
dispenser dr
a
w
er
dur
ing an
y
pr
ogr
amme
.
●
If
y
ou st
op a pr
ogr
amme
par
t w
a
y thr
ough a w
ash
or ther
e is a po
w
er cut
,
tak
e car
e
when opening
the door
,the machine
ma
y c
o
n
tain hot w
a
te
r.
Is y
our w
a
ter pr
essur
e t
o
o
high?
If
y
our machine is still not w
o
rk
ing
co
n
tac
t:
R
epair S
e
rvic
e and Inf
or
ma
tion D
esk
UK 08709 066 066
R
epublic of Ir
eland 1850302 200
Y
ou will be ask
e
d f
or the f
ollo
wing
details:
Name and A
ddr
ess
,P
ost
C
o
de
,T
elephone Number
,D
a
te of
P
u
rchase
,C
olour and M
o
del/S
er
ial
Numbers - which can be f
ound on
the inside of the door
.
C
lear and pr
ecise details of the quer
y
or fault.
If
the digital displa
y sho
ws a F
ault
co
de number (see STEP 5),
please
advise us
.
R
ememb
er
,y
ou will b
e
char
ged for a
ser
vic
e c
all if a problem with y
our
machine is c
aused b
y
inc
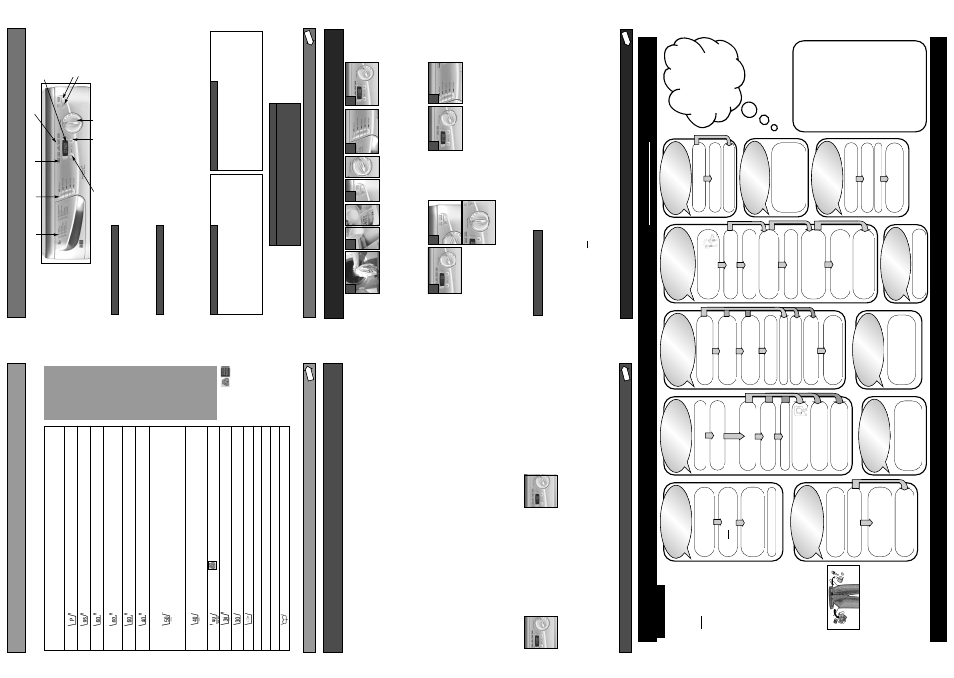
orrec
t
installation or misuse
.
C
heck all loose it
ems
,such as
coins
,h
a
v
e been r
emo
v
e
d
fr
om the laundr
y.
Ha
v
e
b
oth
tr
ansit bolts been
remo
v
ed fr
om the machine?
S
ee STEP 2:
Installation
Is the fuse in the plug OK?
MY MA
CHINE MAKES A
NOISE OR
VIBR
A
TES IN A
SPIN PR
OGR
AMME
.
P
lug the machine in and
tur
n the sock
et swit
ch on.
If
possible use another sock
et
for the machine
.
If
not r
eplac
e it
,see STEP
1:
Elec
tricit
y Supply
S
ee STEP
2:
Installation
C
lear an
y block
ages tha
t ha
v
e
been f
ound
Is the standpipe or household
dr
ain block
ed
.
Ha
v
e
y
ou adjust
ed the f
eet
to
stabilise the machine?
C
heck the f
eet ha
v
e
been
lev
elled
.
Is st
eam c
oming fr
om
the dispenser dr
a
w
er?
If
not tigh
ten them.
D
o
es the w
asher need
replacing?
✓
C
lose the door
.
C
hoose a
pr
ogr
amme and then pr
ess
‘On/O
ff
’
D
o
es the
‘d
oor indica
tor
’ligh
t
come on af
ter 2 sec
onds?
MY
MA
CHINE WILL
NO
T
ST
AR
T
MY
MA
CHINE DOES NO
T
PUMP OUT
W
A
TER
MY
MA
CHINE IS
LEAKING
THE PR
OGR
AMME
T
AKES A
LONG TIME
SUDS ARE C
OMING FR
OM
THE DISPENSER DR
A
WER
NO
T ALL OF
THE DETER
GENT
HAS BEEN FL
USHED A
W
A
Y
Is the machine plugged in
and swit
ched on?
Is the sock
et OK?
Test with
another applianc
e t
o
check.
Is the machine c
onnec
ted t
o
a sink w
ast
e sy
st
em?
C
heck the block
ed end of the
under sink dr
ainage unit has
been cut off
.
T
he machine is designed t
o
release st
eam fr
om the dispenser
dr
a
w
er dur
ing hot w
ashes
.
✓
Has
‘R
inse Hold
’b
een selec
ted?
T
he ligh
t will flash un
til the butt
o
n
is pr
essed again.
P
ress the
‘R
inse Hold
’butt
o
n
again.
✓
Y
ou ma
y need t
o
call in a
plumber
.
✓
✓
T
u
rn
the main supply tap
do
wn.
A
re the dr
ainage unit
,standpipe
or under sink c
onnec
tions fr
ee
fr
om block
ages?
✓
Has the dr
ain hose been installed
co
rr
ec
tly? Ensur
e it is not block
ed
or k
ink
ed
.
✓
Y
ou ma
y need a c
old fill adapt
or
to
run y
our machine as c
old fill
only
.
S
ee ‘Installa
tion
’,STEP
2.
Is y
our hot w
a
ter pr
essur
e lo
w?
C
heck the inlet hoses ar
e not
k
ink
ed
.
✓
C
heck tha
t y
our w
a
ter supply
taps ar
e tur
ned on fully
.
✓
W
as a shor
t spin pr
ogr
amme
used on a non-syn
thetic load
.
Did y
ou r
educ
e the spin speed of
y
our selec
ted w
ash pr
ogr
amme?
S
ee STEP 6:
Options
Did the w
a
te
r pump out?
If
not see
‘MY
MA
CHINE
DOES
NO
T
PUMP
OUT
W
A
TER
’.
T
he
‘R
inse Hold
’butt
on has
been pr
essed
,this will hold
laundr
y in the final r
inse w
a
te
r,
un
til the butt
on is pr
essed
again.
C
lean fabr
ic dispenser dr
a
w
er
.
S
ee STEP 3:
‘The Disp
enser
Dr
aw
er
’.
C
heck f
or lo
w t
emper
a
tur
e and
lo
w pr
essur
e of the hot and c
old
w
a
ter supply
.
THE DISPENSER
WILL NO
T
CL
OSE PR
OPERL
Y
C
heck the c
o
rr
ec
t amoun
t of
suitable det
er
gen
t has been used
,
re
fer t
o
manufac
tur
e
r’
s
re
commenda
tions
.
If
y
ou ha
v
e
used the wr
ong t
y
pe of
det
er
gen
t,
selec
t a R
inse pr
ogr
amme
to
flush out y
our machine
.
T
her
e has been an unbalanc
ed load
and the machine c
ould not spin.
S
ee ‘
A
ut
oma
tic
F
e
a
tur
es
’STEP
7.
MY L
A
UNDR
Y HAS NO
T
SPUN DR
Y
.
MY MA
CHINE ST
OPS
BEFORE A SPIN
PR
OGR
AMME
.
W
A
TER C
OLLECT
S IN
THE
FABRIC DISPENSER
C
OMP
AR
T
MENT
✓
✗
✗
C
lean the dispenser dr
a
w
er
,see
STEP 3:
‘The Disp
enser Dr
aw
er
’
Is the dr
a
w
er clogged with
det
er
gen
t?
C
heck the dr
a
w
er is pr
oper
ly
aligned
.
✓
✗
✗
✗
✗
✗
✗
✓
✓
✓
✓
A
re the fill hoses on c
o
rr
ec
tly?
T
roublesho
oting -
Mor
e
‘T
roublesho
oting inf
orma
tion and gener
al pr
o
duc
t advic
e c
a
n b
e
f
ound on our w
ebsit
e
,visit:
www
.theser
vic
ec
en
tr
e
.c
o
.uk/help
W
ashc
ar
e T
ips:
●
D
o
not o
v
er
load the machine
(maximum load 6kg).
In addition t
o
r
educing the
qualit
y of the w
ash,
this ma
y also
damage y
our laundr
y and the
machine
.
●
W
e
str
ongly r
e
commend tha
t y
ou
do not
w
ash
under
wir
ed br
as
in
this machine
.
S
hould the wir
es
bec
ome detached it c
ould cause
damage t
o
y
our clothes and the
machine
.
If the w
ashcar
e label
sta
tes tha
t the br
a is machine
w
ashable
,then w
e
advise placing
it in a sealed pillo
w case or a
similar w
ashbag
.R
ememb
er
,y
ou
will b
e
char
ged for a ser
vic
e c
all
resulting from a detached br
a
wire
.
●
D
o
not use the machine if the
it
em t
o
be w
ashed does not ha
v
e
a w
ash label.
B
e
fo
re
w
ashing laundr
y w
e
re
commend tha
t y
ou do the
follo
wing:
●
P
re-tr
ea
t a
w
k
w
ar
d stains with
w
ashable tr
ea
tmen
ts
.
D
o
not w
ash an
y it
ems tha
t ha
v
e
pr
eviously been tr
ea
ted with
solv
en
ts
.
●
C
lose zips
,fast
en belts
,tie str
ings
and close pr
ess studs t
o
pr
ev
en
t
tangling
.
●
Empt
y ALL objec
ts fr
om pock
ets
as they ma
y damage the clothes
and the machine
.
R
ememb
er
,y
ou will b
e
char
ged
for a ser
vic
e c
all t
o
rec
tify a
malfunc
tion resulting from
objec
ts
,such as c
oins
,p
ens
,hair
grips et
c.
falling from p
o
ck
ets
.
●
Limit the siz
e of absorben
t loads
ie
.t
o
w
els
,t
o 3kg (7lb) t
o
giv
e
good w
ashing and r
insing r
esults
.
●
P
lac
e small it
ems in a w
ash bag
.
●
A
lw
a
y
s f
ollo
w the car
e
label on
it
ems when choosing the w
ash
pr
ogr
amme
.
●
W
ash non-c
olour
fast it
ems or
really dir
ty
laundr
y separ
a
tely as
they ma
y aff
ec
t other it
ems
.
STEP 8
Remember
,
y
ou will be c
har
g
ed f
or a ser
vice call f
or pr
ob
lems ca
used b
y
incorrect installation,
non-remo
v
a
l of transit bolts or
pac
ka
ging,
leaks fr
om household pipe
w
ork,
loose or b
loc
ked fill a
nd drain hoses.
W
ashing items that DO
NO
T ha
ve a wash label or washing items tha
t are not intended as mac
h
ine washab
le and NO
T emptying content
s fr
om poc
kets ma
y cause pump or drain b
loc
ka
g
es,
or ma
y dama
g
e
components within the mac
hine
.
✗
✗
✗
Why not pin this
char
t up near y
our
machine or inside
a cupb
oard do
or
...
where y
ou c
an
easily refer t
o
it?