Oven use_cg_wobimw, Racks and bakeware_w10643471, Satinglide roll-out rack_w10643472 – KITCHENAID 27 Inch Single Convection Electric Wall Oven Control Guide User Manual
Page 7: Oven use, Rack and bakeware positions, Satinglide™ roll-out extension rack
7
OVEN USE
Odors and smoke are normal when the oven is used the first few
times, or when it is heavily soiled.
During oven use, the heating elements will not remain on, but will
cycle on and off throughout oven operation.
IMPORTANT:
The health of some birds is extremely sensitive to
the fumes given off. Exposure to the fumes may result in death to
certain birds. Always move birds to another closed and well
ventilated room.
Rack And Bakeware Positions
Use the following illustration and charts as guides.
Rack Positions - Upper And Lower Oven
Broiling
Food
Rack Position
Most broiling
6
Traditional Cooking
Food
Rack Position
Large roasts, turkeys, angel food, bundt
cakes, quick breads, pies
1 or 2
Yeast breads, casseroles, meat and
poultry
2
Cookies, biscuits, muffins, cakes
2 or 3 when single-
rack baking; 2 and
5 when multi-rack
baking
Convection Cooking (For Convection Models Only)
Oven Setting
Number of
Racks Used
Rack Position
Rapid Preheat Bake
1
3
Rapid Preheat
Convection Bake
1
3
Convection Bake
1
1, 2 or 3
Convection Bake
2
2 and 5
Convection Bake
3
1, 3 and 5
Convection Roast
1
1 or 2
Convection Broil
1
4, 5 or 6
Bakeware
To cook food evenly, hot air must be able to circulate. For best
results, allow 2" (5 cm) of space around bakeware and oven walls.
Use the following chart as a guide.
Number of Pan(s)
Position on Rack
1
Center of rack.
2
Side by side or slightly staggered.
3 or 4
See the rack position graphic in this
section for pan placement
recommendations.
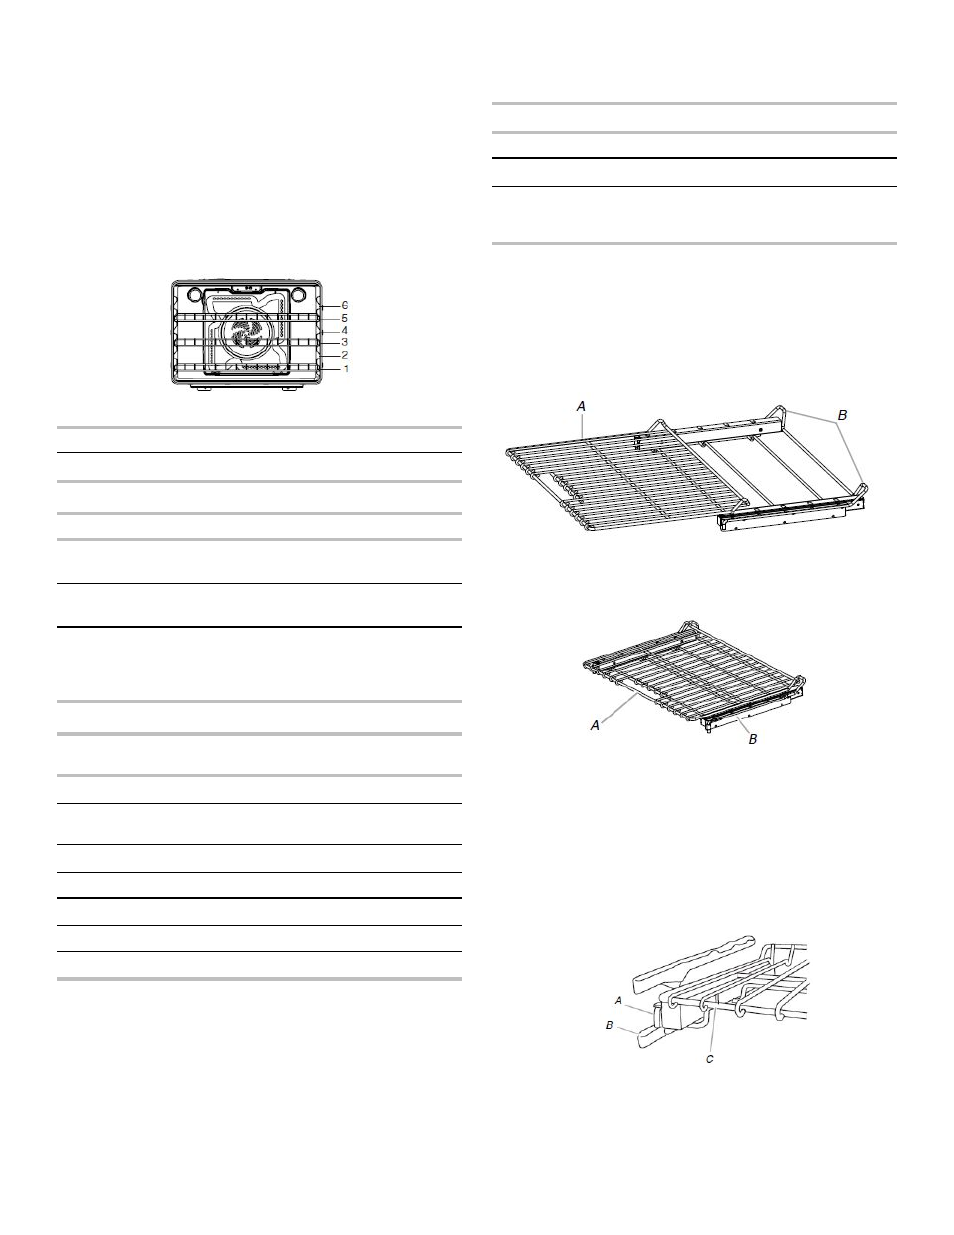
SatinGlide™ Roll-Out Extension
Rack
The SatinGlide
™
roll-out extension rack allows easy access to
position and remove food in the oven. It can be used in rack
positions 1 through 6.
Open Position
A. SatinGlide™ roll-out extension rack
B. Sliding shelf
Closed and Engaged Position
A. SatinGlide™ roll-out extension rack
B. Sliding shelf
To Remove SatinGlide
™
Roll-Out Extension Rack:
1.
Slide the rack in completely so that it is closed and engaged
with the sliding shelf.
2.
Using 2 hands, lift up on the front edge of the rack and push
the sliding shelf to the back wall of the oven so that the front
edge of the sliding shelf sits on the rack guides. The front
edge of the rack and the sliding shelf should be higher than
the back edge.
A.
Sliding shelf
B.
Rack guide
C.
SatinGlide™ roll-out extension rack
3.
Pull the rack and the sliding shelf out.