KITCHENAID 36 Inch Gas Cooktop Quick Start Guide User Manual
Warning, Gas cooktop quick start guide, Product registration and owner information
W11635508B
Gas Cooktop Quick Start Guide
PRODUCT REGISTRATION AND OWNER INFORMATION
YOUR QR CODE UNLOCKS
Product
registration
How-to
videos
Product
guides
Troubleshooting
materials
YOUR
QR
CODE
UNLOCKS:
Product
registration
and
warranty
information,
installation
instructions,
how-to
videos,
and
additional
accessories
to
get
the
most
out
of
your
product.
If
you
purchased
a
smart
appliance,
your
QR
code
will
provide
instructions
on
how
to
download
the
app
and
connect.
You
can
access
the
full
Installation,
User
Maintenance
and
Operating
Instructions,
Warranty
details,
and
more
by
visiting
our
website
at
https://www.kitchenaid.com/service-and-support
,
or
in
Canada
https://www.kitchenaid.ca/service-and-support
.
This
may
save
you
the
cost
of
a
service
call.
To receive a free printed copy of the information online, call us at
1-800-422-1230
(U.S.A.)/
1-800-807-6777
(Canada) or write to us at:
KitchenAid
Brand
Home
Appliances
Customer
eXperience
Center
553
Benson
Road
Benton
Harbor,
MI
49022–2692
K
itchenAid
Brand
Home
Appliances
Customer
eXperience
Centre
200–6750
Century
Ave.
Mississauga,
Ontario
L5N
0B7
Register to access warranty information and receive important notifications related to your product. Scan the Photo Registration Card or QR code to
register your product.
OPERATING INSTRUCTIONS
WARNING:
To reduce the risk of fire, electric shock, or injury to persons, read the IMPORTANT SAFETY
INSTRUCTIONS, located in your appliance's Owner's Manual, before operating this appliance.
Using Your Cooktop
WARNING
Fire Hazard
Do not let the burner flame extend beyond
the edge of the pan.
Turn off all controls when not cooking.
Failure to follow these instructions can
result in death or fire.
SELECTING THE PROPER FLAME SIZE
The flame size should match the cookware
you are using. Watch the flame, not the
knob, to adjust the heat. A flame larger than
the bottom of the cookware wastes energy
and will heat the handle.
�
High flame -
Start food cooking, bring
water to a boil, or pan broiling.
�
Medium flame -
Maintain a slow boil, fry
or sauté, thicken sauces, steam, or
stew.
�
Low flame -
Keep food cooking or keep
food warm.
REMEMBER:
When cooktop is in use, the
entire cooktop area may become hot.
PROPANE GAS CONVERSION
IMPORTANT:
This cooktop is factory set for use with Natural gas. If you wish to use Liquid Propane, call a
licensed professional to install the Propane gas conversion kit (included).
PLACEMENT OF BURNER HEADS AND CAPS
All burner caps and burner bases should be properly installed BEFORE operating the cooktop. Check that
the right size head and cap is on the right size burner.
Refer to the “Burner Placement” section for proper burner head placement details.
LIGHTING THE BURNERS
IMPORTANT:
All burners will click/spark when a knob is pushed in and turned counterclockwise towards
“Ignite”. A burner will light while the knob is between the “Ignite” and “Hi” position.
Surface burners use electric igniters. When the cooktop control knob is turned towards “Ignite” position, a
spark is used to light the burner. This sparking will conclude between the “Ignite” and “Hi” position.
To light the burners:
1.
Push in the knob.
2.
Turn the knob counterclockwise to “Ignite”. Wait until you see a flame.
3.
Turn the knob anywhere between Hi (H) and Lo (L) to the desired setting.
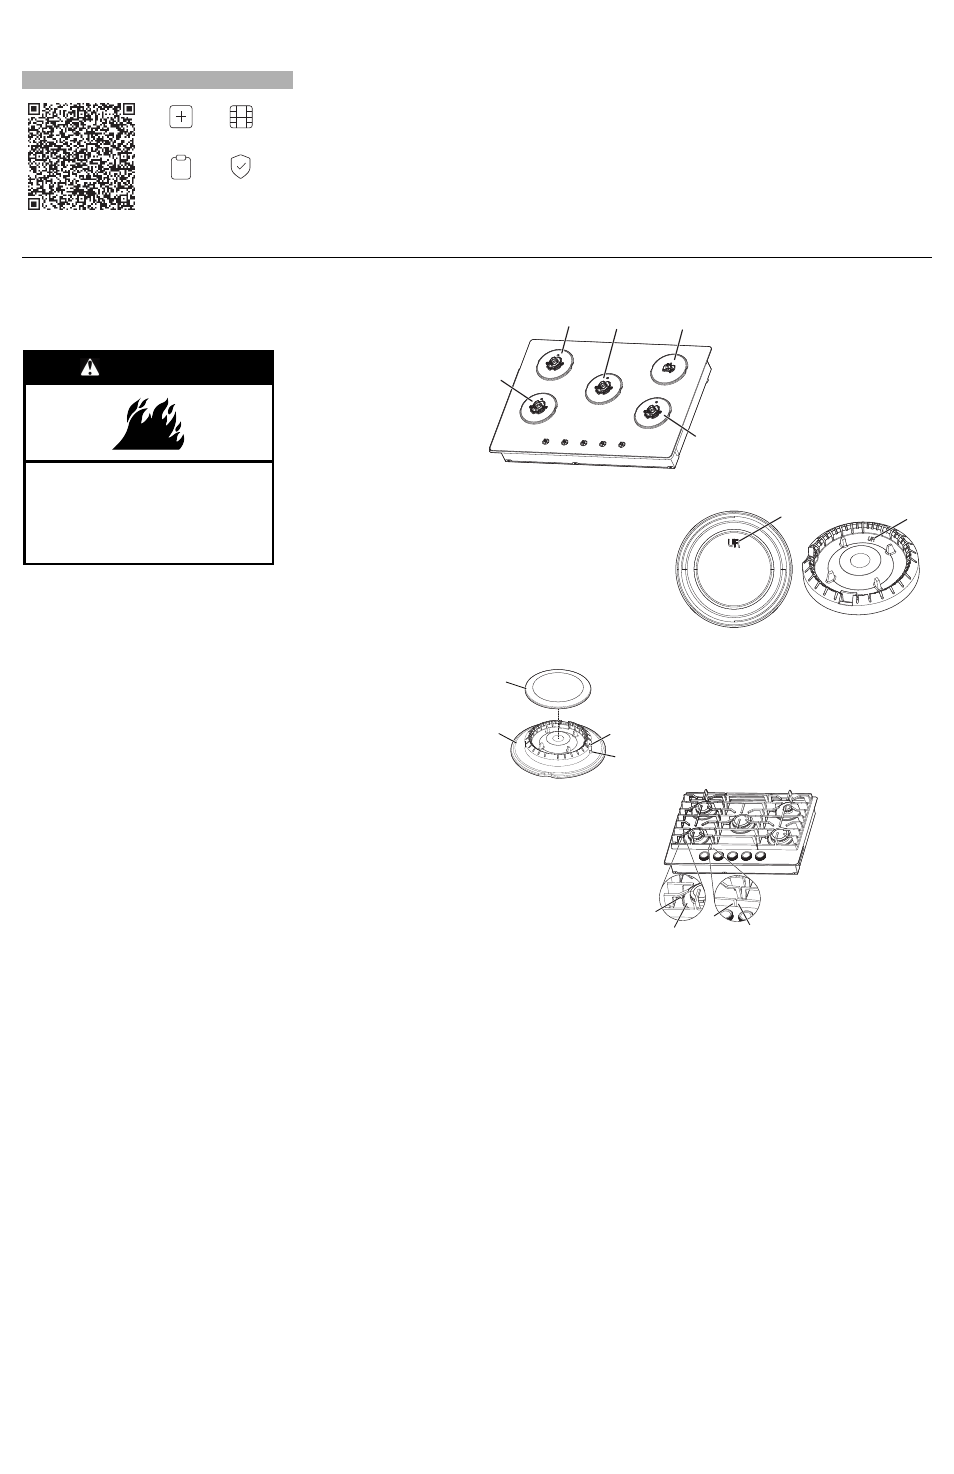
ASSEMBLING THE BURNERS
Use the following images for reference only.
E
A
D
B
C
5-Burner 30" and 36" Cooktop
A. All-Purpose burner
B. Power
™
burner
C. Even-Heat burner
D. All-Purpose burner
E. All-Purpose burner
Burner Placement
�
Burner caps and bases are included
with your cooktop.
�
Always match the burner cap to the
correct base by matching the type
markings which can be found on the
underside of the burner cap and top
interior of the burner base (ex: AUX,
SR, R, UR).
�
Always line up the hole in the burner
base to the electrode.
�
All-Purpose, Power
™
and Even-Heat
burners are similar in assembly.
Burner Cap
A
A.
Burner Cap Symbol
Burner Base
A
A.
Burner Cap Symbol
B
A
D
C
All-Purpose, Power
™
™
Burner and Even-Heat
Burners
A. Burner Cap
B. Burner Base
C. Electrode
D. Burner Base Hole
GRATE PLACEMENT
To install the grates, align the feet on
the grates with the burner bezels
and align the grate slots with the
adjacent grates. Be sure to line up
the slots and feet for proper grate
alignment.
A
B
C
D
A. Grate Foot
B. Burner Bezel
C. Left Grate Slot
D. Center Grate Slot