Operating instructions – Euro-Pro EP136R User Manual
Page 6
OPERATING INSTRUCTIONS
OPERATING INSTRUCTIONS
Warning: Always unplug from electrical
outlet before opening the dust cup
(container).
Note: Dust cup filter must be used when
operating the hand vacuum.
How To Operate Your Hand
Vacuum
1. Hold the hand vacuum firmly in your
hand by the Handle.
2. Push the On/Off Power Switch to
“On” position.
3. Start vacuuming
.
CAUTION: The hand vacuum is a
Very powerful unit. Make sure that you
hold it firmly, otherwise it can slip out of
your hand and cause injury.
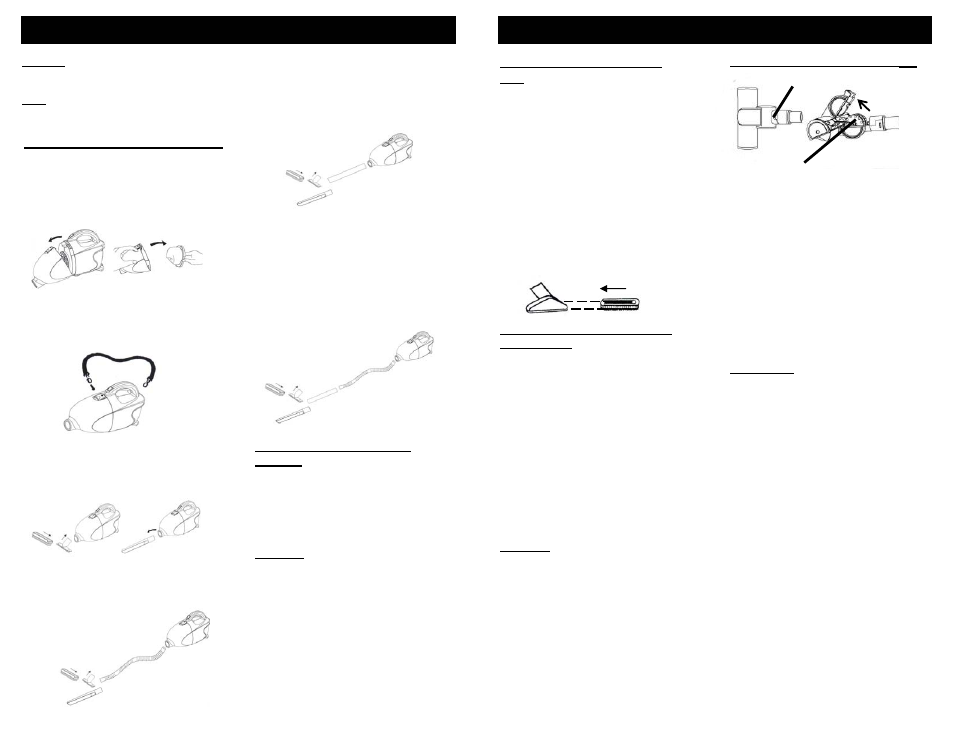
Using The Unit As A Hand Vacuum
1. To open the dust cup (container), lift
button and pull out the dust cup. Verify
that the dust cup filter is inside, then
attach the dust cup (container) to the
hand vacuum.
2. To use the hand vacuum with the
shoulder strap, attach it to the unit as
shown below.
3. To attach the cleaning brush or
crevice tool to the Hand Vacuum,
push accessory into the suction
hole, as shown below.
4
4. To use the hand vacuum with the
flexible hose, push the end of the
hose into the suction hole,
then attach the desired
accessory to the other
end of the flexible hose,
as shown below.
6. To use the hand vacuum with both
the flexible hose and the extension
tube, first insert the flexible hose
into the hand vacuum and then
push the narrower end of the tube
into the other end of the flexible
hose. Then attach the desired
accessory to the other end of the
tube, as shown below.
5. To use the hand vacuum with the
extension tube, push the narrower
end of the tube into the suction
hole, then attach the desired
accessory to the other end of the
tube, as shown below.
Slide
Using the Unit With Air Driven
Turbo Brush
1. Slide the narrow end of the
extension tube into the air driven
turbo brush.
2. Slide the wide end of the extension
tube onto the round end of the
deluxe hose with suction control.
3. Slide the round side of the deluxe
hose with suction control into the
suction hole of the vacuum unit.
4. Attach the shoulder strap to the
vacuum and hang it from your
shoulder.
5. You can now proceed to vacuum
your carpet or hard floor.
1. Slide locking latch forward then tilt the
top housing of the brush upwards. The
top housing is hinged and will tilt up
approximately 45° only.
2. Inspect turbine wheel and air passage
for debris and/or blockage. Remove
debris if present.
3. Inspect the rotating brush for built-up
hair or string. If present, remove by
carefully cutting with scissors. Avoid
damaging or cutting bristles.
4. Once clean, close the top cover of the
turbo brush and slide the locking latch
toward the rear of the brush to lock.
Cleaning Air Driven Turbo Brush
Turbine
Tilt
Upwards
Locking Latch
IMPORTANT: This unit is equipped with
a motor protective thermostat. If for
some reason the vacuum cleaner should
overheat, the thermostat will
automatically turn the unit off. Should
this occur:
• Push the On/Off button once.
• Disconnect the plug from the power
source.
• Check the source of overheating
problem. (i.e. clogged hose or filter)
• If clogged hose or filter is found,
unclog the hose and replace the
filters.
• Wait at least 45 minutes before
attempting to reuse the vacuum.
• After unit has cooled down for 45
minutes, plug in the cleaner and push
the On/Off button. The vacuum should
start again.
• If the vacuum still does not start,
please contact Customer Service at
1 (800) 798-7398.
CAUTION: The suction hole must be
open, free of any obstructions at all
times. Otherwise, the motor will
overheat and could get damaged.
Using the Convertible Brush
Note: The convertible brush with
removable bristles can be used with
the hose, the extension tube or with
the unit alone.
For vacuuming high, hard to reach
places such as ceilings,
curtains/drapes, etc., use the
convertible brush with removable
bristles as follows:
1. Insert the convertible brush to the
hose alone or with the extension
tube attached to the hose.
2. If you need a brush action, slide on
the removable bristle brush onto
the deluxe brush. (See illustration
below)
5