MAAX COCOON 6054 User Manual
Page 5
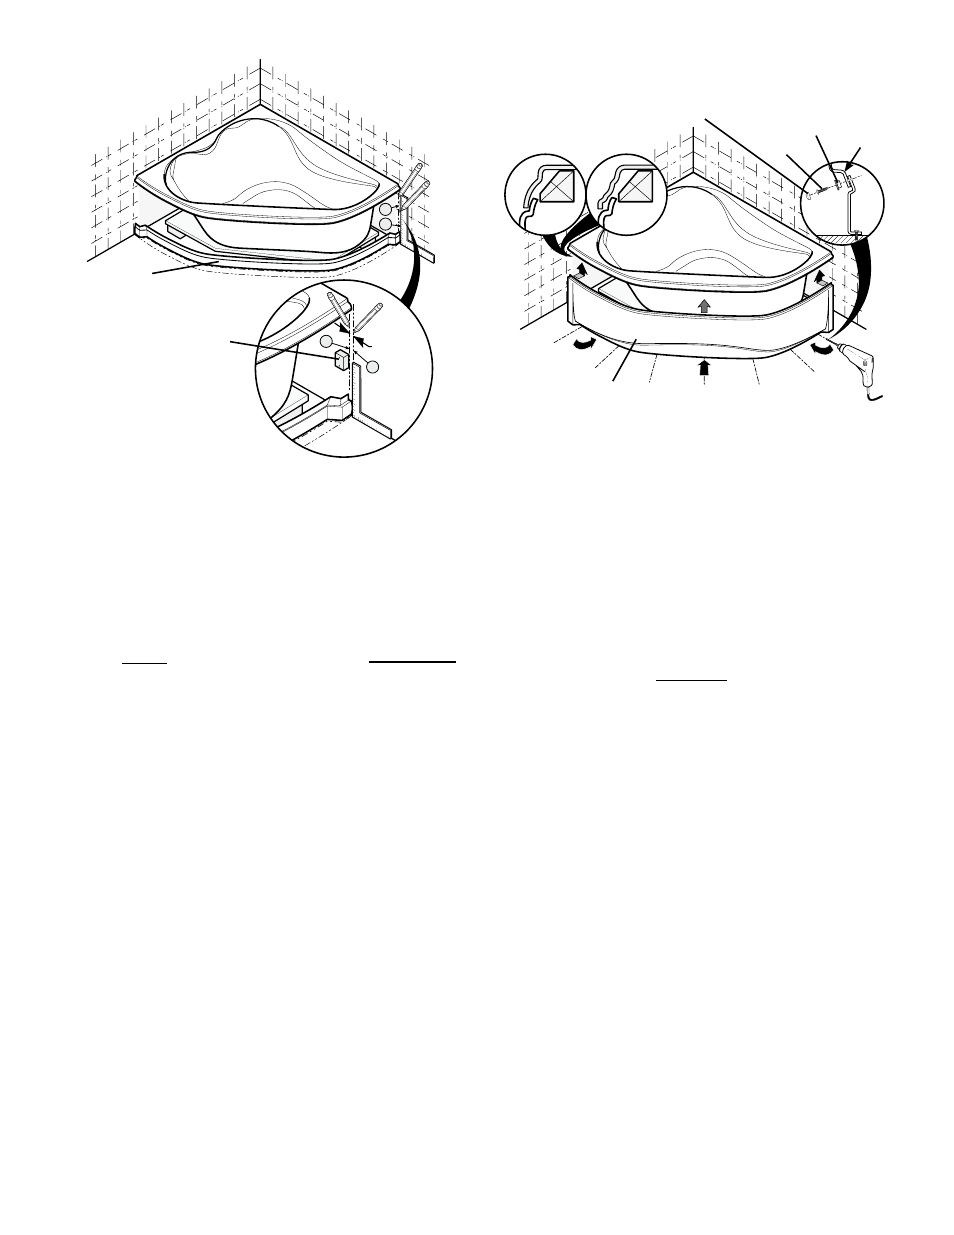
4. iNstaLLatioN du tabLieR
À l’aide d’un niveau, tracer sur le
mur une ligne verticale coïncidant
exactement au rebord avant du
coup de pied (ligne B).
Tracer une ligne parallèle à la ligne
B, à une distance de
1/2” (13 mm)
à l’intérieur de la ligne B (Ligne
B’). Fig. 4.
Fixez un bloc de bois au mur, en
alignant celui-ci sur la ligne B’.
Installer temporairement le tablier
et au besoin, ajuster la position du
coup de pied et du bloc de bois.
Retirer le tablier.
Percer des trous de 3/16” dans la
lèvre de fixation au bas du tablier.
Ne pas percer le coup de pied.
Installer le tablier en glissant son
rebord supérieur sous le rebord
de la baignoire. Fixer le tablier en
position en vissant le bas de celui-
ci sur le coup de pied avec les vis
auto-taraudeuses #8 x 5/8” et les
receveurs de cache vis. Installer
les cache vis. Fig. 5.
10012144
4. aPRoN iNstaLLatioN
Using a level or plumb line, trace,
on the wall, a line coinciding exactly
with the front of the kickplate (Line
B).
Trace a second line, parallel to
line B, at a distance of
1/2” (13
mm) inside line B (Line B’). Fig. 4.
Install a wood bloc on the wall,
aligning its front edge with line B’.
Trial install the apron and adjust
the kickplate and wood bloc
position as required. Remove the
apron.
Drill 3/16” holes in the bottom of
the apron fastening flange.
do
not drill through the kickplate.
Install the apron by sliding the
upper edge of the apron under the
edge of the bathtub. Fix the apron
to the kickplate using the #8 x 5/8”
self-drilling screws and screw cap
receivers. Install the screw caps.
Fig. 5.
4. iNstaLacióN deL faLdóN
Con la ayuda de un nivel, trazar
sobre el muro una línea vertical
que coincida exactamente con
el reborde delantero de la chapa
(línea B).
Trazar una línea paralela a la línea
B,
a una distancia de
1/2” (13 mm)
al interior de la línea B (Línea B’).
Fig. 4.
Fije un bloque de madera al muro,
alineandolo sobre la línea B’.
Instalar temporalmente el faldón y
en caso de necesidad, ajustar la
posición de la chapa
y del bloque
de madera. Retirar el faldón.
Perforar huecos de 3/16” en la
pestaña de fijación en la parte
inferior del faldón.
No perforar
la chapa
.
Instalar el faldón en
posición atornillando su parte
inferior sobre la chapa
con los
tornillos autorroscantes #8 x 5/8”
y los receptores
de tapa tornillo.
Instalar los tapa tornillos. Fig. 5.
B
B'
B
B'
1/2"
(13 mm)
fig. 4
Kickplate
Wood bloc
2” x 2” x 1 3/4”
Chapa
Bloc de bois
2” x 2” x 1 3/4”
fig. 5
Apron
Apron
#8 x 5/8”
Screw cap
Screw cap
receiver
Tablier
Cache vis
Tablier
Receveur de
cache vis
Coup de pied
Bloque de madera
2” x 2” x 1 3/4”
Faldón
Cubre tornillos
Receptor de
tapa tornillos
Faldón