Auto-fill / auto-dump instruction manual – Sandia Auto-Fill / Auto-Dump User Manual
Page 3
© 2015 Copy Rights Reserved Ultimate Solutions |
Questions? Call: 714-901-8400
Auto-Fill / Auto-Dump Instruction Manual
By Ultimate Solutions | Sandia Products
Page 3
Float
Float Hanger
Chemical Feed Hose
Proportioning Valve
3.0 Automatic Chemical Feed Continued
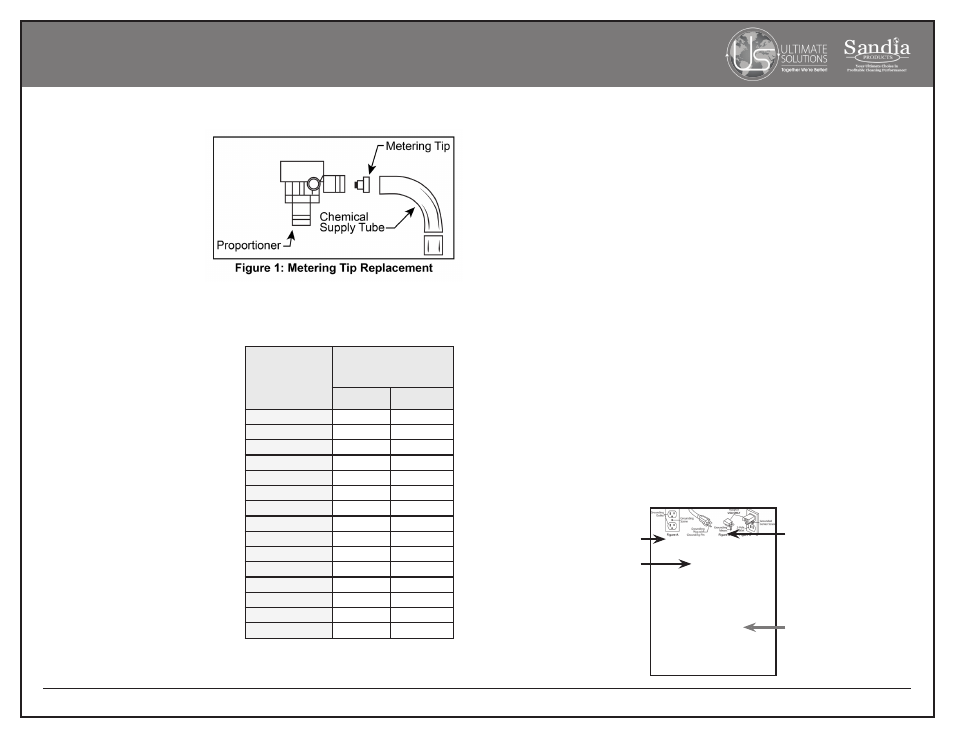
3.1 Metering Tip Replacement:
To adjust the amount of cleaning
concentrate being drawn, simply
remove the plastic supply tube
from the chemical feed metering
valve (Figure 1). Unscrew the
colored metering tip and replace
with the tip that corresponds to
the portable dilution ratio for
your cleaning product (Figure
2). Reconnect the plastic supply
tube.
3.2 Liquid Concentrates:
The machine comes with the orange metering tip installed at the factory. This tip is
rated for a 0.4 oz. of chemical per gallon of water, which is a standard dilution ratio
for the most popular liquid cleaning
products on the market. Refer to your
product’s dilution ratio and select the
proper metering tip from the chart
displayed in Figure 2.
3.3 Fresh Water Rinse:
For
fresh water rinsing, simply leave the
chemical supply tube in the solution
tank.
3.4 Manual Filling:
To use the
machine without the automatic filling
system, simply pre-mix your solution.
3.5 Setup:
Inside the solution tank
is a bottle float. Check the chemical
feed supply foot valve for debris and
clean if necessary. Insert the line into
the cleaning concentrate so that it
touches the bottom of the bottle. Set
cleaning concentrate on the machine
or inside the fresh water solution tank
opening. Connect the fill hose to the
quick disconnect located on the back
of the machine.
Figure 2: Metering Tip Dilution Ratios
Tip Color
Concentrated Dilution
Ratio
(oz./gal.)
Liquids
Powders
Tan
0.30
---
Orange
0.40
---
Turquoise
0.50
---
Pink
0.75
---
Clear
1.00
---
Brown
1.12
---
Red
1.50
---
White
1.75
---
Green
2.00
0.25
Blue
2.50
0.30
Yellow
3.75
0.47
Black
5.00
0.63
Purple
8.50
1.06
Gray
11.50
---
None
16.25
---
3.0 Automatic Chemical Feed Continued
3.5 Setup Continued:
Attach the water supply hose to any available faucet. It
may require adapters to fit the various faucet combinations you will encounter. Never
force a threaded fitting. Place a towel over the faucet connection so that any spray
will be controlled. Turn on the water and check the hose connections for leaks.
The solution tank will fill approximately half full (about 5-gallons). As the tank is
filling, cleaning concentrate is being drawn into the solution tank.
3.6 Shutdown:
Before the end of each job, turn off the water supply to prevent
the solution tank from becoming completely full. With the cleaning completed and
the solution pump turned off, disconnect the fill hose from the faucet, drain the water
in the fill hose back into the solution tank and remove the fill hose. Remove the
chemical feed supply tube from the chemical solution jug, clean the filter and place
into the solution tank. Vacuum out the solution tank and clean the solution tank water
filter.
4.0 Water and Chemical Dilution – Auto Fill
The chemical dilution rate is controlled by the metering tip and the dilution rate can
only be changed by changing the metering tip (see section 4.2).
4.1 Chemical Feed Setup
• Remove the chemical feed hose from the solution tank. Make sure the float is
attached to the valve and hanging freely.
• Place the end of the hose into a container of liquid chemical.
• If the tip is removed and the proportioning system operated with no tip, the
dilution rate will be 8:1 (the equivalent to adding 16-1/4 oz. of chemical to each
gallon of water).
• If a fresh water rinse with no chemical is desired, simply leave the chemical feed
hose inside the solution tank.