Fig.5 fig.6, Fig.5, Fig.6 – Medal Sports WM.com 1354812 GR User Manual
Page 9
www.themdsports.com
1354812 GR
8
(Continúe en la siguiente página.)
(Continued on the next page.)
Español
English
FIG.5
FIG.6
2
A4
X 1
X 4
FIG.5
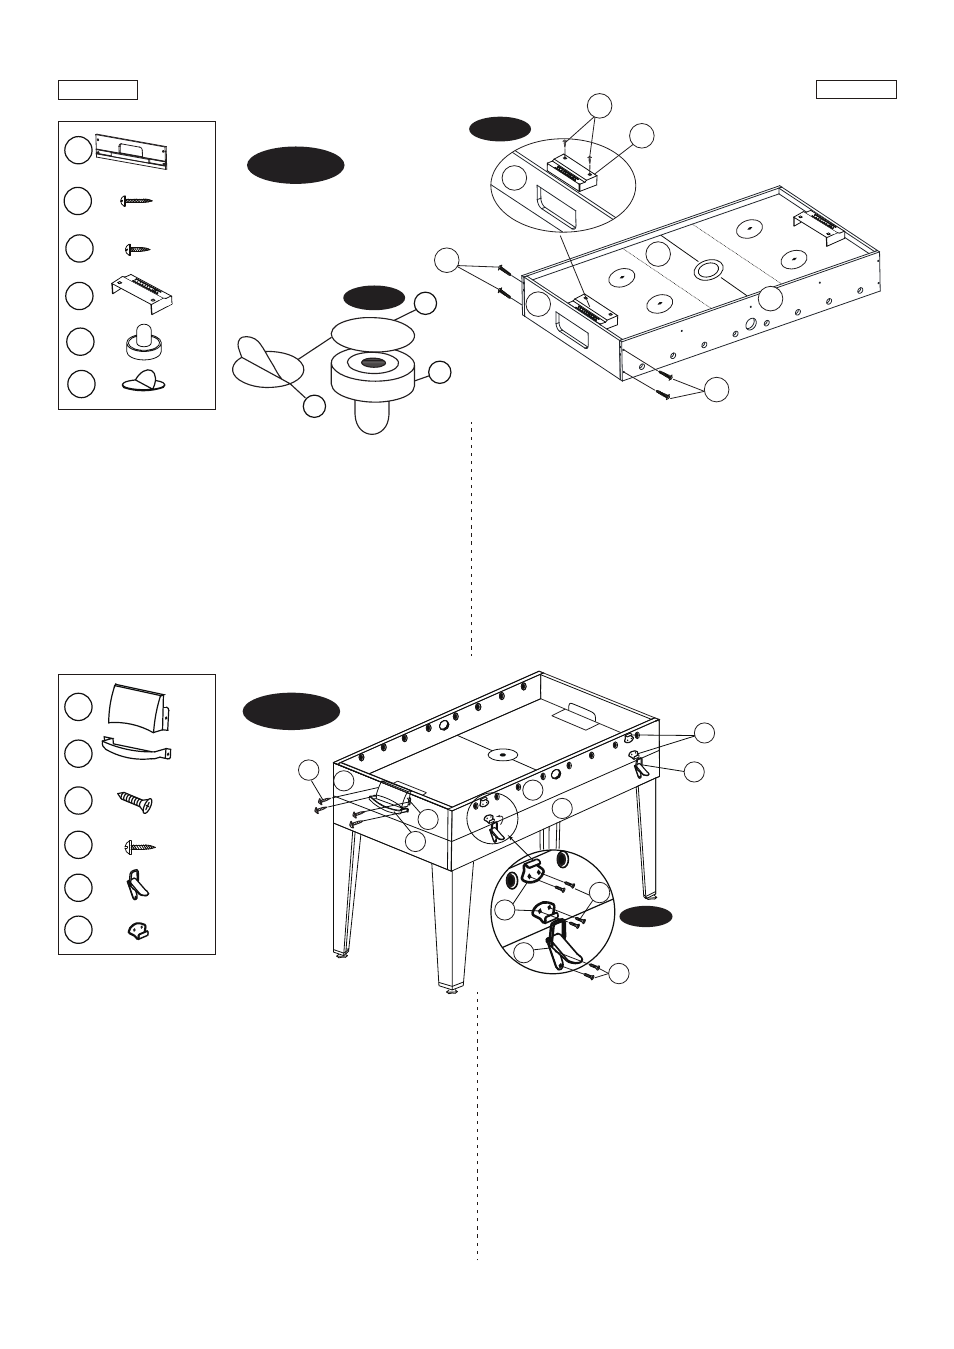
10. Attach the other End Apron (#2) to the Side Aprons
(#1) using four Screws(#A4).
See FIG. 5.
11. Attach the Hockey Goals (#37) to the Hockey
Playfield (#4) using two Screws (#A5) per Hockey
Goal.
See FIG. 5A.
12. Tear off the back side paper of the Felt Pads (#19)
and stick them at the bottom of the Pushers (#18).
See FIG. 5B.
FIG.5
10. Luego adjunte el otro Delantal Final (#2) a
Delantales Lateral (#1) usando 4 Tornillos (#A4).
Vea la FIG. 5.
11. Adjunte los Goles de Hockey (#37) al Campo de
Juego de Hockey (#4) usando 2 Tornillos (#A5) por
Gol de Hockey.
Vea la FIG. 5A.
12. Arranque el papel de la parte trasera de las Almo-
hadil las de Fieltro (#19) y péguelos al fondo de los
Conectes (#18).
Vea la FIG. 5B.
A5
X 4
37
X 2
18
X 2
19
X 2
18
19
19
FIG. 5B
25
24
24
6
1
2
25
A5
17
16
A9
A9
FIG.6A
16
17
X 2
X 2
A9
A5
24
25
X 24
X 8
X 4
X 8
FIG.6
13. Turn the Soccer Table (See FIG.5) over and then
place it on the top of the Billiard Frame (#6).
14. Attach the Top and Bottom Goal Boxes (#16 & #17)
to the End Aprons (#2) using four Screws (#A5) per
Goal Box.
15. Attach the Top Locking Clasps (#25) to the Soccer
Side Aprons (#1) using two Screws (#A9) per Top
Locking Clasp. Attach the Bottom Locking Clasps
(#24) to the Billiard Frame (#6) using two Screws
(#A9) per Bottom Locking Clasp.
See FIG. 6A.
FIG.6
13. Voltee la Mesa de Fútbol (Vea la FIG. 5) y luego lo
coloque sobre la parte superior del Marco de Billar(#6).
14. Adjunte las Cajas de Gol Superior & Inferior
(#16 & #17)a los Delantales Final (#2) usando 4
Tornillos (#A5) por Caja de Goal.
15. Adjunte los Broches de Cerradura Superior (#25) a los
Delantales Lateral de Fútbol (#1) usando 2 Tornillos
(#A9)por Broche de Cerradura Superior. Adjunte los
Broches de Cerradura de Fondo (#24) al Marco de
Billar (#6) usando 2 Tornillos (#A9) por Broche
de Cerradura de Fondo.
Vea FIG. 6A.
0
1
2
3
4
5
6
7
8
9
FIG. 5A
2
3
4
5
6
7
8
9
0
1
2
3
4
5
6
7
8
9
0
1
A4
1
2
A4
4
2
37
A5
0
1
2
3
4
5
6
7
8
9