Fig. 10, Fig.9, Fig.10 – Medal Sports SH1325407 User Manual
Page 11
Español
English
9
9
www.themdsports.com
1325407
10
(La ultima página)
(The last page)
FIG. 10
FIG.9
FIG.9
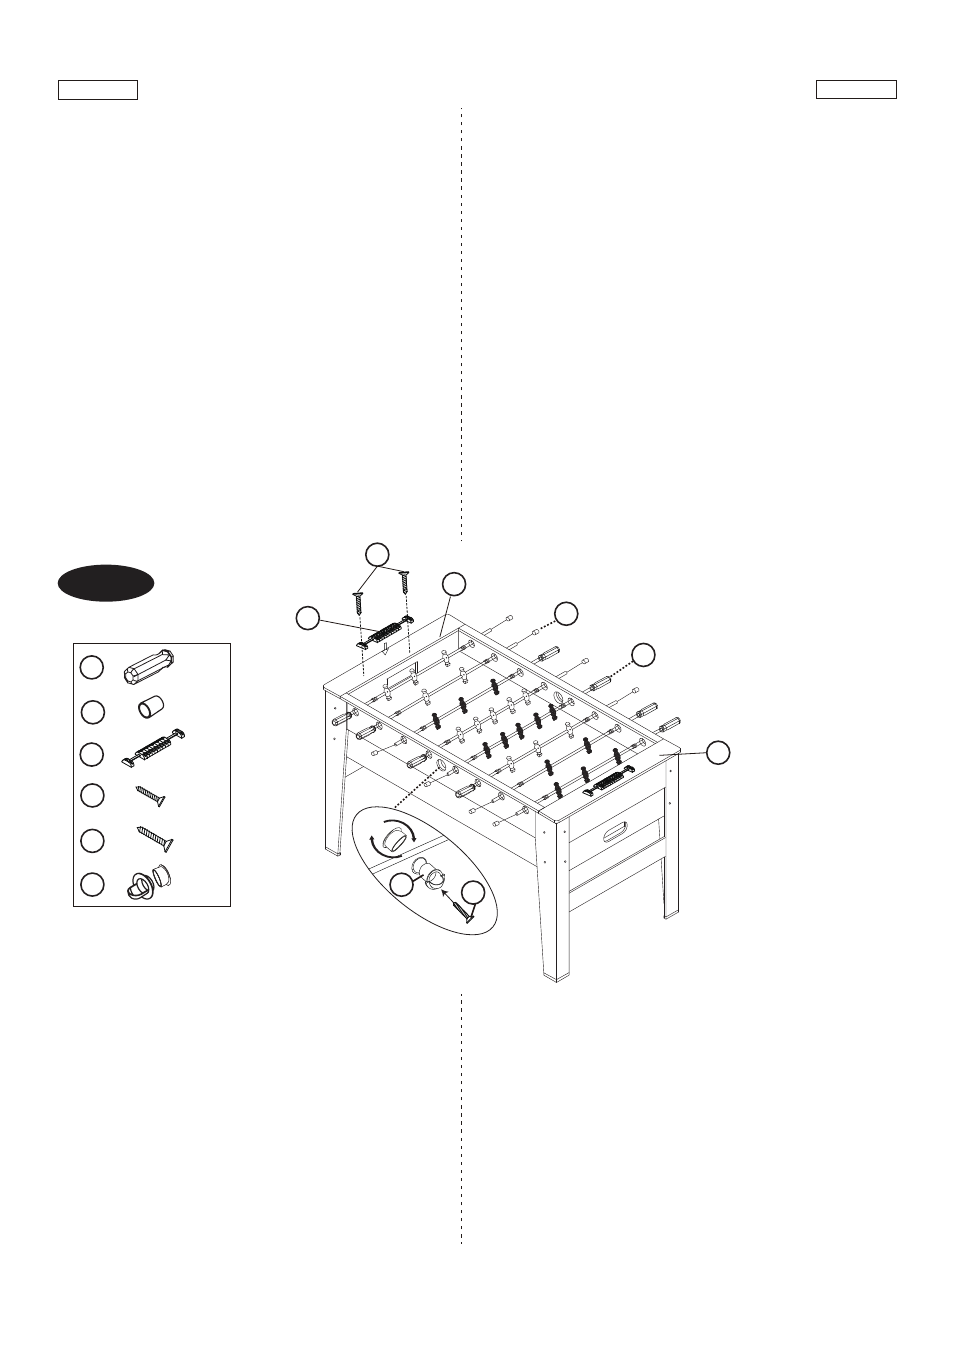
14. Slide the Rods (#15-17) through the Rod Bushings
(#A4) on one Side Apron (#1) in the order as shown
in Fig. 9.
Note: The player Rods have a hole at their end
where the Handles will go.
15. Place the Rod Washer (#20), Foam Bumpers (#21)
and Players (#18 and #19) onto the Player Rods
(#15, #16 and #17)
in the order as shown in Fig.9
and 9A.
16. Now insert the Player Rods through the Rod
Bushings (#A4) on the opposite Side Apron (#1).
17.Attach the Players (#18 or #19) to the Rods using
one Screw (#12) and one Nut (#28) per Player.
See
FIG.9B.
Note: The goalie should be at the left side of
each player.
14. Deslice las Barras (#15-17) por Los Cojinetes de
Barra (#A4) sobre un Delantal Lateral (#1) según el
orden como mostrado en la Fig. 9.
Nota:Las Barras de Jugador hay un agujero en su
parte final donde coloque las Manijas.
15. Coloque los Arandela de Barra(#20), Espuma de
Bómpere (#21) y Jugadores (#18 & #19) sobre las
Barras de Jugador (#15, #16 & #17) según el orden
como mostrado en la Fig. 9 & 9A.
16. Ahora inserte las Barras de Jugador a los Cojinetes
de Barra (#A4) sobre el Delantal Lateral opuesto (#1).
17. Adjunte los Jugadores (#18 o #19) a las Barras
usando 1 Tornillo (#12) y 1 Tuerca (#28) por Jugador.
Vea la FIG. 9B.
Nota:El portero debería estar en la parte izquierda de
cada jugador.
FIG.10
FIG.10
18. Coloque las manijas (#22) sobre la parte superior de
Barras donde tiene un agujero. Y luego coloque las Gorras
de Barra Final (#23) sobre el otro lado de las Barras.
19. Inserte el Marcador (#25) a la Tabla de Listón Superior
(#9) usando 2 Tornillos (#34) por Marcador.
Vea la FIG.
10.
20. Adjunte la Copa de Entrada de Pelota (#35) al Delantal
Lateral usando 1 Tornillo (#30) por Copa.
Vea la FIG. 10.
18. Place the Handles (#22) onto the Rods top which
has a hole. And then place the Rod End Caps
(#23) onto the other side of the Rods.
19. Insert the Scorer (#25)
to the
Top Slat Board
(#9)
using two Screws (#34) per Scorer.
See FIG. 10.
20. Attach Ball Entry Cup (#35) to Side Apron using
one Screw (#30) per Cup.
See FIG. 10.
YOU ARE NOW READY TO PLAY!
USTED ESTA AHORA LISTO PARA JUGAR!
X 8
X 8
23
22
X 4
34
X 2
25
X 2
30
X 2
35
22
23
34
25
30
35